1. Танилцуулга
This manual provides essential information for the safe and efficient operation of your Crosley WR18 Mini Bubbler Jukebox. Please read these instructions thoroughly before using the unit and retain them for future reference.
The Crosley WR18 is a reproduction of a 1946-style jukebox, featuring percolating bubble tubes, neon lights, a front-loading compact disc player, FM radio, and stereo speakers. It is operated primarily via a 12-button remote control.
2. Аюулгүй ажиллагааны заавар
- Төхөөрөмжийг бороо, чийгэнд бүү тавь.
- Агааржуулалтын нүхийг хааж болохгүй.
- Төхөөрөмжийг тогтвортой, тэгш гадаргуу дээр байрлуулсан эсэхийг шалгаарай.
- Аянга шуургатай үед эсвэл удаан хугацаагаар ашиглаагүй үед төхөөрөмжийг цахилгаан тэжээлээс салга.
- Бүх үйлчилгээг мэргэшсэн үйлчилгээний ажилтнуудад шилжүүлээрэй.
3. Тохиргоо
3.1 Савлах ба байрлуулах
Carefully remove the jukebox from its packaging. Place the unit on a flat, stable surface away from direct sunlight, heat sources, and excessive dust or moisture. Ensure there is adequate space around the unit for ventilation.
3.2 Эрчим хүчний холболт
Connect the AC power cord to the power input on the back of the unit, then plug it into a standard wall outlet. The unit is designed for 120V AC, 60Hz power supply.
3.3 Алсын удирдлагатай тохиргоо
Insert two AAA batteries (not included) into the remote control, observing the correct polarity. The remote control is essential for operating most functions of the jukebox.
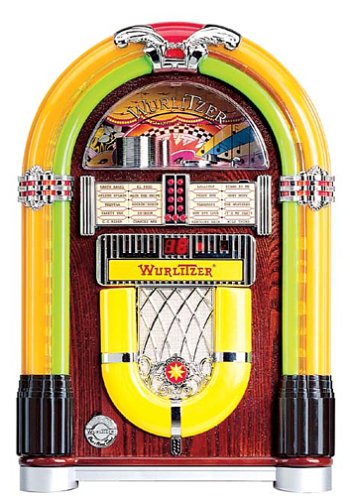
Зураг 1: Урд view of the Crosley WR18 Mini Bubbler Jukebox. This image shows the main unit with its distinctive bubble tubes, neon lights, and speaker grilles. The CD player slot is visible below the main display area.
4. Ашиглалтын заавар
4.1 Асаах/унтраах
дээр дарна уу ХҮЧ төхөөрөмжийг асаах эсвэл унтраахын тулд алсын удирдлага дээрх товчийг дарна уу.
4.2 CD тоглуулагчийн ажиллагаа
- дээр дарна уу CD button on the remote to select CD mode.
- дээр дарна уу НЭЭХ/ХААХ button on the remote to open the CD tray.
- Place a compact disc, label side up, into the tray.
- дарна уу НЭЭХ/ХААХ again to close the tray. The unit will begin reading the disc.
- -г ашиглана уу ТОГЛОХ/ЗОГСООХ тоглуулахыг эхлүүлэх эсвэл түр зогсоохын тулд товчлуурыг дарна уу.
- -г ашиглана уу УРАГДАХ (|>>) эсвэл БУЦАХ (<<|) дуунуудын хооронд шилжих товчлуурууд.
- The ХӨТӨЛБӨР function allows you to create a custom playback order for tracks. Refer to the remote control diagram for specific programming steps.
- The ДАВТАХ function allows you to repeat the current track or the entire disc.
4.3 FM радиогийн ажиллагаа
- дээр дарна уу FM button on the remote to select FM radio mode.
- Extend the external FM antenna located at the back of the unit for optimal reception. Adjust its position for clearer sound.
- -г ашиглана уу ТОХИРУУЛАХ (+) эсвэл ТААРУУЛАХ (-) buttons on the remote to manually tune to desired radio stations.
4.4 Дууны хяналт
Ашиглан дууны хэмжээг тохируулна уу ЭЗЭЭ ДЭЭШЛҮҮЛЭХ (+) ба ЭТГЭЛИЙГ ДАМСАХ (-) buttons on the remote control. Note that all volume adjustments are made via the remote.
4.5 Neon Lights and Bubble Tubes
The genuine multicolored neon lights and percolating bubble tubes activate automatically when the unit is powered on, enhancing the retro aesthetic. There are no separate controls for these features.
5. Засвар үйлчилгээ
5.1 Шүүгээ цэвэрлэх
Wipe the handcrafted hardwood cabinet with a soft, dry cloth. For stubborn marks, a slightly damp даавууг хэрэглэж, дараа нь шууд хатааж болно. Зүлгүүрийн цэвэрлэгч эсвэл уусгагчаас зайлсхий.
5.2 CD тоглуулагчийн арчилгаа
To ensure optimal performance, keep the CD tray and lens clean. Use a specialized CD lens cleaner disc periodically. Avoid touching the CD lens directly.
5.3 Bubble Tubes and Neon Lights
The bubble tubes and neon lights are sealed units and require no user maintenance. If any issues arise with these components, contact customer support.
6. Алдаа засах
| Асуудал | Боломжит шалтгаан | Шийдэл |
|---|---|---|
| Хүч чадалгүй | Цахилгааны утас холбогдоогүй байна; залгуур идэвхгүй байна | Цахилгааны утсыг найдвартай залгасан эсэхийг шалгаарай; залгуурыг өөр төхөөрөмжөөр шалгана уу. |
| Дуу алга | Volume too low; incorrect mode selected | Increase volume using remote; ensure correct mode (CD/FM) is selected. |
| CD тоглуулахгүй байна | Disc inserted incorrectly; disc dirty/scratched; CD mode not selected | Reinsert disc correctly; clean disc; select CD mode. |
| FM хүлээн авах чадвар муу байна | Antenna not extended/positioned correctly | Fully extend and adjust the external FM antenna. |
| Алсын удирдлага ажиллахгүй байна | Batteries depleted; line of sight blocked; remote malfunction | Replace batteries; ensure no obstructions between remote and unit; if remote remains unresponsive, contact customer support as many functions are remote-only. |
7. Техникийн үзүүлэлтүүд
- Загварын дугаар: WR18
- Бүтээгдэхүүний хэмжээ: 12 x 22 x 16 инч (Өргөн x Өндөр x Гүн)
- Барааны жин: 16.8 фунт
- Үйлдвэрлэгч: Кросли радио
- Аудио онцлогууд: Stereo sound with two 4-inch speakers and built-in ampнастан
- Медиа тоглуулах: CD player with program and repeat functions, FM radio with external antenna
- Гоо зүйн шинж чанарууд: Handcrafted hardwood cabinet, genuine multicolored neon lights, bubble tube accents
- Хяналт: 12-button mini jukebox remote control
8. Баталгаат хугацаа ба дэмжлэг
The Crosley WR18 Mini Bubbler Jukebox typically comes with a manufacturer's warranty. Based on user reports, the Crosley warranty period is 90 days. Please note that for warranty service, you may be responsible for shipping the unit back to the manufacturer and an additional fee for return shipping and handling after repair.
For technical support, warranty claims, or service inquiries, please contact Crosley Radio customer service directly. Refer to the contact information provided with your product packaging or visit the official Crosley webхамгийн сүүлийн үеийн тусламжийн дэлгэрэнгүй мэдээллийг авах сайт.