1. Танилцуулга
The SPL 2Control is a compact and user-friendly stereo monitor controller designed to provide comprehensive control over your digital audio workstation's (DAW) monitoring functions. It ensures high-quality audio reproduction through both studio monitors and headphones, allowing you to hear every detail of your mix. Key features include a precise speaker volume potentiometer, active circuitry for sound integrity, and a unique Crossfeed control for accurate headphone monitoring that simulates a stereo speaker image.
2. Аюулгүй ажиллагааны заавар
- Төхөөрөмжийг ажиллуулахаасаа өмнө эдгээр зааврыг сайтар уншина уу.
- Энэ гарын авлагыг цаашид лавлах зорилгоор хадгална уу.
- Гал болон цахилгаан цочролоос сэргийлэхийн тулд төхөөрөмжийг бороо, чийгэнд бүү тавь.
- Тохиромжтой агааржуулалтыг хангах; агааржуулалтын нүхийг хааж болохгүй.
- Зөвхөн үйлдвэрлэгчээс заасан хавсралт/дагалдах хэрэгслийг ашиглана уу.
- Аянга шуурганы үед эсвэл удаан хугацаагаар ашиглаагүй үед цахилгааны утсыг салга.
- Бүх үйлчилгээг мэргэшсэн үйлчилгээний ажилтнуудад шилжүүлээрэй.
- Төхөөрөмжийг радиатор, халаалтын төхөөрөмж, зуух эсвэл бусад төхөөрөмж (үүнд орно) зэрэг дулааны эх үүсвэрийн ойролцоо байрлуулахаас зайлсхий ampөргөгч) дулаан үүсгэдэг.
3. Багцын агуулга
Савлагааг задлахдаа дараах зүйлс багтсан эсэхийг шалгана уу.
- 1 x SPL 2Control Module
- 1 х цахилгаан утас
- Энэхүү хэрэглэгчийн гарын авлага
4. Бүтээгдэхүүн дууссанview
4.1 Урд самбарын удирдлага ба үзүүлэлтүүд
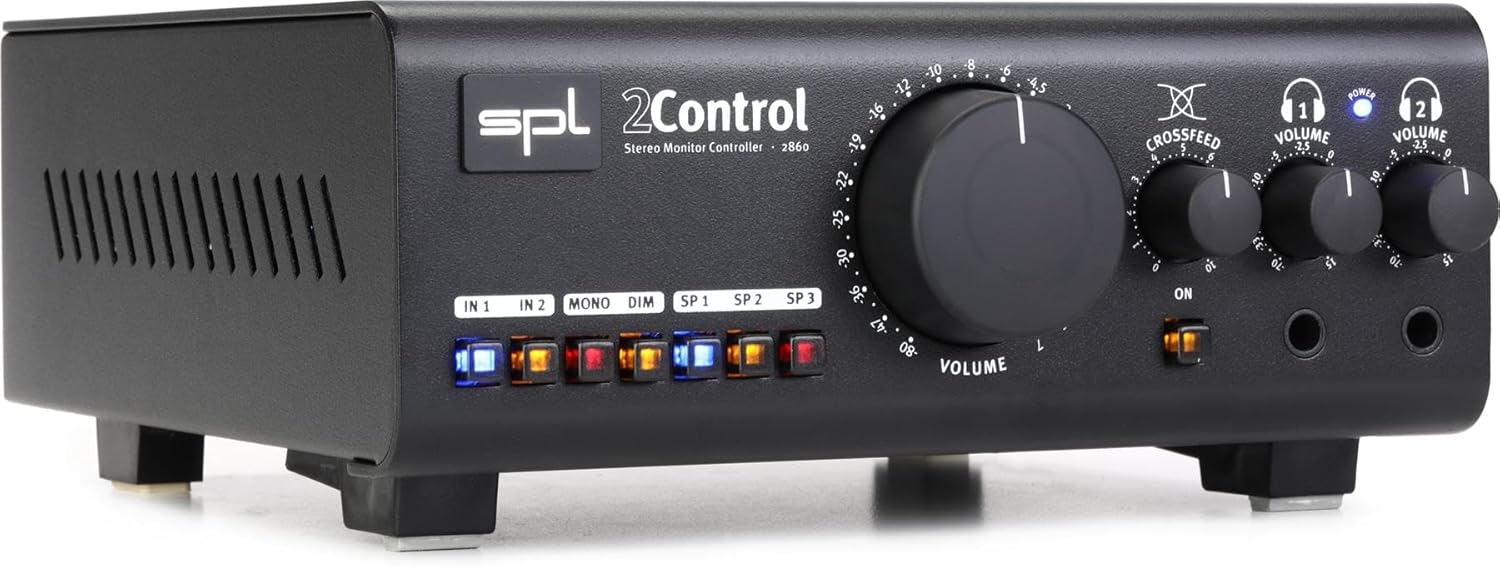
Зураг 1: Front Panel of the SPL 2Control Stereo Monitor Controller.
This image displays the front panel of the SPL 2Control. From left to right, it features input selection buttons (IN 1, IN 2), function buttons (MONO, DIM), speaker output selection buttons (SP 1, SP 2, SP 3), a large central master VOLUME knob, a CROSSFEED knob, and two individual headphone VOLUME knobs with corresponding headphone output jacks. A power indicator LED is visible above the headphone controls.
- IN 1 / IN 2 Buttons: Selects the active stereo input source.
- МОНО товчлуур: Sums the stereo signal to mono for compatibility checking.
- DIM товчлуур: Reduces the output volume by a fixed amount (e.g., -20dB) for temporary level reduction.
- SP 1 / SP 2 / SP 3 Buttons: Selects the active stereo speaker output pair.
- Дууны эзлэхүүн: Master volume control for selected speaker outputs.
- CROSSFEED Knob: Adjusts the stereo panorama for headphone monitoring to simulate a speaker listening environment.
- HEADPHONE VOLUME 1 / 2 Knobs: Independent volume controls for the two headphone outputs.
- HEADPHONE 1 / 2 Jacks: 1/4-inch stereo headphone outputs.
- Эрчим хүчний LED: Төхөөрөмж асаалттай байгааг илтгэнэ.
4.2 Rear Panel Connections (Inferred)
The rear panel typically houses the audio input and output connections, as well as the power input. Based on common audio equipment and product specifications, you can expect:
- Аналог оролтууд: Balanced XLR or TRS inputs for connecting your audio interface or mixer.
- Илтгэгчийн гаралт: Multiple sets of balanced XLR or TRS outputs for connecting up to three pairs of studio monitors.
- Эрчим хүчний оролт: Connector for the included power cord.
5. Тохиргоо
- Байршил: Position the SPL 2Control on a stable, flat surface, ensuring adequate ventilation around the unit.
- Эрчим хүчний холболт: Connect the provided power cord to the power input on the rear panel of the 2Control and then to a suitable AC power outlet.
- Оролтын холболтууд: Connect the stereo outputs of your audio interface, mixer, or other audio source to the IN 1 and/or IN 2 inputs on the rear panel using balanced XLR or TRS cables.
- Чанга яригчийн холболтууд: Connect your studio monitors to the SP 1, SP 2, and/or SP 3 outputs on the rear panel using balanced XLR or TRS cables. Ensure correct left and right channel connections.
- Headphone Connections: Plug your headphones into the HEADPHONE 1 and/or HEADPHONE 2 jacks on the front panel.
- Анхны асаалт: Ensure all volume controls are set to their minimum positions before powering on the unit. Then, connect the power cord to the wall outlet. The POWER LED on the front panel will illuminate.
6. Ашиглалтын заавар
- Оролтоо сонгох нь: Аль нэгийг нь дарна уу 1 онд or 2 онд button to select your desired audio source. The active button will illuminate.
- Selecting Speaker Outputs: дээр дарна уу SP 1, SP 2, эсвэл SP 3 button to route the audio to the corresponding pair of studio monitors. Only one speaker output can be active at a time.
- Мастер дууны түвшинг тохируулах: Slowly turn the large ЭЗЭМШИГ knob clockwise to increase the listening level for the selected speaker outputs. Turn counter-clockwise to decrease.
- Mono Summing: дээр дарна уу МОНО button to sum the stereo signal to mono. This is useful for checking phase compatibility and mix balance. Press again to return to stereo.
- Бүдэг функц: дээр дарна уу DIM button to temporarily reduce the output volume. This is useful for quick conversations or when you need to lower the volume without losing your main volume setting. Press again to restore the original volume.
- Чихэвчний хяналт:
- Plug your headphones into the desired headphone jack (HEADPHONE 1 or 2).
- Хувь хүнийг тохируулна уу HEADPHONE VOLUME 1 or 2 knob to set the listening level for your headphones.
- -г ашиглана уу CROSSFEED knob to adjust the stereo image for headphone listening. Turning it clockwise increases the crossfeed, simulating a more natural speaker-like stereo field by blending the left and right channels slightly.
7. Засвар үйлчилгээ
- Цэвэрлэгээ: Төхөөрөмжийн гадна талыг цэвэрлэхийн тулд зөөлөн, хуурай даавуу ашиглана уу. Шингэн цэвэрлэгч, уусгагчийг бүү ашигла.
- Агааржуулалт: Ensure that the ventilation slots are kept clear of dust and debris to prevent overheating.
- Хадгалах: Хэрэв төхөөрөмжийг удаан хугацаагаар хадгалах бол цахилгаанаас нь салгаад сэрүүн, хуурай газар хадгална уу.
8. Алдаа засах
| Асуудал | Боломжит шалтгаан | Шийдэл |
|---|---|---|
| Чанга яригчаас дуу гарахгүй. |
|
|
| Чихэвчнээс дуу гарахгүй. |
|
|
| Гажуудсан аудио. |
|
|
9. Техникийн үзүүлэлтүүд
| Онцлог | Дэлгэрэнгүй |
|---|---|
| Загварын нэр | 2 Control (also known as 2860) |
| Брэнд | SPL |
| Чанга яригчийн төрөл | Хяналт |
| Зөвлөмж болгож буй хэрэглээ | Control, Volume for Monitors |
| Тохиромжтой төхөөрөмжүүд | Monitors, Speakers |
| Хүрээлэн буй орчны дууны сувгийн тохиргоо | 2.0 |
| Өнгө | Хар |
| Оруулсан бүрэлдэхүүн хэсгүүд | 1 x SPL Control Module |
| Бүтээгдэхүүний хэмжээ (D x W x H) | 8.66" x 8.46" x 3.15" |
| Зүйлийн жин | 7.06 фунт (ойролцоогоор 3.2 кг) |
| Эрчим хүчний эх үүсвэр | Утастай цахилгаан |
| Холболтын технологи | TRS, XLR |
| Аудио гаралтын горим | Стерео |
| Суурилуулах төрөл | Ширээний тавиур |
| Үйлдвэрлэгч | Sound Performance Lab |
10. Баталгаат хугацаа ба дэмжлэг
The SPL 2Control Monitor Controller comes with a limited warranty. For specific warranty terms, duration, and conditions, please refer to the documentation provided with your purchase or visit the official SPL website. For technical support, service, or inquiries, please contact the manufacturer, Sound Performance Lab, or your authorized dealer.
Үйлдвэрлэгч: Sound Performance Lab