1. Танилцуулга
This manual provides essential information for the safe and effective operation of your Dawson Tools DSM101N Digital Multimeter with Environmental Tester. This device is designed for measuring various electrical parameters such as AC/DC voltage, AC/DC current, resistance, continuity, and diode testing. Additionally, it integrates environmental sensors for temperature, relative humidity, light intensity, and sound level measurements. Please read this manual thoroughly before use and retain it for future reference.
2. Аюулгүй байдлын мэдээлэл
Always adhere to basic safety precautions when using this instrument to reduce the risk of fire, electric shock, or personal injury. Improper use can result in electric shock or damage to the meter.
- Боть бүү хэрэглээрэйtagтоолуурын заасан хамгийн их хязгаараас давсан гүйдэл эсвэл e.
- Ботьтой ажиллахдаа маш болгоомжтой байгаарайtag60V DC эсвэл 30V AC RMS-ээс дээш хүчдэлтэй. Эдгээр ботьtagцочролын аюул учруулж байна.
- Функц эсвэл хүрээг өөрчлөхөөс өмнө туршилтын утсыг хэлхээнээс үргэлж салгаж байгаарай.
- Inspect test leads for damaged insulation or exposed metal before each use. Replace if damaged.
- Хэрэв тоолуур эвдэрсэн эсвэл эвдэрсэн харагдаж байвал түүнийг бүү ажиллуул.asing нээлттэй байна.
- Ensure the battery compartment cover is securely closed before operation.
- Use the correct input terminals for the selected measurement function.
- Do not use the meter in wet environments or in the presence of explosive gases or dust.
3. Бүтээгдэхүүн дууссанview
The Dawson Tools DSM101N combines a digital multimeter with environmental testing capabilities. Familiarize yourself with the components shown below.
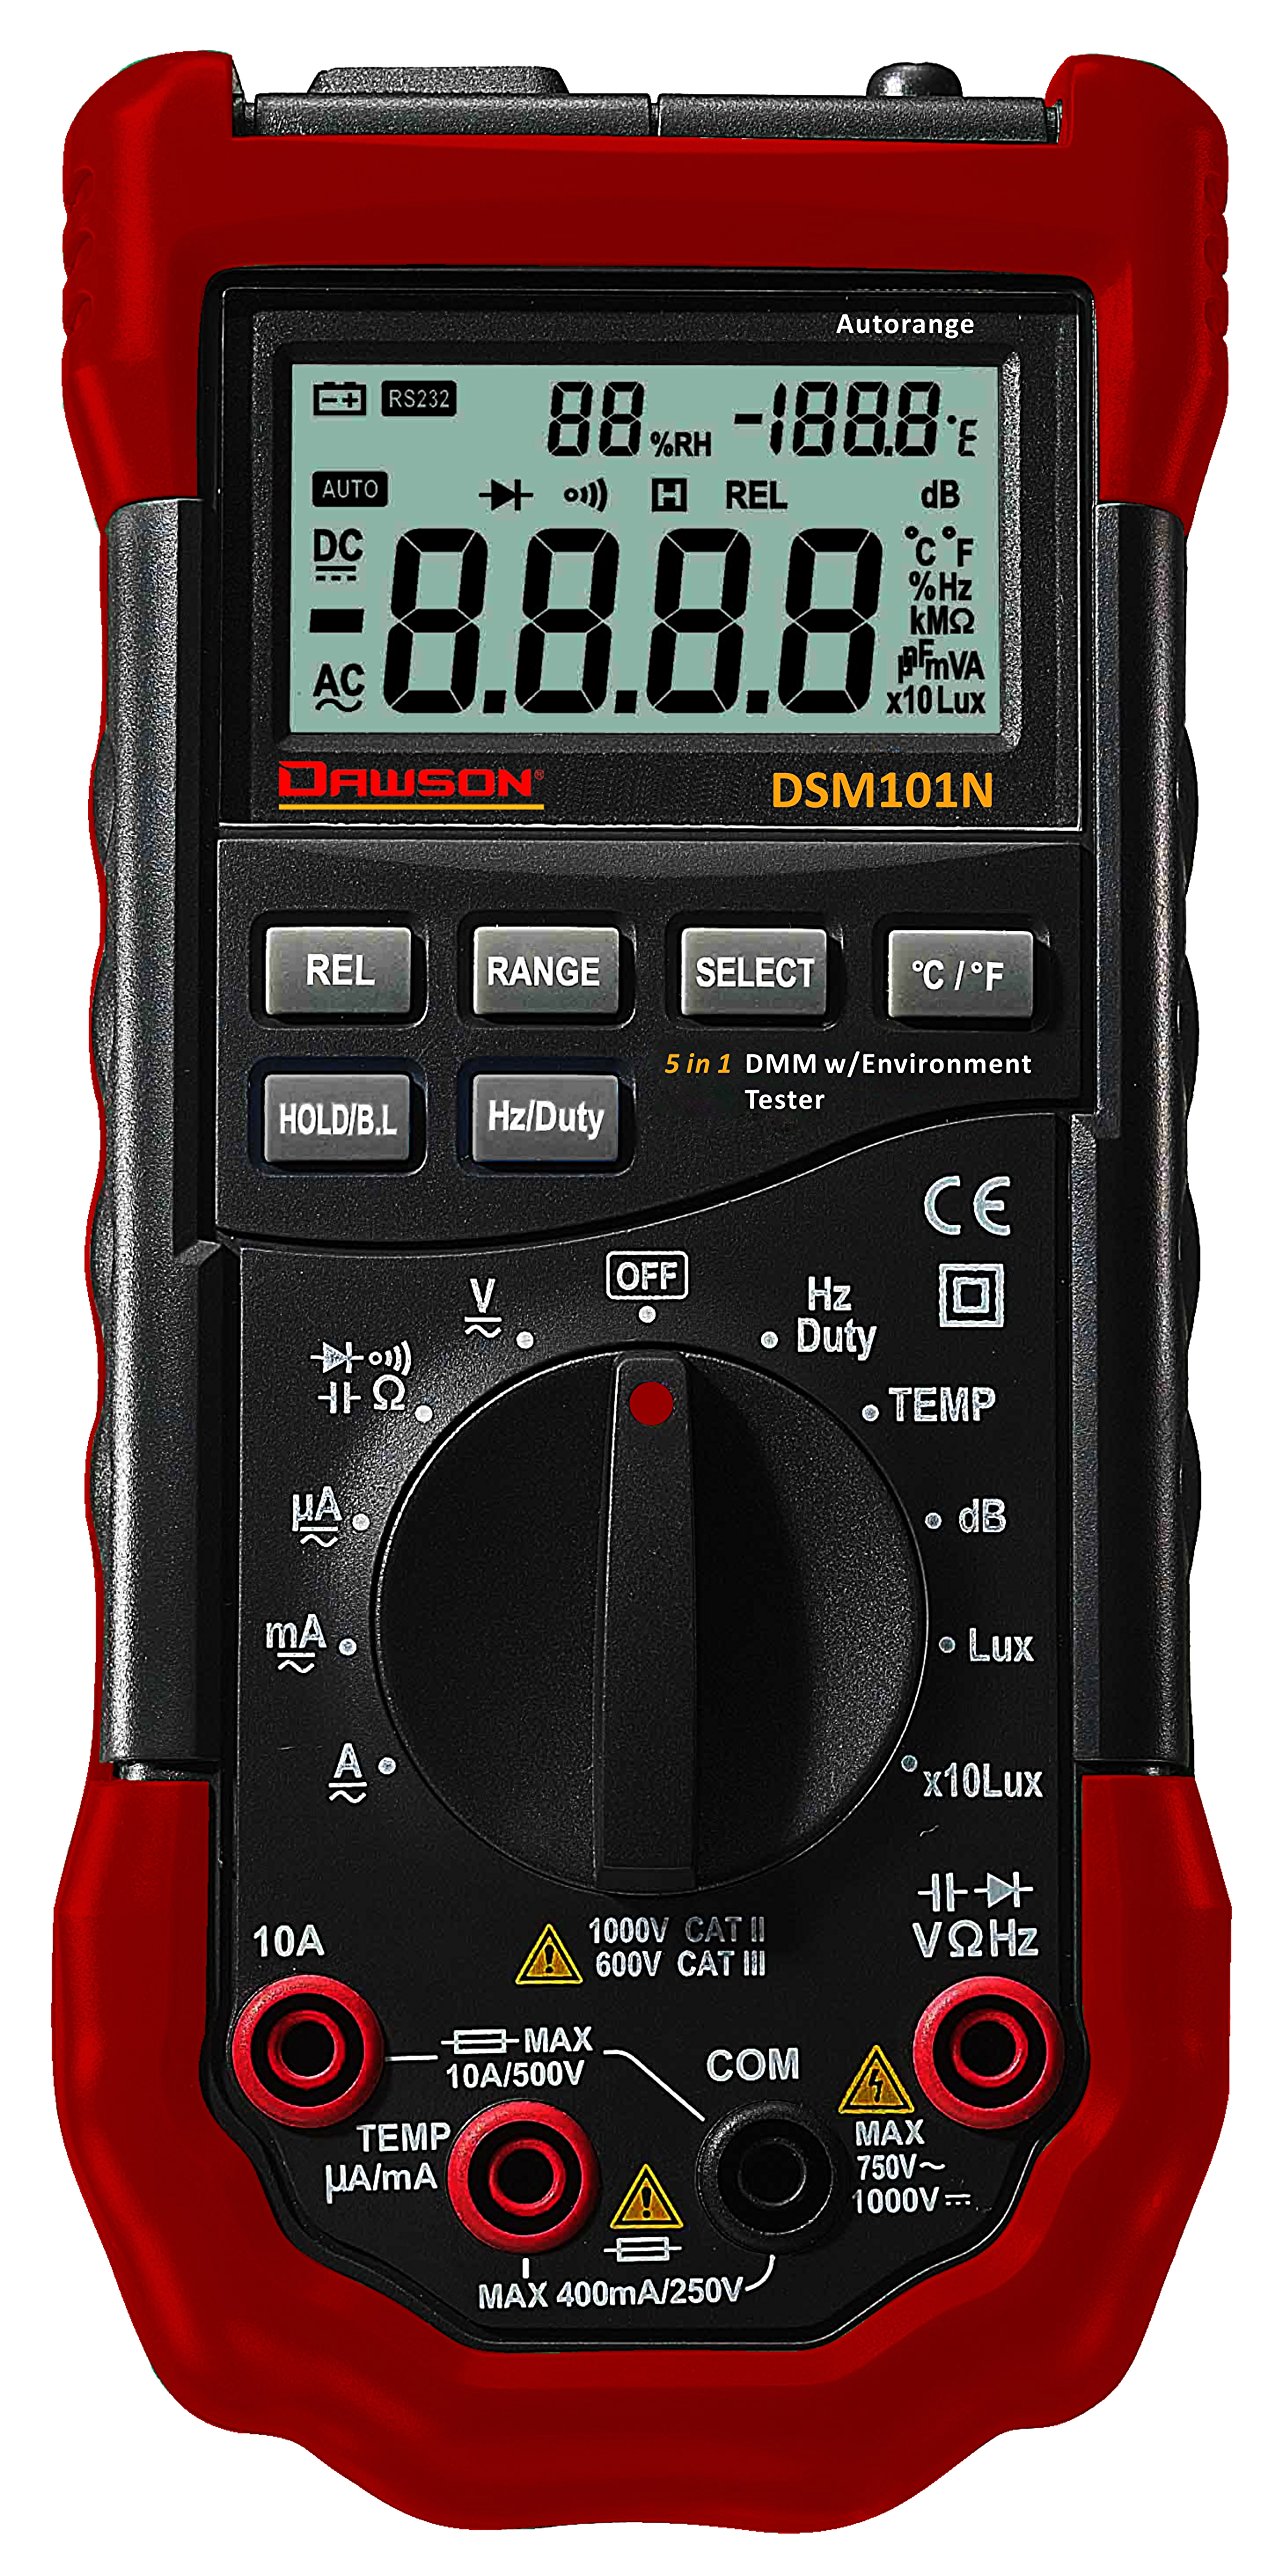
Зураг 1: Урд view of the Dawson Tools DSM101N Digital Multimeter. This image displays the large LCD screen, the central rotary function dial, the input jacks for test leads at the bottom, and the integrated sensors for environmental measurements (light, sound, temperature, humidity) located at the top of the device.
3.1 Гол бүрэлдэхүүн хэсгүүд
- LCD дэлгэц: Хэмжилтийн заалт, нэгж, функцийн үзүүлэлтүүдийг харуулна.
- Function Rotary Dial: Used to select the desired measurement function.
- Жак оролт: Terminals for connecting test leads (COM, VΩmA, 10A).
- Байгаль орчны мэдрэгч: Integrated sensors for light, sound, temperature, and humidity measurements.
- Функцийн товчлуурууд: Buttons for features like Data Hold, Backlight, Range, etc.
4. Тохиргоо
4.1 Батерей суурилуулах
The DSM101N is powered by a 9V battery (not included). Follow these steps to install or replace the battery:
- Ensure the meter is turned off and disconnect all test leads.
- Тоолуурын ар талд батерейны тасалгааны тагийг олоорой.
- Unscrew the retaining screw(s) and carefully remove the cover.
- Connect a new 9V battery to the battery connector, observing correct polarity.
- Зайг тасалгаанд байрлуулж, тагийг нь боолтоор нь бэхлэнэ.
A low battery indicator will appear on the LCD when the battery needs replacement.
5. Ашиглалтын заавар
This section details how to perform various measurements using your DSM101N multimeter.
5.1 General Measurement Steps
- Turn the rotary dial to the desired function.
- Connect the test leads to the appropriate input jacks (usually COM and VΩmA for most measurements, or 10A for high current).
- Туршилтын утсыг туршигдаж буй хэлхээ эсвэл эд ангитай холбоно уу.
- LCD дэлгэц дээрх хэмжилтийн утгыг уншина уу.
- Disconnect test leads from the circuit before changing functions or turning off the meter.
5.2 Electrical Measurements
- DC ботьtage (V=):
1. Set the rotary dial to the "V=" position.
2. Insert the black test lead into the COM jack and the red test lead into the VΩmA jack.
3. Connect the test leads in parallel across the DC voltage source or component. Observe polarity. - AC ботьtage (V~):
1. Set the rotary dial to the "V~" position.
2. Insert the black test lead into the COM jack and the red test lead into the VΩmA jack.
3. Connect the test leads in parallel across the AC voltagэх үүсвэр эсвэл бүрэлдэхүүн хэсэг. - Эсэргүүцэл (Ω):
1. Set the rotary dial to the "Ω" position.
2. Insert the black test lead into the COM jack and the red test lead into the VΩmA jack.
3. Ensure the circuit is de-energized. Connect the test leads across the component to measure its resistance. - Тасралтгүй байдлын тест:
1. Set the rotary dial to the continuity/diode position (often indicated by an audible beep symbol).
2. Insert the black test lead into the COM jack and the red test lead into the VΩmA jack.
3. Connect the test leads across the component. A continuous beep indicates continuity (low resistance). - Диодын туршилт:
1. Set the rotary dial to the continuity/diode position (often indicated by a diode symbol).
2. Insert the black test lead into the COM jack and the red test lead into the VΩmA jack.
3. Connect the red lead to the anode and the black lead to the cathode of the diode. The display will show the forward voltagУтаснуудыг эргүүлнэ үү; сайн диодын хувьд дэлгэц дээр "OL" (Нээлттэй гогцоо) гарч ирэх ёстой. - DC Current (A=) / AC Current (A~):
1. Set the rotary dial to the appropriate "A=" or "A~" range (e.g., mA, 10A).
2. For mA/µA, insert the black test lead into the COM jack and the red test lead into the VΩmA jack. For 10A, insert the red test lead into the 10A jack.
3. Crucially, connect the meter in series with the circuit. Break the circuit and insert the meter so that the current flows through it. Never connect in parallel for current measurement.
5.3 Environmental Measurements
- Температур (температур):
1. Set the rotary dial to the "Temp" position.
2. The meter will display the ambient temperature using its internal sensor. If an external K-type thermocouple is used (not included), connect it to the designated input ports (often VΩmA and COM, or specific Temp ports if available) and the display will show the external temperature. - Харьцангуй чийгшил (RH):
1. Set the rotary dial to the "RH" position.
2. The meter will display the relative humidity percentage using its internal sensor. - Light (Lux/Fc):
1. Set the rotary dial to the "Light" position.
2. Point the light sensor (usually located at the top of the meter) towards the light source. The display will show the light intensity in Lux or Foot-candles (Fc). - Sound Level (dB):
1. Set the rotary dial to the "Sound" position.
2. Point the microphone (usually located at the top of the meter) towards the sound source. The display will show the sound level in decibels (dB).
5.4 Тусгай чиг үүрэг
- Өгөгдөл хадгалах (HOLD): Дэлгэц дээрх одоогийн заалтыг царцаахын тулд "HOLD" товчийг дарна уу. Суллахын тулд дахин дарна уу.
- Арын гэрэлтүүлэг: Press the backlight button (often labeled with a light bulb icon) to illuminate the display for better visibility in low-light conditions.
- Range Selection (RANGE): In some functions, the meter may have auto-ranging. Pressing the "RANGE" button can switch between auto-ranging and manual ranging, allowing you to select a specific range.
6. Засвар үйлчилгээ
6.1 Цэвэрлэгээ
Тоолуурын тоолуурын тоолуурыг арчинаasing зартайamp даавуу, зөөлөн угаалгын нунтаг. Зүлгүүр, уусгагчийг бүү ашигла. Хэрэглэхийн өмнө тоолуур бүрэн хатсан эсэхийг шалгаарай.
6.2 Батерейг солих
Refer to Section 4.1 for battery replacement instructions. Replace the battery promptly when the low battery indicator appears to ensure accurate readings.
6.3 Гал хамгаалагч солих
Хэрэв гүйдлийн хэмжилтийн функц ажиллахгүй бол гал хамгаалагчийг солих шаардлагатай байж магадгүй. Энэ процедурыг зөвхөн мэргэшсэн ажилтнууд гүйцэтгэх ёстой.
- Ensure the meter is turned off and all test leads are disconnected.
- Open the battery compartment cover (and potentially the entire back casing, depending on design).
- Locate the fuse(s). Note the type and rating of the blown fuse.
- Replace the fuse with one of the exact same type and rating. Never use a fuse with a different rating.
- Reassemble the meter, ensuring all screws are tightened.
7. Алдаа засах
| Асуудал | Боломжит шалтгаан | Шийдэл |
|---|---|---|
| Дэлгэц байхгүй эсвэл бүдэг харагдаж байна | Батарей цэнэггүй эсвэл бага | 9V батерейг солино уу (4.1-р хэсгийг үзнэ үү). |
| "OL" (Хэт ачаалал) харагдана | Measurement exceeds selected range or meter's maximum capacity. Open circuit for continuity/resistance. | Select a higher range or ensure proper circuit connection. |
| Буруу уншилтууд | Incorrect function selected, poor test lead connection, or damaged test leads. | Verify function, check lead connections, inspect and replace leads if necessary. |
| Одоогийн хэмжилт ажиллахгүй байна | Гал хамгаалагч шатсан. | Replace the fuse (refer to Section 6.3). |
8. Техникийн үзүүлэлтүүд
The following are the general specifications for the Dawson Tools DSM101N Digital Multimeter with Environmental Tester. Specifications are subject to change without notice.
- Дэлгэц: LCD, 3½ digit (1999 counts)
- DC ботьtage: 1000 В хүртэл
- AC ботьtage: 750 В хүртэл
- Тогтмол гүйдэл: 10А хүртэл
- AC гүйдэл: 10А хүртэл
- Эсэргүүцэл: 20MΩ хүртэл
- Температур: Range typically -20°C to 1000°C (with K-type thermocouple)
- Харьцангуй чийгшил: 0% - 100% RH
- Гэрэл: Up to 200,000 Lux / 20,000 Fc
- Дууны түвшин: 35дБ-аас 100дБ хүртэл
- Эрчим хүчний эх үүсвэр: 9V батерей
- Хэмжээ (L x W x H): Ойролцоогоор 19.6 x 9.1 x 5.6 см (7.7 x 3.6 x 2.2 инч)
- Жин: Ойролцоогоор 408 гр (0.9 фунт)
- Ашиглалтын температур: 0°C - 40°C (32°F - 104°F)
9. Баталгаат хугацаа ба дэмжлэг
Dawson Tools products are manufactured to high-quality standards. For warranty information, technical support, or service, please contact your local distributor or the manufacturer directly. Keep your purchase receipt as proof of purchase.
Manufacturer: Dawson Tools