
1. Бүтээгдэхүүн дууссанview
The KUIDAMOS DSO FNIRSI PRO is a portable digital oscilloscope designed for various measurement tasks. It features a 2.4-inch LCD display, a real-time sampling rate of up to 20MS/s, and an analog bandwidth of 5MHz. This device is equipped with a built-in 1200mAh rechargeable lithium battery, offering approximately 3 hours of continuous operation. It supports waveform storage and management, making it suitable for both maintenance and research and development applications.
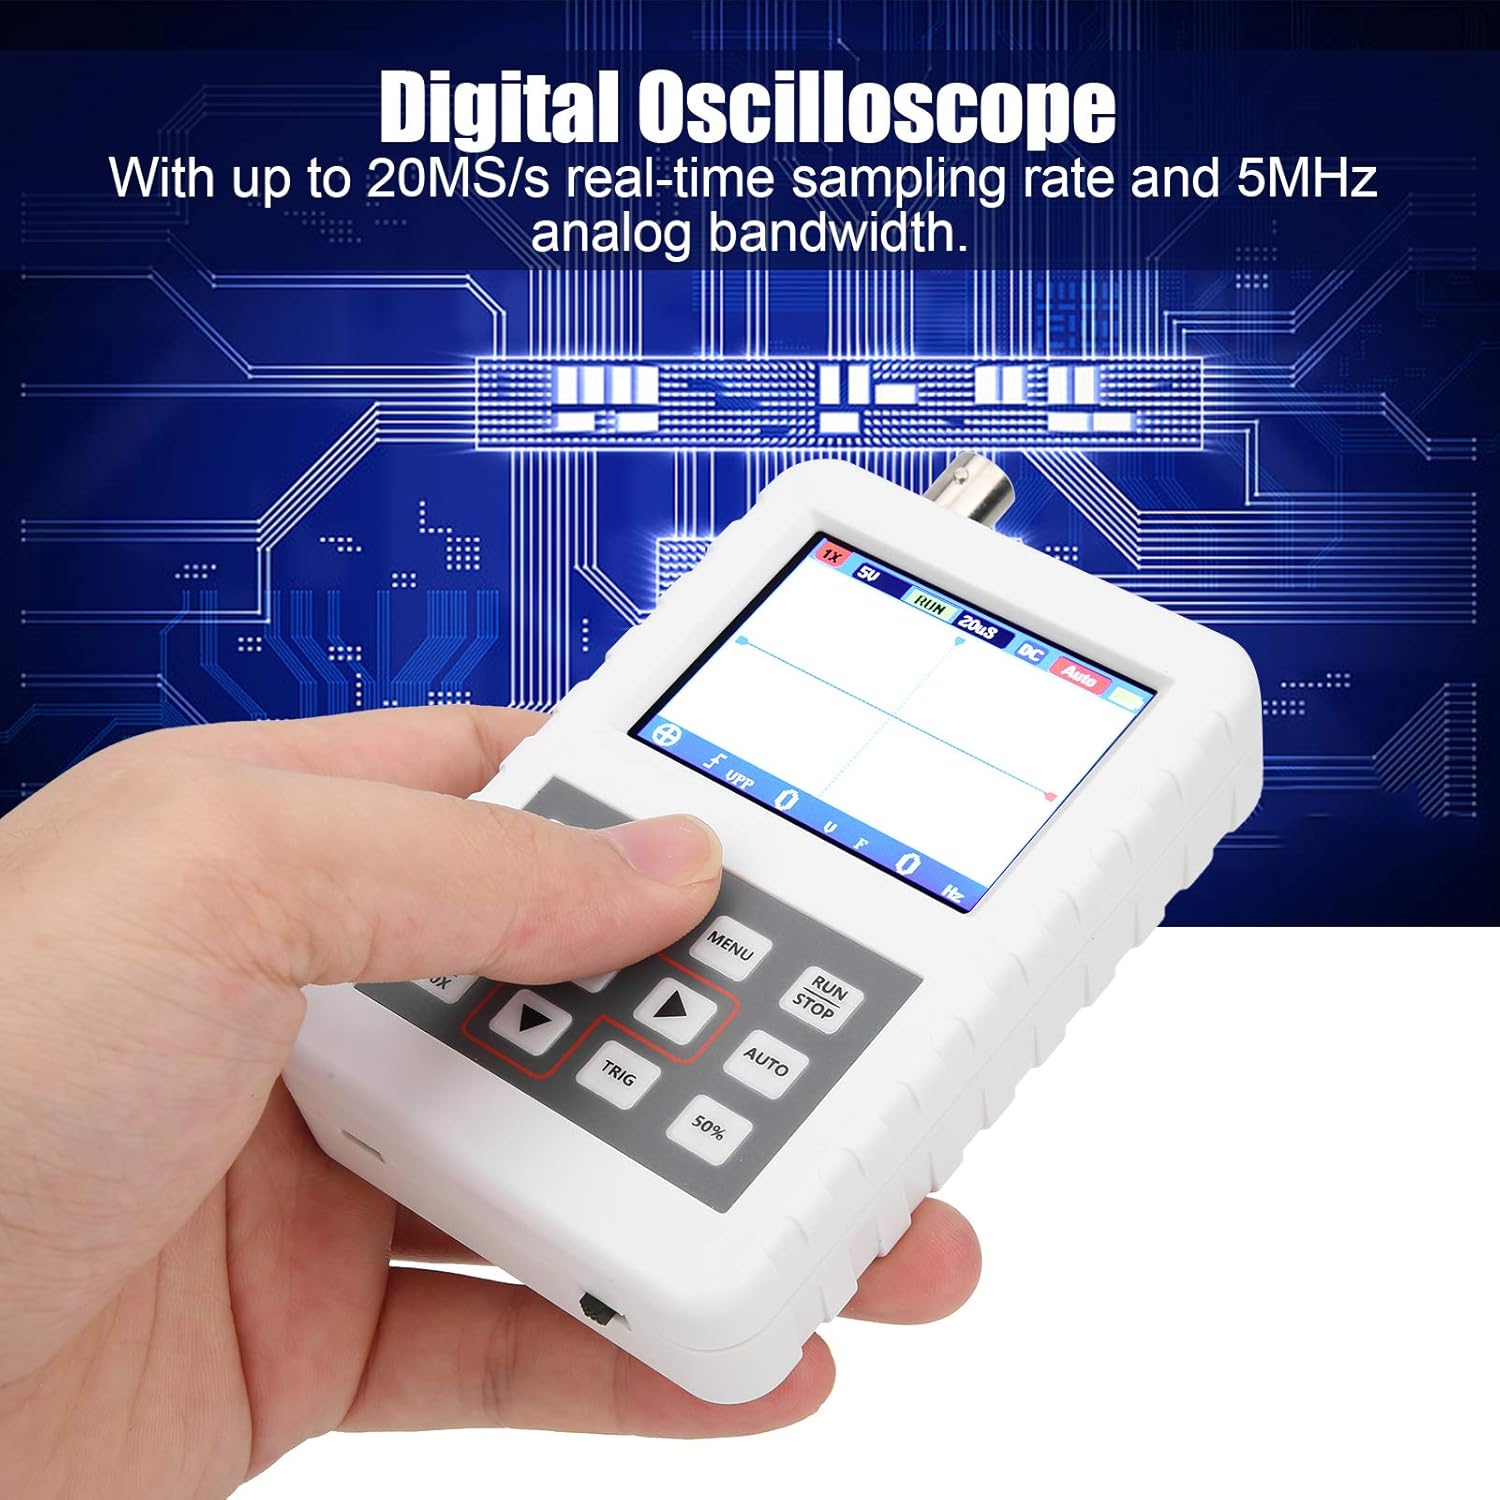
Image 1.1: The DSO FNIRSI PRO Digital Oscilloscope, highlighting its 20MS/s sampling rate and 5MHz analog bandwidth.

Image 1.2: The oscilloscope's 2.4-inch HD LCD screen with 320 x 240 resolution for clear waveform display.

Зураг 1.3: Урд ба хойд views of the DSO FNIRSI PRO, illustrating its physical layout.
2. Багцын агуулга
Доор жагсаасан бүх зүйл таны багцад байгаа эсэхийг шалгаарай.
- 1 x DSO FNIRSI PRO Digital Oscilloscope
- 1 x Matching Probe
- 1 x USB Data Line
- 1 х хэрэглэгчийн гарын авлага (энэ баримт бичиг)
3. Анхны тохиргоо
3.1 Төхөөрөмжийг цэнэглэх
Before first use, fully charge the oscilloscope. Connect the provided USB data line to the device's charging port and to a 5V/1A, 2A, 3A, or 4A USB power adapter. The built-in 1200mAh lithium battery can be charged continuously for approximately 3 hours.
3.2 Пробыг холбох
Connect the matching probe to the BNC connector on the top of the oscilloscope. Ensure a secure connection by twisting the probe connector clockwise until it locks into place.
3.3 Асаах/унтраах
To power on the device, press and hold the power button (usually located on the side or bottom) for a few seconds until the screen illuminates. To power off, press and hold the power button again until the device shuts down.
4. Ашиглалтын заавар
4.1 Хяналт ба интерфэйс
The oscilloscope features a user-friendly interface with several buttons for navigation and function control.

Image 4.1: Operating the DSO FNIRSI PRO, showing the placement of control buttons.
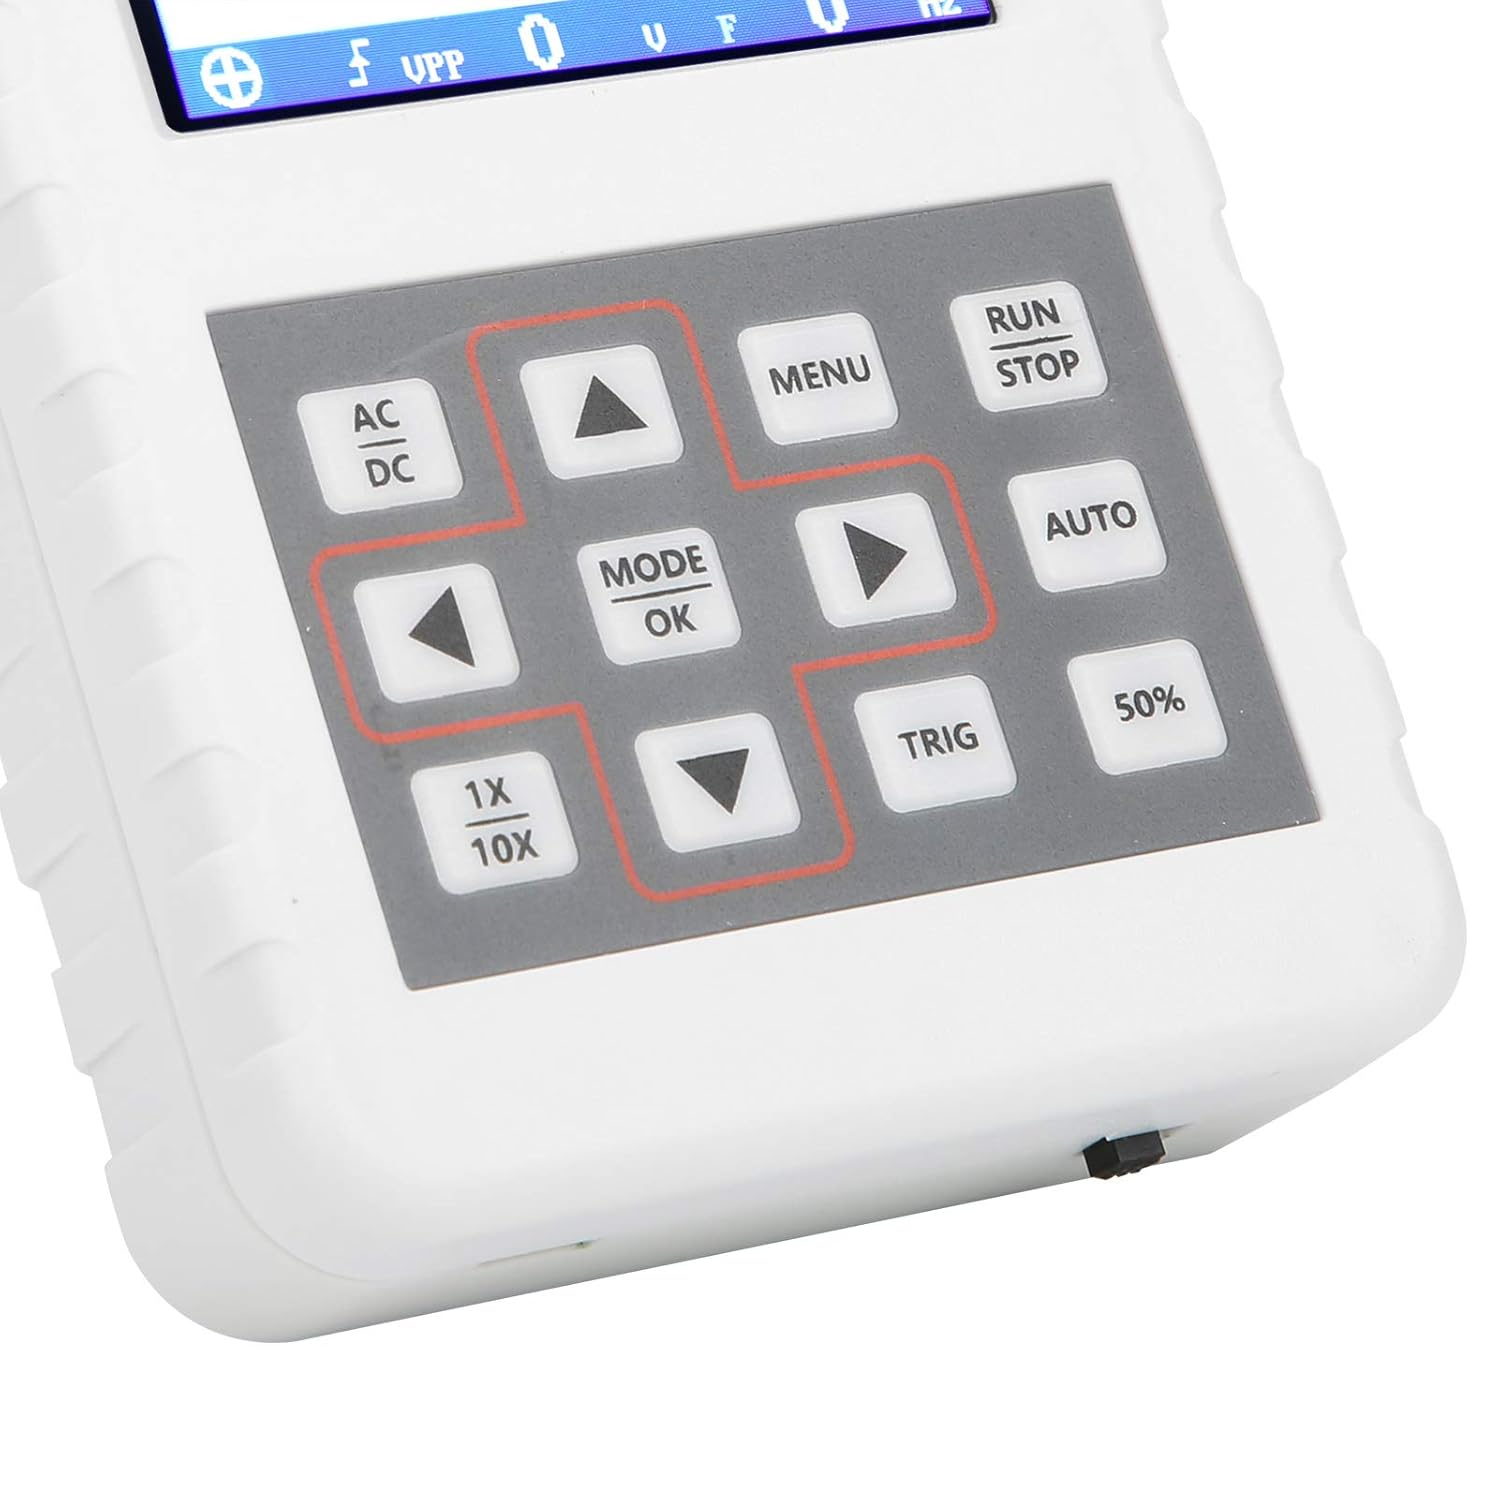
Зураг 4.2: Нарийвчилсан view of the oscilloscope's control panel.
- Цэс: Accesses the main menu for settings and functions.
- RUN/STOP: Starts or pauses waveform acquisition.
- АВТО: Automatically adjusts settings for optimal waveform display.
- ТРИГ: Adjusts trigger level.
- 50%: Sets the trigger level to 50% of the waveform ampөргөрөг
- AC/DC: Toggles between AC and DC coupling modes.
- 1X/10X: Sets the oscilloscope's input attenuation to match the probe's setting.
- MODE/OK: Confirms selections or changes modes.
- Сумны товчлуурууд (Дээш, Доош, Зүүн, Баруун): Navigate menus and adjust parameters.
4.2 Probe Attenuation Settings
It is critical to match the probe's attenuation setting with the oscilloscope's input setting to ensure accurate measurements.
- Учир нь 1X measurement (0-40V): Set both the physical switch on the probe and the 1X/10X button on the oscilloscope to the 1X байр суурь.
- Учир нь 10X measurement (40-800V): Set both the physical switch on the probe and the 1X/10X button on the oscilloscope to the 10X байр суурь.
4.3 Measurement Modes and Triggering
The oscilloscope supports various trigger modes to stabilize waveform display:
- Ганц бие: Captures a single waveform event and then stops.
- Ердийн: Captures a waveform only when a trigger condition is met.
- Автомат: Continuously acquires waveforms, even without a trigger, but will trigger if a signal is present.
-г ашиглана уу ТРИГ button and arrow keys to adjust the trigger level, which determines the voltage point at which the oscilloscope begins to acquire data.
4.4 Waveform Storage and Management
The device includes 16MB of built-in storage, capable of storing up to 500 waveform images. Use the file manager function to browse, view, and manage saved waveforms. This includes viewing detailed information, flipping through images, and deleting unwanted files.

Зураг 4.3: Жишээ ньamples of sine wave measurements at various frequencies.

Зураг 4.4: Жишээ ньamples of square, triangular, and sawtooth wave measurements.
5. Арчилгаа, засвар үйлчилгээ
5.1 Цэвэрлэгээ
Төхөөрөмжийг зөөлөн, хуурай даавуугаар арчина. Зүлгүүрийн цэвэрлэгч эсвэл уусгагч хэрэглэж болохгүй, учир нь тэдгээр нь төхөөрөмжийг гэмтээж болзошгүй.asing эсвэл дэлгэц. Төхөөрөмжийг цэвэрлэхийн өмнө унтраалттай, цахилгаан эх үүсвэрээс салгасан эсэхийг шалгаарай.
5.2 Батерейны арчилгаа
To prolong battery life, avoid fully discharging the battery frequently. If storing the device for an extended period, charge it to approximately 50% and recharge every few months.
5.3 Хадгалалт
Store the oscilloscope in a cool, dry place, away from direct sunlight, extreme temperatures, and high humidity. Keep it protected from dust and physical impact.
6. Алдаа засах
- Issue: Abnormal measured data.
Шийдэл: Check the probe's attenuation switch (1X or 10X) and ensure it matches the setting on the oscilloscope (using the 1X/10X button). If the probe is set to 10X and the oscilloscope is set to 1X, the device will not be damaged, but the data displayed will be incorrect. - Issue: Device does not power on.
Шийдэл: Ensure the battery is sufficiently charged. Connect the device to a power source using the USB data line and allow it to charge for at least 30 minutes before attempting to power it on again. - Issue: Screen is blank or frozen.
Шийдэл: Try performing a soft reset by pressing and holding the power button for an extended period (e.g., 10-15 seconds) until the device powers off, then power it back on. If the issue persists, ensure the battery is charged.
7. Техникийн үзүүлэлтүүд
| Онцлог | Тодорхойлолт |
|---|---|
| Бүтээгдэхүүний загвар | DSO FNIRSI PRO |
| Бүтээгдэхүүний материал | ABS |
| Сувгийн тоо | 1 |
| Дэлгэцийн хэмжээ | Ойролцоогоор 6.1 см / 2.4 инч |
| Дэлгэцийн нягтрал | 320 x 240 |
| Дэлгэцийн төрөл | LCD дэлгэц |
| Аналог зурвасын өргөн | 5 МГц |
| Хамгийн их Sampling Rate | 20MSps |
| Триггер горим | Single/Normal/Auto |
| Долгионы хэлбэрийн хадгалалт | 16MB (up to 500 waveform pictures) |
| Баригдсан батерей | Лити батерей 1200 мАч |
| Зогсоолын цаг | 3 цаг |
| Цэнэглэх оролт | 5V/1A/2A/3A/4A |
| Үйлдвэрлэгч | KUIDAMOS |
| Гарал үүслийн улс | АНУ |
| Зүйлийн хэсгийн дугаар | KUIDAMOStgaix9hwck |
8. Баталгаат хугацаа ба хэрэглэгчийн дэмжлэг
For warranty information, technical support, or service inquiries, please refer to the documentation provided with your purchase or contact the seller directly. Keep your purchase receipt as proof of purchase for any warranty claims.