Aeomjk CM5320 Espresso and Cappuccino Coffee Machine Instruction Manual
Загвар: CM5320
Танилцуулга
This manual provides detailed instructions for the safe and efficient operation of your new Aeomjk CM5320 Espresso and Cappuccino Coffee Machine. Please read all instructions carefully before use and retain this manual for future reference.
The Aeomjk CM5320 is designed to prepare a variety of coffee beverages, including espresso, cappuccino, and latte, with ease. Featuring a 20-bar high-pressure pump and an integrated automatic milk frother, it delivers quality coffee experiences.
Бүтээгдэхүүн дууссанview
The Aeomjk CM5320 combines a sleek design with user-friendly features for a convenient coffee brewing experience.
Зураг 1: Урд view of the Aeomjk CM5320 Espresso and Cappuccino Coffee Machine, showcasing түүний авсаархан дизайн, хяналтын самбар.
Гол онцлогууд:
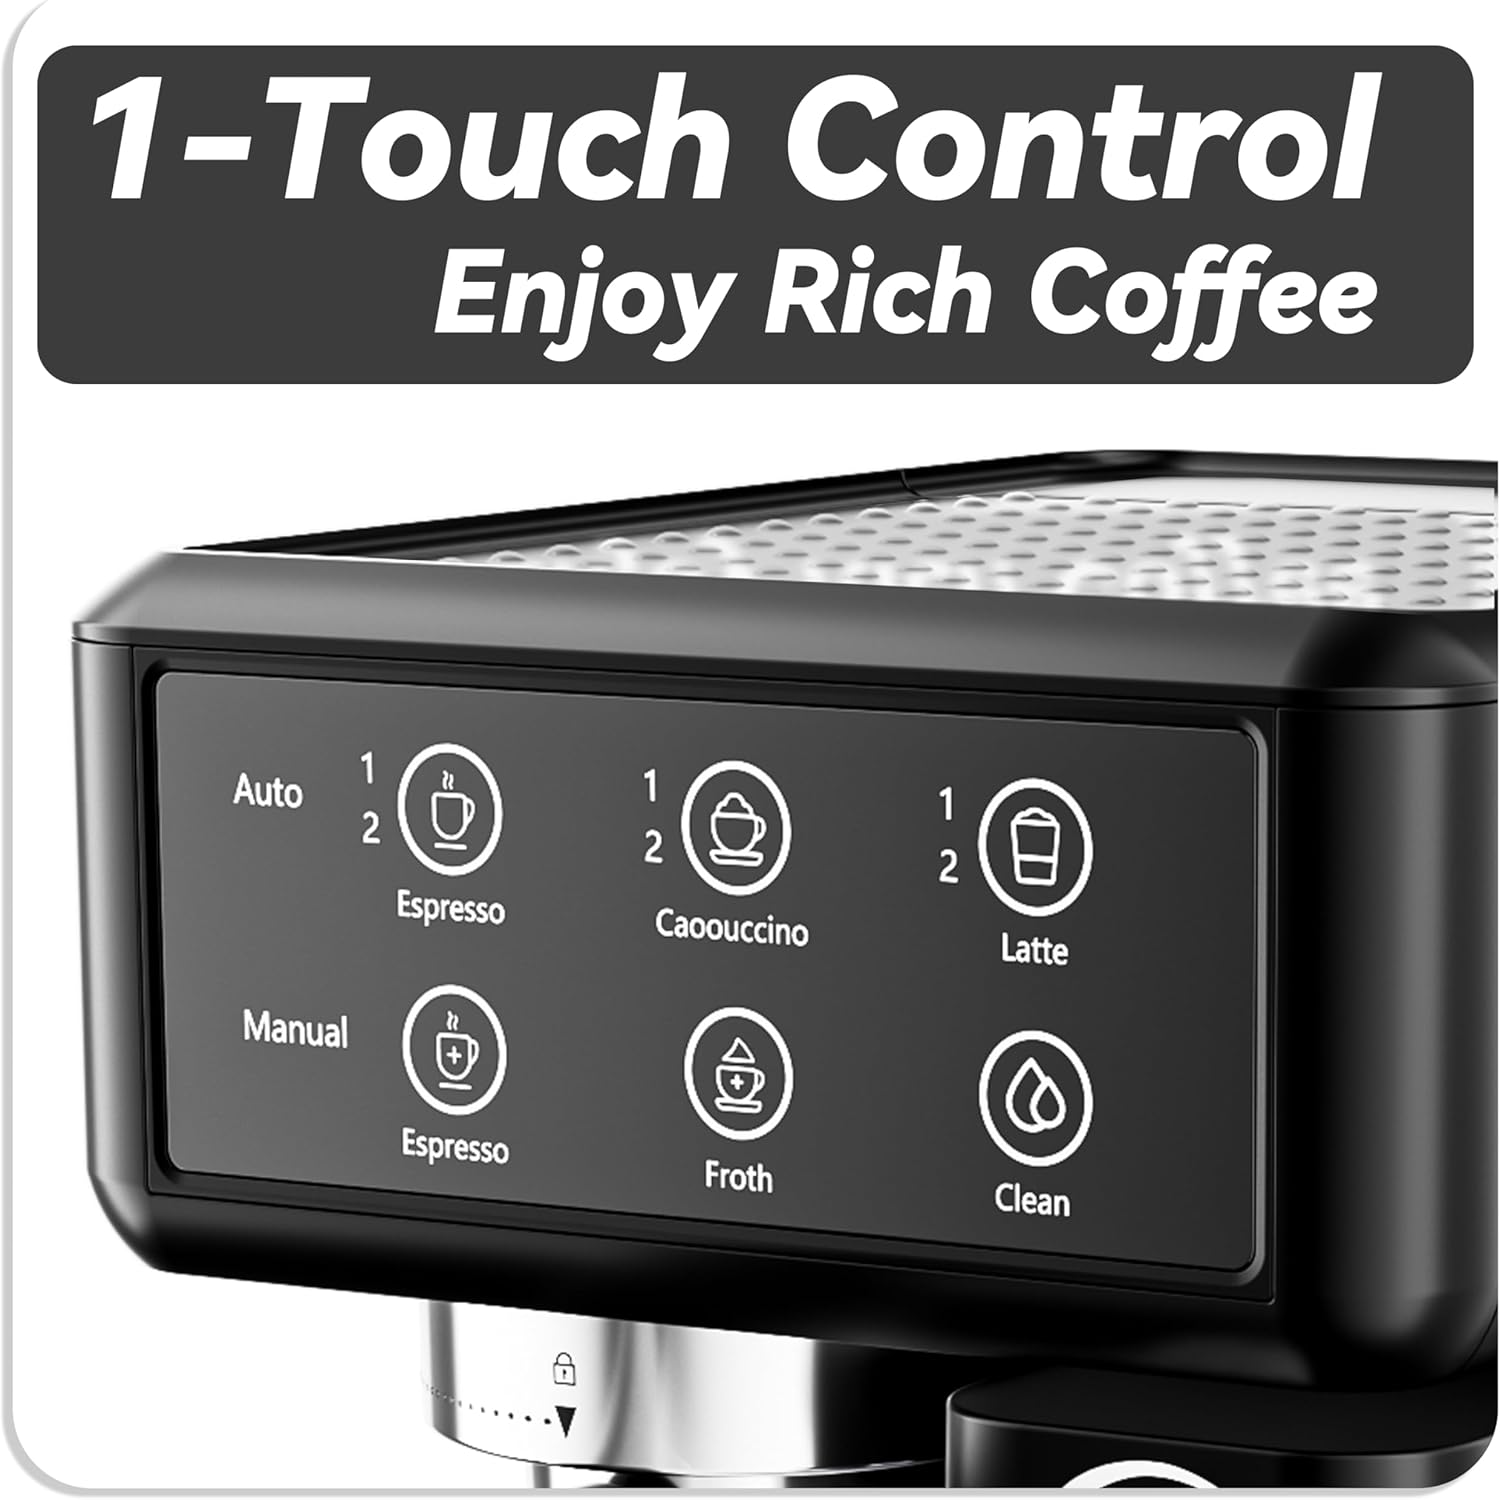
Нэг товчлуурын ажиллагаа: Simplifies the brewing process for various coffee drinks.
20-Bar High Pressure: Өтгөн эспрессогийн хамгийн оновчтой хандыг баталгаажуулдаг.
Автомат сүү хөөсрүүлэгч: Integrated system for creating creamy milk foam for cappuccinos and lattes.
Large Capacity Milk Box: Allows for precise control over milk quantity and temperature.
Өөрийгөө цэвэрлэх функц: Maintains hygiene of the milk frother system.
Компакт дизайн: Space-saving integrated body and milk tank.
Аяга халаагч: Top surface designed to keep cups warm.
Fill the filter basket with ground coffee. Use the tamper to firmly press the coffee grounds.
Attach the portafilter to the brewing head of the machine and lock it into place by turning the handle to the right.
Place a cup under the portafilter spouts.
Select either '1 Espresso' for a single shot or '2 Espresso' for a double shot on the control panel. The machine will automatically brew the espresso.
Figure 2: The intuitive one-touch control panel for selecting espresso, cappuccino, or latte.
3. Preparing Cappuccino or Latte:
Эспрессо бэлтгэхийн тулд 1-3 алхмуудыг дагана уу.
Adjust the milk frother knob to your desired froth level (delicate or fluffy).
Place a cup under the portafilter spouts and the milk frother spout.
Select '1 Cappuccino' or '2 Cappuccino' for cappuccino, or '1 Latte' or '2 Latte' for latte. The machine will first froth the milk and then brew the espresso into your cup.
Figure 3: The adjustable milk frother knob allows customization of milk foam texture.
Цэвэрлэгээ, засвар үйлчилгээ
1. Self-Cleaning Function (Milk Frother):
After each use of the milk frother, turn the milk frother knob to the 'CLEAN' position.
The machine will automatically flush the milk frother system with hot water to prevent milk residue buildup.
Return the knob to the 'OFF' position once cleaning is complete.
2. Тогтмол цэвэрлэгээ:
Water Tank & Milk Frother Tank: Remove and wash with warm soapy water. Rinse thoroughly.
Портафилтер ба шүүлтүүрийн сагс: Remove coffee grounds and wash with warm soapy water.
Cup Warmer, Milk Frother, Removable Tank, Self-Cleaning
Даралт
20 бар
Хүч
1350 Вт
Усны савны багтаамж
1.8 литр (60.8 унц)
Сүүний савны багтаамж
17 унц
Кофены оролтын төрөл
Pods/Capsules (Note: The product's feature bullets describe using ground coffee with a portafilter, which contradicts this specification. Please refer to product packaging for definitive compatibility.)
Баталгаат болон дэмжлэг
For warranty information or customer support, please refer to the product packaging or contact the manufacturer directly. Keep your proof of purchase for any warranty claims.
Ask a question about this manual
Ask about setup, troubleshooting, compatibility, parts, safety, or missing instructions. Manuals+ will review the question and use this page’s manual context to help answer it.