1. Танилцуулга
This manual provides detailed instructions for the installation, operation, and maintenance of your plplaaoo 100A MPPT Solar Charge Controller. This advanced controller is designed to optimize energy harvest from your solar panels and manage battery charging efficiently for 12V, 24V, 36V, and 48V solar power systems. Please read this manual thoroughly before installation and use to ensure proper function and safety.
2. Аюулгүй ажиллагааны заавар
Суурилуулалт болон ашиглалтын явцад дараах аюулгүй байдлын урьдчилан сэргийлэх арга хэмжээг дагаж мөрдөнө үү.
- Ensure all wiring is correctly connected and securely fastened to prevent loose connections and overheating.
- Хянагчийг суурилуулах эсвэл тохируулахаасаа өмнө нарны хавтан болон батерейны тэжээлийг үргэлж салгаж байгаарай.
- Use appropriate tools and wear protective gear, including eye protection, during installation.
- Install the controller in a well-ventilated area, away from flammable gases and liquids.
- Хянагчийг өөрөө задлах эсвэл засах гэж бүү оролдоорой. Үйлчилгээ авахын тулд мэргэшсэн ажилтантай холбогдоно уу.
- Ensure the battery bank is properly sized and compatible with the controller's voltage болон одоогийн үнэлгээ.
- Avoid short-circuiting the solar panel, battery, or load terminals.
3. Бүтээгдэхүүний онцлог
- Хамгийн их Power Point Tracking (MPPT): Achieves up to 98% conversion efficiency by intelligently tracking the maximum power point of solar panels under varying conditions.
- Автомат ботьtage Adaptation: Automatically detects and adapts to 12V, 24V, 36V, or 48V battery systems.
- Multifunctional Control: Supports various operating modes including PWM charging, constant current output, and voltage зохицуулалт.
- Integrated USB and DC Outputs: Features dual 5V 1A USB ports and a 2A DC output for charging external devices.
- Иж бүрэн хамгаалалт: Includes safeguards against overvoltage, overcurrent, overtemperature, overload, short circuits, and reverse polarity.
- Хэрэглэгчдэд ээлтэй интерфэйс: Equipped with a backlit LCD display for real-time monitoring and intuitive buttons for configuration.
- Удаан эдэлгээтэй барилга: Features an aluminum heatsink for efficient cooling and robust design for harsh environments (0°C to 60°C).
- Батерейны нийцтэй байдал: Compatible with gel, sealed lead-acid, and lithium batteries.
4. Багцын агуулга
- 1 x plplaaoo 100A MPPT Solar Charge Controller
- 1 х хэрэглэгчийн гарын авлага
5. Бүтээгдэхүүн дууссанview болон бүрэлдэхүүн хэсгүүд
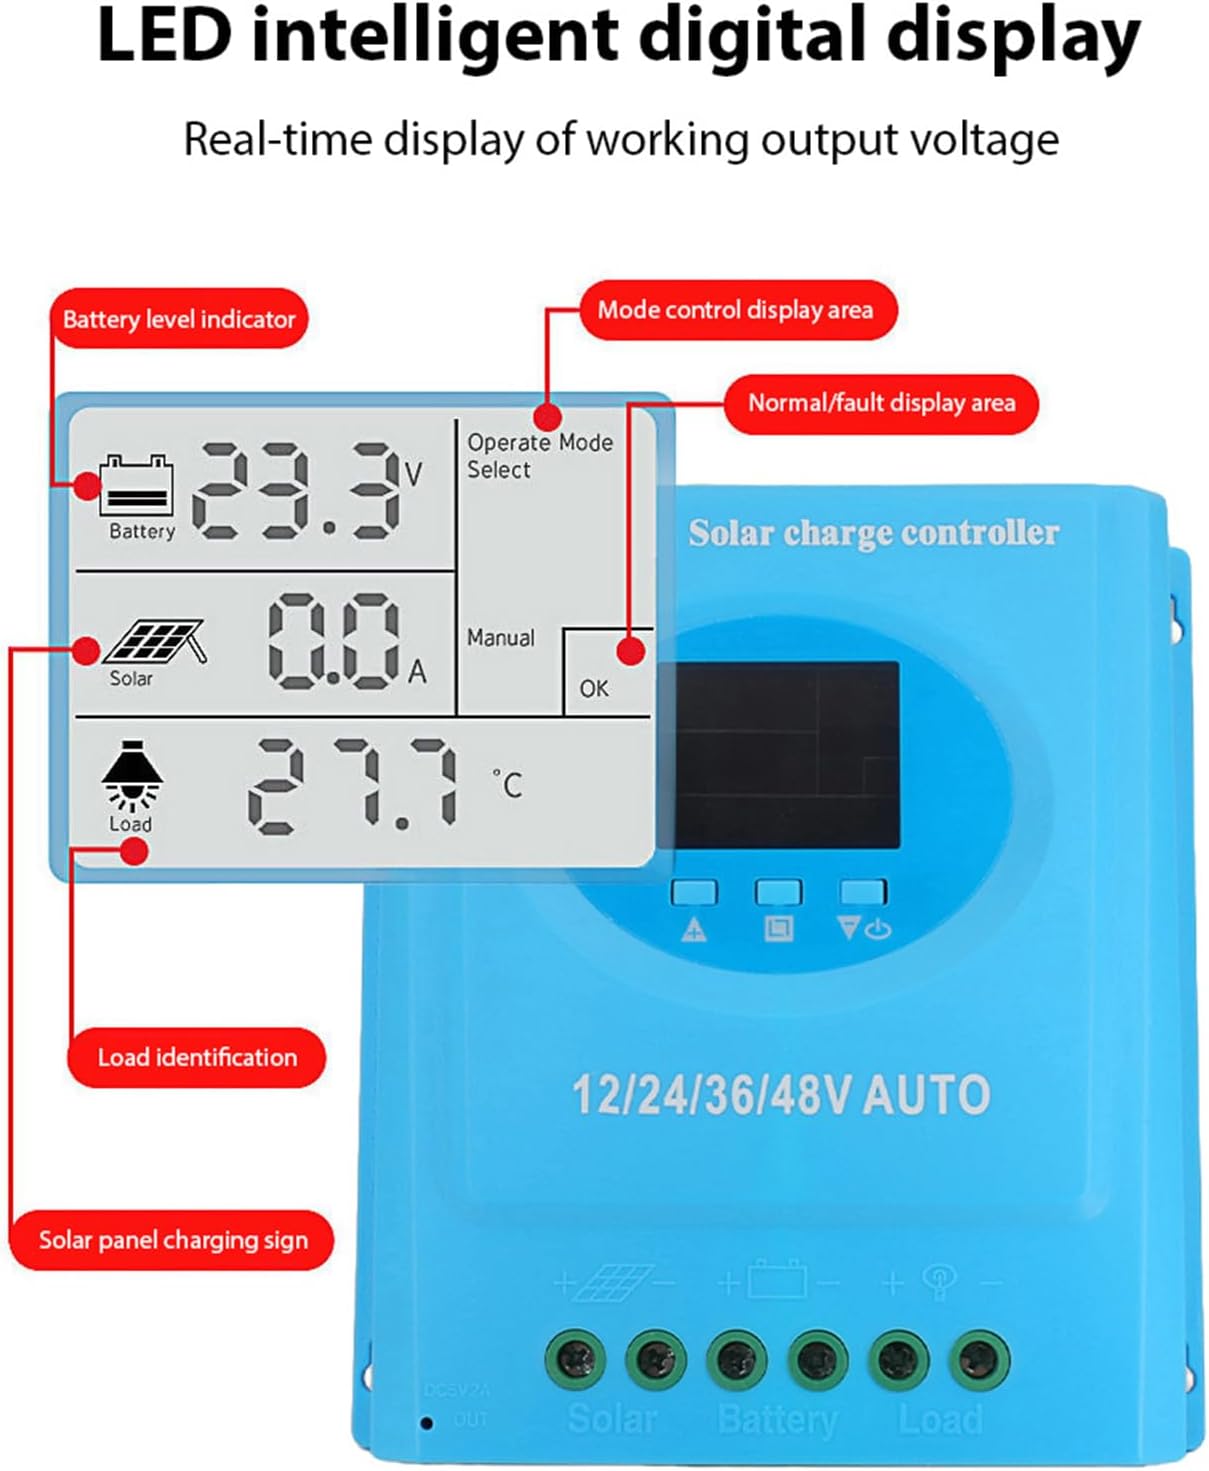
Familiarize yourself with the main components and interface of the solar charge controller.

Зураг 5.1: Урд view of the solar charge controller, highlighting the LCD screen and various connection terminals.
The controller features an intuitive LCD display and clearly labeled ports for easy connection. The display provides real-time information about the system's status.
Зураг 5.2: Нарийвчилсан view of the controller's connection ports.

Зураг 5.3: Нарийвчилсан view of the LCD display, indicating battery level, solar panel charging sign, load identification, operating mode, and real-time voltage.
5.1. Холболтын портууд
- Dual USB Interface: Two 5V 1A USB ports for charging mobile devices.
- Solar Panel Port: Connects to your solar panels (positive and negative).
- Зайны порт: Connects to your battery bank (positive and negative).
- DC Load Port: Connects to your DC loads (positive and negative).
- DC гаралтын порт: Additional DC output.
6. Тохиргоо ба суурилуулалт
Follow these steps for proper installation of the solar charge controller. Ensure all power sources are disconnected before beginning.
6.1. Утас тавих арга
Гэмтлээс урьдчилан сэргийлэхийн тулд эд ангиудыг дараах дарааллаар холбоно уу.
- Батерейг холбоно уу: Connect the battery to the controller's battery terminals (positive to positive, negative to negative). The controller will automatically detect the battery voltage.
- Нарны хавтанг холбох: Connect the solar panel to the controller's solar panel terminals (positive to positive, negative to negative).
- DC ачааллыг холбоно уу: Connect the DC load to the controller's load terminals (positive to positive, negative to negative).
Чухал: Эхлээд батерейг, дараа нь нарны хавтан, эцэст нь ачааллыг үргэлж холбоно уу. Урвуу дарааллаар салга.

Зураг 6.1: Solar energy system wiring diagram. Note the correct polarity for all connections.
6.2. Холбох
Mount the controller vertically on a flat surface in a well-ventilated area, ensuring adequate clearance for air circulation around the heatsink. Avoid direct sunlight, high temperatures, and humid environments.
7. Ашиглалтын заавар
Once installed, the controller will automatically begin operating. The LCD display provides real-time system status.
7.1. LCD дэлгэцийн мэдээлэл
The LCD screen displays various parameters:
- Батерейны түвшний үзүүлэлт: Shows the current charge status of the battery.
- Solar Panel Charging Sign: Indicates when the solar panels are actively charging the battery.
- Load Identification: Shows the status of the connected DC load.
- Operating Mode Display Area: Displays the current operating mode (e.g., manual, automatic).
- Normal/Fault Display Area: Indicates normal operation or displays error codes if a fault occurs.
- Real-time Working Output Voltage: Одоогийн боть харуулж байнаtage системийн.
7.2. Товчлуурын функцууд
The controller typically features multiple buttons for navigation and setting adjustments:
- Цэсийн товчлуур: Used to enter and exit the menu settings.
- Дээш/доош товчлуурууд: Used to navigate through menu options and adjust parameter values.
- OK товчлуур: Used to confirm selections and save settings.
Refer to the on-screen menu for specific parameter adjustments such as battery type, load control mode, and charging thresholds.
8. Засвар үйлчилгээ
Тогтмол засвар үйлчилгээ нь таны нарны цэнэг хянагчийн оновчтой ажиллагаа, удаан эдэлгээг хангана.
- Цэвэрлэгээ: Тоос шороо, хог хаягдлыг арилгахын тулд хянагчийн гадна талыг хуурай даавуугаар үе үе цэвэрлэж байгаарай. Агааржуулалтын нүхнүүд цэвэр байгаа эсэхийг шалгаарай.
- Холболт шалгах: Annually inspect all wiring connections for tightness and corrosion. Re-tighten if necessary.
- Байгаль орчны шалгалт: Ensure the installation environment remains within the specified operating temperature range and is free from excessive moisture or dust.
- Батерейны үзлэг: Regularly check the battery terminals for corrosion and ensure the battery is in good condition.
9. Алдаа засах
Хэрэв та нарны цэнэгийн зохицуулагчтай холбоотой асуудалтай тулгарвал дараах нийтлэг асуудал, шийдлүүдийг үзнэ үү.
| Асуудал | Боломжит шалтгаан | Шийдэл |
|---|---|---|
| Controller not powering on / LCD blank |
|
|
| Батерейг цэнэглэхгүй байна |
|
|
| Ачаалах ажиллахгүй байна |
|
|
| Алдааны кодыг харуулав | Системийн тодорхой алдаа. | Refer to the controller's display for the specific error code and consult the full product documentation or contact support for detailed interpretation and resolution. |
10. Техникийн үзүүлэлтүүд
| Параметр | Үнэ цэнэ |
|---|---|
| Загвар | plplaaoozi6egog4wm-0A |
| Брэнд | plplaaoo |
| Нэрлэсэн гүйдэл | 100 А |
| Системийн ботьtage | 12V / 24V / 36V / 48V Automatic Adaptation |
| Цэнэглэх төрөл | MPPT (Хамгийн их цахилгаан цэгийн хяналт) |
| Хөрвүүлэлтийн үр ашиг | 98% хүртэл |
| USB гаралт | Dual 5V 1A ports |
| DC гаралт | 2A |
| Ашиглалтын температур | 0 хэмээс 60 хэм хүртэл |
| Хэмжээ (ойролцоогоор) | 19.5 см x 18.3 см x 6.8 см (7.7 инч x 7.2 инч x 2.7 инч) |

Зураг 10.1: Approximate dimensions of the solar charge controller.
11. Баталгаат хугацаа ба дэмжлэг
Баталгаат мэдээлэл, техникийн дэмжлэг, үйлчилгээний лавлагаа авахыг хүсвэл жижиглэн худалдаалагч эсвэл үйлдвэрлэгчтэй шууд холбогдоно уу. Худалдан авалтын баримтаа худалдан авалтын баталгаа болгон хадгалаарай.