1. Танилцуулга
This manual provides detailed instructions for the installation, operation, and management of your MokerLink 8-Port 10G Managed Ethernet Switch. This device is designed to enhance network performance and efficiency with its high-speed connectivity and advanced management features. Please read this manual thoroughly before using the product to ensure proper setup and functionality.
2. Бүтээгдэхүүн дууссанview
The MokerLink 8-Port 10G Managed Ethernet Switch features a robust design for high-bandwidth network environments. It includes 4x10Gbps Ethernet RJ45 ports and 4x10Gbps SFP+ slots, offering versatile connectivity options for various network devices. The switch supports a 160Gbps switching capacity and a packet forwarding rate of 119.04Mpps, ensuring non-blocking 10G line speed forwarding across all ports.
Гол онцлогууд нь:
- High-Speed Ports: 4x10Gbps RJ45 ports (auto-adaptive 10G/5G/2.5G/1000M/100M) and 4x10Gbps SFP+ slots (compatible with 1G/10G optical modules).
- Өндөр зурвасын өргөн: 160Gbps switching capacity and 119.04Mpps packet forwarding rate.
- L3 Management: Дэмждэг Web and Command Line Interface (CLI) for comprehensive device and port configuration, including IPv4/IPv6 management and routing.
- Дэвшилтэт давхаргын 2-р онцлогууд: VLAN, ACL, QoS, Jumbo frame, DHCP, security, multicast, MAC address table, diagnosis, Statistics, MSTP/RSTP/STP.
- Security & Diagnosis: AAA/802.1X/MAC-Based authentication, DoS anti-attack, dynamic ARP inspection, DHCP Snooping, IP Source Guard, Port Security, Protected Ports, storm control, Console/RAM/Flash Logs, Port Mirroring, Ping, Traceroute, Port Tests, UDLD Protocol.
- Бат бөх дизайн: Metal case with industrial-grade fan for efficient heat dissipation, suitable for desktop or wall-mounting.
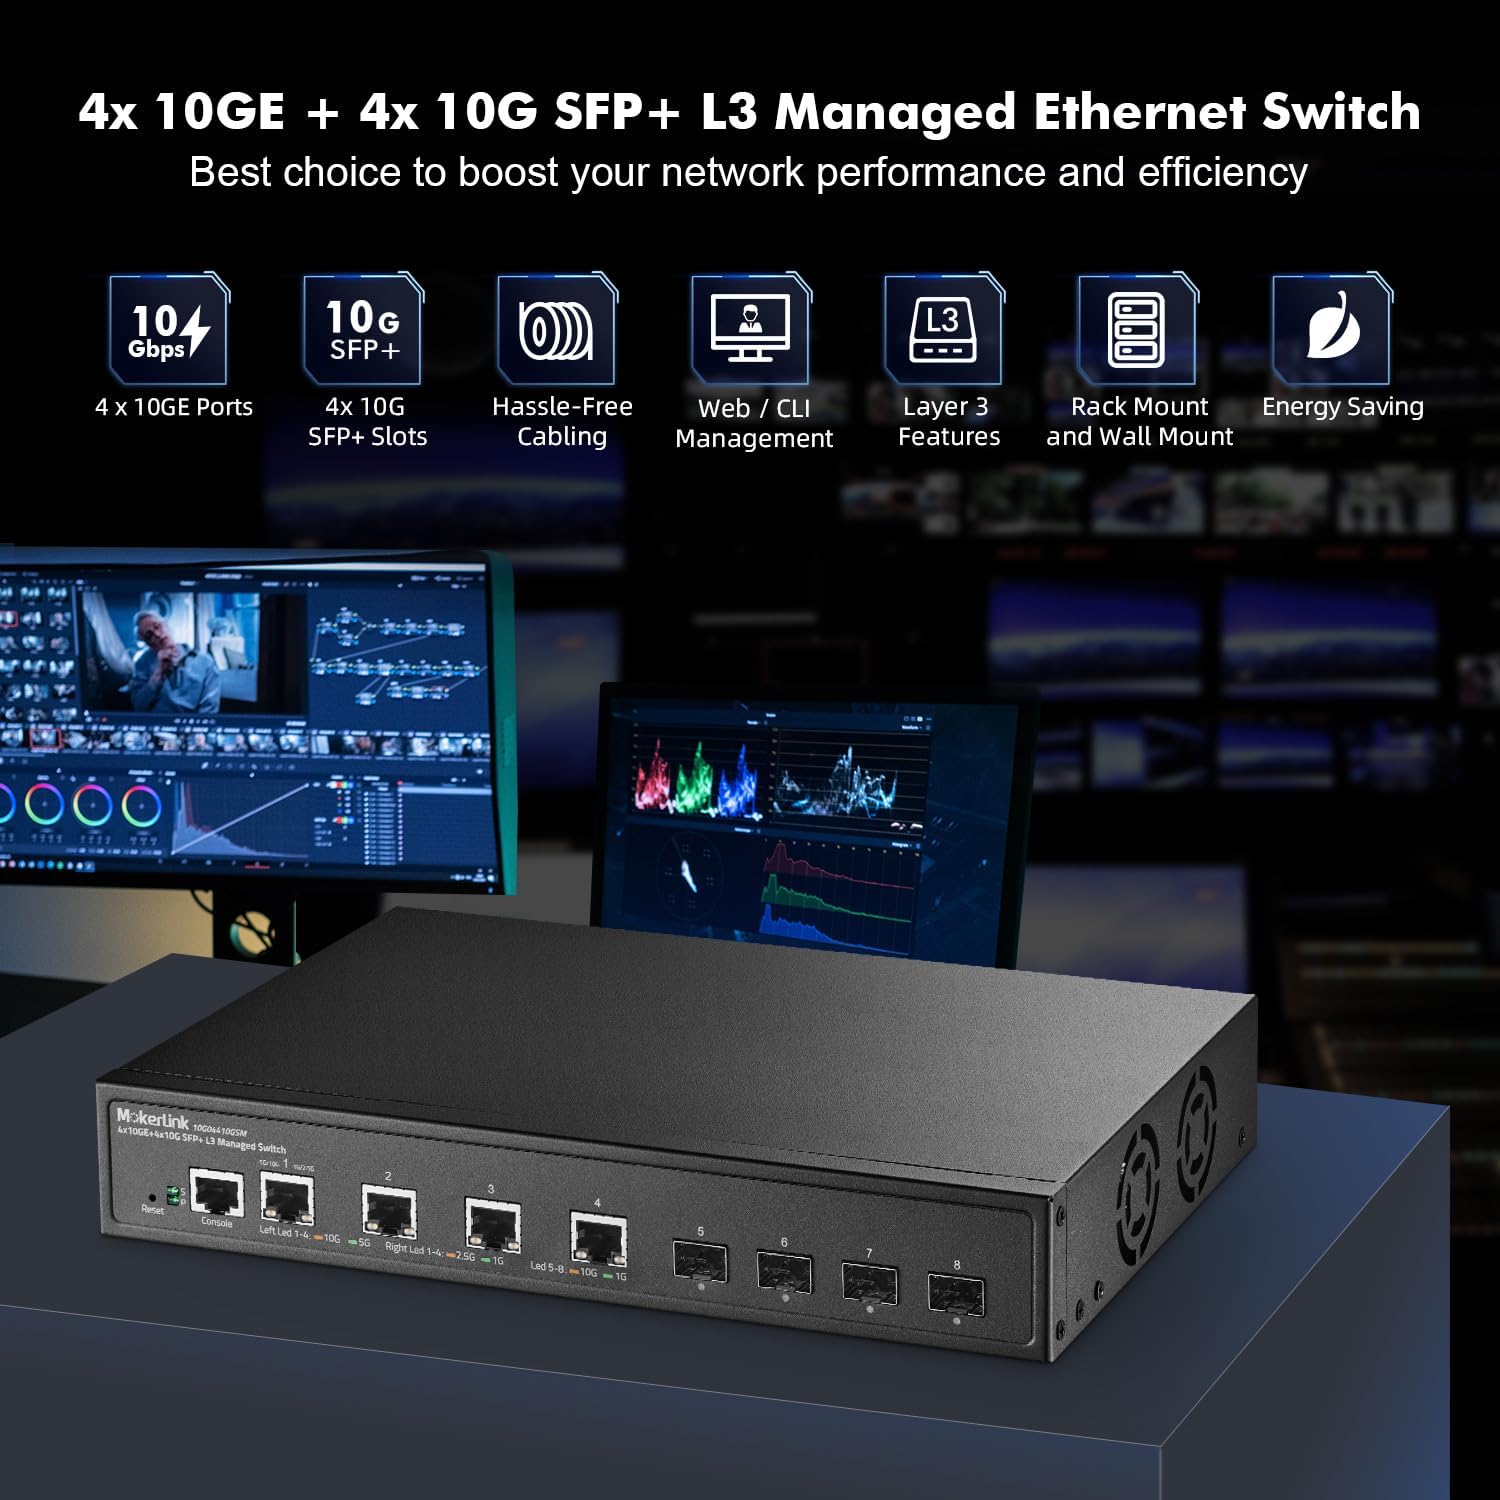
Figure 2.1: MokerLink 8-Port 10G Managed Ethernet Switch highlighting key features like 10G ports, SFP+ slots, Web/CLI management, L3 features, rack/wall mount, and energy saving.

Figure 2.2: Front and rear panel view of the switch, showing 4x10Gbps RJ45 ports, 4x10Gbps SFP+ slots, console port, reset button, power indicator, system indicator, and external power supply input.
3. Багцын агуулга
Verify the contents of your package upon opening. If any items are missing or damaged, please contact your vendor.
- 1 x MokerLink 10G Managed Switch
- 1 x тэжээлийн адаптер
- 1 х хэрэглэгчийн гарын авлага (энэ баримт бичиг)
- Mounting Accessories (for desktop or wall-mount installation)
4. Тохиргоо
4.1 Физик суурилуулалт
The MokerLink 8-Port 10G Managed Ethernet Switch is designed for flexible deployment, supporting both desktop and wall-mount installations.
- Ширээний байршил: Place the switch on a flat, stable surface, ensuring adequate ventilation around the device.
- Хананд бэхлэх: Use the provided mounting accessories to securely attach the switch to a wall. Ensure the mounting location is sturdy and allows for proper cable management and ventilation.
4.2 Сүлжээний төхөөрөмжүүдийг холбох
Connect your network devices (e.g., servers, workstations, NAS, WiFi 6/7 APs) to the switch's RJ45 or SFP+ ports.
- RJ45 портууд: Use appropriate Ethernet cables for optimal performance. For 10Gbps connections, Cat6a or Cat7 cables are recommended. For 2.5Gbps/5Gbps, Cat5e or Cat6 cables are suitable.
- SFP+ Slots: Insert compatible 1G or 10G SFP/SFP+ optical modules into the slots, then connect fiber optic cables to the modules.

Figure 4.1: The switch connected to various high-performance devices such as WiFi 6/7 AP, servers, workstations, NAS, and 4K/8K video systems, illustrating cable type recommendations for different speeds.
4.3 Асаах
Connect the provided power adapter to the switch's power input and then to a power outlet. The Power LED (P) on the front panel should illuminate, indicating the switch is receiving power. The System LED (S) will blink during startup and remain steady when the system is operational.
5. Ашиглалтын заавар
5.1 LED үзүүлэлтүүд
Урд самбарын LED нь статусын мэдээллийг өгдөг:
- P (Power Indicator):
- Асаалттай: Эрчим хүчийг нийлүүлдэг.
- Унтраах: Цахилгаан байхгүй.
- S (System Indicator):
- On: The system is normal.
- Off: System startup or abnormality.
- RJ45 Port LEDs (Left/Right):
- Left LED (Link/Activity): Orange for 10Gbps, Green for 5Gbps, 2.5Gbps, 1Gbps, or 100Mbps. Blinks for activity.
- Right LED (Speed): Orange for 10Gbps, Green for 1Gbps.
- SFP+ портын LED:
- Led: Orange for 10Gbps, Green for 1Gbps. Blinks for activity.
5.2 Удирдлагын интерфейсийн анхны хандалт
Шилжүүлэгчийг a-ээр удирдаж болно Web-based interface or Command Line Interface (CLI).
- Web Интерфэйс: Access the switch by entering its default IP address (typically 192.168.2.1) into a web browser. The default username is 'admin' and the default password is 'admin'.
- CLI: Connect to the console port using a console cable and a terminal emulator, or use Telnet/SSH for remote access.

Figure 5.1: Illustration of accessing the switch's management interfaces, including the web interface and command line interface, with default login credentials.
6. Удирдлагын онцлог
The MokerLink 8-Port 10G Managed Ethernet Switch offers a comprehensive suite of Layer 2 and Layer 3 management features.
6.1 Layer 2 Switching Features
- VLAN (Virtual Local Area Network): Supports 802.1Q Tag-based VLANs to segment networks and improve security and performance.
- Холбоосыг нэгтгэх (LACP): Combines multiple physical links into a single logical link to increase bandwidth and provide link redundancy.
- QoS (Үйлчилгээний чанар): Prioritizes network traffic to ensure critical applications receive sufficient bandwidth and low latency.
- MSTP/RSTP/STP: Spanning Tree Protocols prevent network loops.
- Jumbo хүрээ: Supports larger Ethernet frames for increased data throughput.

Зураг 6.1: Жишээ ньample of 802.1Q Tag-based VLANs segregating network traffic for different devices like cameras, servers, and IP phones.

Figure 6.2: Illustration of Link Aggregation (LACP) connecting the switch to another switch and a NAS for enhanced bandwidth and resilience.

Figure 6.3: QoS mechanism prioritizing audio, video, and data traffic to reduce packet loss and latency.
6.2 Layer 3 Routing Features
- IPv4/IPv6 Management: Supports both IPv4 and IPv6 protocols for network addressing and routing.
- Статик маршрутууд: Configurable static routes for directing traffic between different IP networks.
- ARP (Хаяг шийдвэрлэх протокол): Manages the mapping of IP addresses to MAC addresses.
- Loopback Interface: A virtual interface used for management and routing protocols.
6.3 Security and Diagnosis
- AAA/802.1X/MAC-Based Authentication: Provides robust user and device authentication.
- DoS Anti-Attack: Үйлчилгээг татгалзах халдлагаас хамгаалдаг.
- DHCP Snooping & IP Source Guard: Prevents unauthorized DHCP servers and IP spoofing.
- Портын аюулгүй байдал: Limits the number of MAC addresses on a port to prevent unauthorized access.
- Шуурганы хяналт: Prevents network performance degradation due to excessive broadcast, multicast, or unknown unicast traffic.
- Порт толин тусгал: Duplicates network traffic from one port to another for monitoring and analysis.
- Ping, Traceroute, Port Tests: Diagnostic tools for network connectivity and performance.
- UDLD Protocol: Unidirectional Link Detection protocol to detect and disable unidirectional links.
- Гогцоо илрүүлэх: Identifies and removes network loops to prevent traffic disruptions.

Figure 6.4: Loop detection feature identifying and preventing network loops between two switches, ensuring stable network operation.
7. Засвар үйлчилгээ
Regular maintenance ensures the longevity and optimal performance of your switch.
- Програм хангамжийн шинэчлэлт: Periodically check the MokerLink official website for firmware updates to enhance features and improve security. Follow the provided instructions for a safe upgrade process.
- Configuration Backup/Restore: Regularly back up your switch configuration to prevent data loss. This allows for quick restoration in case of misconfiguration or device replacement.
- Байгаль орчны нөхцөл: Ensure the switch operates within recommended temperature and humidity ranges. Maintain clear airflow around the device to facilitate heat dissipation by the industrial-grade fan.
- Цэвэрлэгээ: Keep the switch clean and free from dust. Use a soft, dry cloth for cleaning.
8. Алдаа засах
Энэ хэсэгт танд тулгарч болох нийтлэг асуудлуудыг авч үзэх болно.
8.1 Эрчим хүчгүй
- Цахилгаан адаптер нь унтраалга болон ажиллаж байгаа цахилгаан залгуурт найдвартай холбогдсон эсэхийг шалгаарай.
- Өөр төхөөрөмжийг залгах замаар цахилгааны залгуур ажиллаж байгаа эсэхийг шалгана уу.
- Цахилгаан адаптерт харагдахуйц гэмтэл байгаа эсэхийг шалгана уу.
8.2 Порт дээр холбоос байхгүй
- Check the Ethernet or fiber cable connection at both ends. Ensure cables are not damaged.
- Холбогдсон төхөөрөмж асаалттай, зөв ажиллаж байгаа эсэхийг шалгана уу.
- Ensure the correct cable type is used for the speed (e.g., Cat6a/7 for 10G RJ45).
- Шилжүүлэгчийн удирдлагын интерфэйс дэх портын төлөвийг шалгана уу.
- Шилжүүлэгч дээрх өөр порт руу холбогдох эсвэл өөр кабель ашиглана уу.
8.3 Хандалт хийх боломжгүй байна Web Интерфэйс
- Ensure your computer's IP address is in the same subnet as the switch's default IP (192.168.2.x, with subnet mask 255.255.255.0).
- Verify the switch's IP address has not been changed from the default (192.168.2.1).
- Хөтөчийнхөө кэшийг цэвэрлэх эсвэл өөр хөтөч ашиглаж үзнэ үү.
- Компьютер дээрх галт хана эсвэл вирусны эсрэг программ хангамжийг түр идэвхгүй болго.
8.4 Үйлдвэрийн тохиргоонд дахин оруулах
If you forget the password or encounter persistent issues, you can restore the switch to its factory default settings.
- With the switch powered on, locate the Дахин тохируулах урд самбар дээрх товчлуур.
- Цаасны хавчаар эсвэл үүнтэй төстэй үзүүртэй объект ашиглан Reset товчийг 6 секунд орчим дарна уу.
- Release the button. The switch will reboot with factory default settings.
9. Техникийн үзүүлэлтүүд
| Онцлог | Тодорхойлолт |
|---|---|
| Брэнд | MokerLink |
| Загварын дугаар | 4x10G + 4x10G SFP Managed |
| Портын тоо | 9 (4x10Gbps RJ45, 4x10Gbps SFP+, 1xConsole) |
| Оруулсан бүрэлдэхүүн хэсгүүд | 10G Managed Switch |
| Өнгө | Хар |
| Тохиромжтой төхөөрөмжүүд | Ширээний компьютер |
| Интерфэйс | RJ45, SFP+ |
| Өгөгдөл дамжуулах хурд | Секундэд 160 Гигабит (Соних хүчин чадал) |
| Шилжүүлэгчийн төрөл | Managed (L3) |
| MAC хаягийн хүснэгтийн хэмжээ | 16 мянга |
| Пакет дамжуулах хурд | 119.04 Mpps |
| Менежмент | Web, CLI, Telnet, SSH, SNMP |
| Эрчим хүчний хэрэглээ | Empty Load Power: <36W |
10. Баталгаат хугацаа ба дэмжлэг
10.1 Баталгаат хугацааны мэдээлэл
The MokerLink 8-Port 10G Managed Ethernet Switch comes with a 1 жилийн хязгаарлагдмал баталгаат хугацаа худалдан авсан өдрөөс эхлэн. Энэхүү баталгаа нь хэвийн ашиглалтын үед материал болон хийцийн согогийг хамарна. Энэ нь буруу ашиглалт, осол, зөвшөөрөлгүй өөрчлөлт, эсвэл гадны шалтгаанаас үүдэлтэй хохирлыг хамрахгүй.
10.2 Техникийн дэмжлэг
For technical assistance, troubleshooting, or warranty claims, please contact MokerLink customer support through the official website or your point of purchase. Please have your product model number and purchase information ready when contacting support.