1. Танилцуулга
This manual provides instructions for the installation, configuration, and operation of your ASUS RT-N13U Wireless-N Router. The RT-N13U is a versatile networking device capable of functioning as a wireless router, an access point, or a wireless repeater. It also features a USB 2.0 port for enhanced functionalities such as printer sharing, FTP hosting, network storage, and direct BitTorrent downloading.
Төхөөрөмжийг зөв тохируулж, оновчтой ажиллагааг хангахын тулд ашиглахаасаа өмнө энэхүү гарын авлагыг сайтар уншина уу.
2. Бүтээгдэхүүн дууссанview
2.1 Гол онцлогууд
- EZ All-in-One Printer Sharing: Utilize the USB port to share a printer across your network.
- EZ Switch: Easily switch between Router, Repeater, and Access Point modes with a single touch.
- Enhanced Download Master: Татаж авах files directly to a connected USB hard drive even when your computer is off.
- Wireless-N Connectivity: Supports 802.11b/g/n standards for high-speed wireless networking.
- 4 LAN Ports: Provides four 10/100 Mbps Ethernet ports for wired connections.
- Diagnostic and Bandwidth Management Tools: Includes Dr. Surf and EZQoS for network monitoring and quality of service management.
2.2 Багцын агуулга
- ASUS RT-N13U Wireless-N Router
- Эрчим хүчний адаптер
- Ethernet кабель
- Түргэн эхлүүлэх гарын авлага
- Support CD (containing user manual and utilities)
2.3 Техник хангамжийн интерфейс
Familiarize yourself with the ports, buttons, and LED indicators on your RT-N13U router.
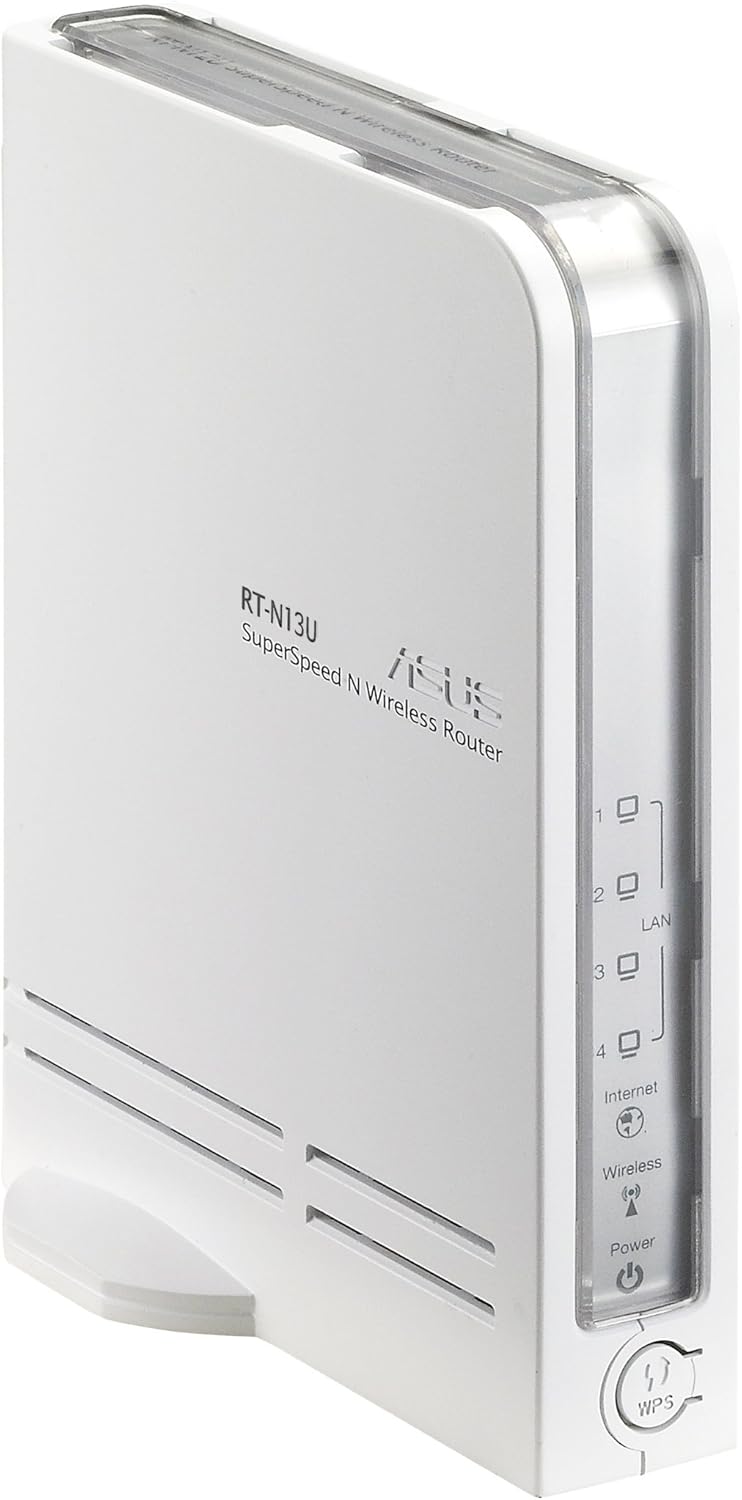
Зураг 1: Урд ба хажуу View of the ASUS RT-N13U Router. This image shows the front panel with LED indicators for Power, Wireless, Internet, and LAN ports (1-4), along with the WPS button.

Зураг 2: Арын View of the ASUS RT-N13U Router. This image displays the rear panel, including the USB 2.0 port, four LAN ports (yellow), one Internet (WAN) port (blue), and the power input port.
LED үзүүлэлтүүд:
- Эрчим хүчний LED: Тэжээлийн төлөвийг заана. Хэвийн ажиллагаанд зориулсан ногоон өнгөтэй.
- Утасгүй LED: Indicates wireless activity. Blinks when data is being transmitted wirelessly.
- Интернет LED: Indicates internet connection status. Solid green for connected, blinking for activity.
- LAN 1-4 LEDs: Indicate activity on the respective LAN ports. Solid green for connected, blinking for activity.
- WPS LED: Wi-Fi хамгаалагдсан тохиргооны төлөвийг заана.
Портууд болон товчлуурууд:
- USB 2.0 порт: For connecting USB devices such as printers or external storage.
- LAN портууд (1-4): Connect wired devices like computers or gaming consoles.
- Интернет (WAN) порт: Таны модемтой холбогдож интернетэд холбогдоно.
- Эрчим хүчний порт: Дагалдах тэжээлийн адаптерт холбогдоно.
- WPS товчлуур: Утасгүй холболтыг хялбар болгохын тулд Wi-Fi хамгаалалттай тохиргоог эхлүүлнэ.
- Дахин тохируулах товч: (Typically a small pinhole button) Used to restore factory default settings.
- EZ Switch: A physical switch to change the device's operating mode (Router, AP, Repeater).
3. Тохиргоо
3.1 Анхны техник хангамжийн холболт
- Connect the power adapter to the router's Power port and plug it into a power outlet.
- Connect one end of the Ethernet cable to the Internet (WAN) port of the RT-N13U and the other end to your modem's Ethernet port.
- (Optional) For initial configuration, connect your computer directly to one of the LAN ports (1-4) on the router using an Ethernet cable.
- Power on your modem, then power on the RT-N13U router. Wait for the Power, Internet, and Wireless LEDs to stabilize.
3.2 Тохиргооны горимууд
The RT-N13U supports three operating modes, selectable via the EZ Switch:
- Чиглүүлэгчийн горим: The default mode, where the device acts as a gateway for your network, providing internet access and managing local network traffic.
- Хандалтын цэг (AP) горим: Extends an existing wired network by adding wireless connectivity. In this mode, internet features are typically disabled, and the device acts as a wireless hub.
- Давталтын горим: Extends the range of an existing wireless network by receiving and re-transmitting the wireless signal.
Select the desired mode using the physical EZ Switch on the router before proceeding with software configuration.
3.3 Web Интерфейсийн хандалт
- Нээлттэй a web browser (e.g., Chrome, Firefox, or IE8/Edge; IE9 beta may have compatibility issues).
- Хаягийн мөрөнд чиглүүлэгчийн анхдагч IP хаягийг бичнэ үү (ихэвчлэн
192.168.1.1orrouter.asus.com) хийгээд Enter дарна уу. - Анхдагч хэрэглэгчийн нэр болон нууц үгээ оруулна уу (ихэвчлэн
adminfor both). Refer to the label on the bottom of your router if these defaults do not work. - Follow the on-screen setup wizard.
3.4 Internet Connection Setup (Router Mode)
If the EZ UI setup feature does not automatically configure your internet connection, manual steps may be required, especially for certain Internet Service Providers (ISPs).
- Gather Information:
- Your computer's MAC address (Physical Address). On Windows, open Command Prompt and type
ipconfig /all. - Your ISP's DNS server addresses. If connected via Ethernet, use
ipconfig /allto find "DNS Servers".
- Your computer's MAC address (Physical Address). On Windows, open Command Prompt and type
- Access Network Map: Чиглүүлэгчид web interface, navigate to the "Network Map" or "EZ-UI" section.
- Гарын авлагын тохиргоо: If the connection fails, the system may prompt for manual configuration.
- -г ашиглах MAC клон feature. Some ISPs tie your internet service to a specific MAC address. Cloning your computer's MAC address to the router can resolve connectivity issues.
- Manually enter your ISP's DNS server addresses if required.
- Apply Settings and Restart: Apply the new settings. The router will restart. Your computer may temporarily lose connection. Reconnect to the router.
- Power Cycle (If Needed): If the internet connection is still not established:
- Power off the wireless router.
- Power off your modem/ISP's box.
- 5 минут хүлээнэ үү.
- First, power on the modem/ISP's box and wait for it to fully boot.
- Then, power on the ASUS RT-N13U router.
- Check for internet connectivity.
Note: For optimal wireless performance, ensure the wireless radio is set to "N only" mode in the router's settings if all your devices support 802.11n.
4. Үйл ажиллагаа
4.1 Төхөөрөмжүүдийг холбох
Утастай холболтууд:
Connect Ethernet-enabled devices (e.g., desktop computers, smart TVs, gaming consoles) to the yellow LAN ports (1-4) on the back of the router using Ethernet cables.
Утасгүй холболтууд:
- Утасгүй төхөөрөмж дээрээ (зөөврийн компьютер, ухаалаг утас, таблет) боломжтой Wi-Fi сүлжээг хайж олоорой.
- Select the network name (SSID) of your ASUS RT-N13U (default SSID is usually "ASUS" or "ASUS_RT-N13U").
- Enter the network security key (password). This can be found on a label on the router or in the router's web интерфейс.
- Alternatively, press the WPS button on the router and then activate WPS on your wireless device within two minutes for a quick connection.
4.2 USB функцууд
The USB 2.0 port on the RT-N13U provides additional functionalities:
Принтер хуваалцах:
Connect a compatible USB printer to the USB 2.0 port. Configure printer sharing through the router's web interface to allow multiple computers on your network to print to it.
Download Master:
Connect a USB storage device (e.g., external hard drive, flash drive) to the USB 2.0 port. The Download Master feature allows you to initiate downloads (including BitTorrent) directly to the connected storage device, even when your computer is turned off. This feature typically works only when the router is in Router Mode.
Note: Ensure the USB storage device is formatted correctly and recognized by the router. For BitTorrent downloads, you may need to provide the exact URL location for the downloader to function properly.
5. Засвар үйлчилгээ
5.1 Програм хангамжийн шинэчлэлтүүд
Regularly updating the router's firmware is crucial for performance improvements, security enhancements, and bug fixes. Visit the official ASUS support website for the RT-N13U model to download the latest firmware. Follow the instructions provided with the firmware update package carefully to avoid damaging the device.
Note: Firmware updates can resolve many common issues and improve compatibility with various devices and services.
5.2 Үйлдвэрийн тохиргоог сэргээх
If you encounter persistent issues or forget your login credentials, you can restore the router to its factory default settings. This will erase all custom configurations.
- With the router powered on, locate the Reset button (often a small pinhole) on the device.
- Use a paperclip or a similar pointed object to press and hold the Reset button for approximately 5-10 seconds.
- Release the button when the Power LED starts blinking rapidly or all LEDs briefly flash.
- The router will restart with factory default settings. You will need to reconfigure it from scratch.
6. Алдаа засах
6.1 Нийтлэг асуудал ба шийдвэрлэх арга замууд
- Интернет холболт байхгүй:
- Check all cable connections (modem to router WAN port, router to computer LAN port).
- Perform a power cycle on both your modem and router (unplug, wait 5 minutes, plug modem first, then router).
- Verify your ISP settings in the router's web interface, especially if MAC cloning or specific DNS servers are required.
- Ensure the router is in the correct operating mode (Router Mode for internet access).
- Чиглүүлэгчид хандах боломжгүй Web Интерфэйс:
- Компьютероо чиглүүлэгчтэй (утастай эсвэл утасгүй) холбосон эсэхээ шалгаарай.
- Verify the IP address (e.g.,
192.168.1.1) is correct. - Өөрийг туршиж үзээрэй web хөтөч.
- Компьютер дээрх галт хана эсвэл вирусны эсрэг программ хангамжийг түр идэвхгүй болго.
- If you forgot the password, perform a factory reset (see Section 5.2).
- Slow Wireless Speed or Dropped Connections:
- Чиглүүлэгчийн програм хангамж шинэчлэгдсэн эсэхийг шалгаарай.
- Check for wireless interference from other devices (cordless phones, microwaves).
- Adjust the wireless channel in the router settings.
- Position the router in a central location, away from obstructions.
- If all devices support 802.11n, set the wireless mode to "N only" for higher speeds.
- USB төхөөрөмж танигдаагүй:
- Ensure the USB device is properly connected and powered (if external power is required).
- Чиглүүлэгчийг шалгана уу web interface for USB device status and configuration.
- Verify compatibility of the USB device with the router.
- Ensure the router is in Router Mode for USB features like Download Master.
6.2 LED заагчийн утга
| LED үзүүлэлт | Статус | Тодорхойлолт |
|---|---|---|
| Хүч | Хатуу ногоон | Төхөөрөмж асаалттай, хэвийн ажиллаж байна. |
| Унтраах | Төхөөрөмж унтарсан байна. | |
| Утасгүй | Хатуу ногоон | Утасгүй холболт идэвхжсэн. |
| Ногоон анивчих | Wireless data transmission is active. | |
| Интернет | Хатуу ногоон | Интернетэд холбогдсон. |
| Ногоон анивчих | Internet data transmission is active. | |
| Унтраах | Интернет холболт байхгүй. | |
| LAN 1-4 | Хатуу ногоон | Төхөөрөмж нь холбогдох LAN порт руу холбогдсон байна. |
| Ногоон анивчих | Data transmission is active on the corresponding LAN port. | |
| WPS | Анивчиж байна | WPS connection process is active. |
7. Техникийн үзүүлэлтүүд
| Онцлог | Дэлгэрэнгүй |
|---|---|
| Загварын нэр | RT-N13U |
| Утасгүй стандарт | 802.11b/g/n |
| Давтамжийн зурвас | Single Band (2.4 GHz) |
| Холболтын технологи | Утасгүй, Ethernet |
| Ethernet портууд | 4 x 10/100 Mbps LAN, 1 x 10/100 Mbps WAN |
| USB порт | 1 x USB 2.0 |
| Антенны төрөл | Дотоод |
| Онцлог шинж чанарууд | Access Point Mode, Repeater Mode, WPS, Printer Sharing, Download Master |
| Бүтээгдэхүүний хэмжээс | 10 x 8.88 x 3.75 инч |
| Зүйлийн жин | 5.3 унц (ойролцоогоор 150 грамм) |
| Үйлдвэрлэгч | ASUS |
| Эхний боломжтой огноо | 28 оны есдүгээр сарын 2009 |
8. Аюулгүй байдлын мэдээлэл
- Use only the power adapter provided with the device. Using an incompatible adapter may damage the device and void your warranty.
- Төхөөрөмжийг ус, чийг, хэт өндөр температурт бүү тавь.
- Хэт халалтаас сэргийлэхийн тулд төхөөрөмжийг агааржуулалт сайтай газар байрлуулна.
- Төхөөрөмжийг нээж болохгүй casing. Servicing should only be performed by authorized personnel.
- Төхөөрөмжийг хүчтэй цахилгаан соронзон орноос хол байлга.
9. Баталгаат хугацаа ба дэмжлэг
For warranty information, technical support, and further assistance, please visit the official ASUS support website or contact ASUS customer service. Details can typically be found on the ASUS webсайт эсвэл таны бүтээгдэхүүнд хавсаргасан баримт бичигт.
ASUS-ийн дэмжлэг Webсайт: www.asus.com/support/


