1. Танилцуулга
This manual provides detailed instructions for the installation, configuration, operation, and maintenance of your D-Link DNS-320L Cloud Storage 2-Bay Network Attached Storage (NAS) device. Please read this manual thoroughly before using the device to ensure proper setup and optimal performance. The DNS-320L is designed to provide a centralized storage solution for your home or small office network, offering data redundancy, remote access, and media streaming capabilities.
2. Аюулгүй байдлын мэдээлэл
- Санамсаргүй уналтаас сэргийлж төхөөрөмжийг тогтвортой, хавтгай гадаргуу дээр байрлуулсан эсэхийг шалгаарай.
- Төхөөрөмжийг ус, чийг, хэт өндөр температурт бүү тавь.
- Use only the power adapter supplied with the device. Using an incorrect adapter may damage the device and void the warranty.
- Төхөөрөмжийг нээж болохгүй casing. Бүх үйлчилгээг мэргэшсэн боловсон хүчинд шилжүүлээрэй.
- Хэт халалтаас урьдчилан сэргийлэхийн тулд агааржуулалтын нүхийг цэвэр байлгах хэрэгтэй.
- Disconnect the power cable before cleaning or moving the device.
3. Багцын агуулга
Таны багц дараах зүйлсийг агуулж байгаа эсэхийг шалгана уу.
- D-Link DNS-320L Cloud Storage 2-Bay NAS Enclosure
- Эрчим хүчний адаптер
- Ethernet кабель
- Шуурхай суулгах гарын авлага
- Resource CD (may include software and full manual)
Хэрэв ямар нэг зүйл дутуу эсвэл гэмтсэн бол жижиглэнгийн худалдаачин эсвэл D-Link-ийн тусламжтай холбогдоно уу.
4. Физик хэтэрсэнview
Familiarize yourself with the ports, buttons, and indicators on your DNS-320L device.
Зураг 4.1: Урд View of D-Link DNS-320L. This image displays the front panel of the DNS-320L, typically showing LED indicators for power, network activity, and hard drive status. It may also feature a power button and a USB port for quick access.
4.1 Урд самбар
- Эрчим хүчний LED: Эрчим хүчний төлөвийг заана.
- HDD 1/2 LEDs: Indicate hard drive activity and status for each bay.
- USB порт: For connecting external USB storage devices or printers.
- Цахилгаан товч: Төхөөрөмжийг асаах/унтраах.
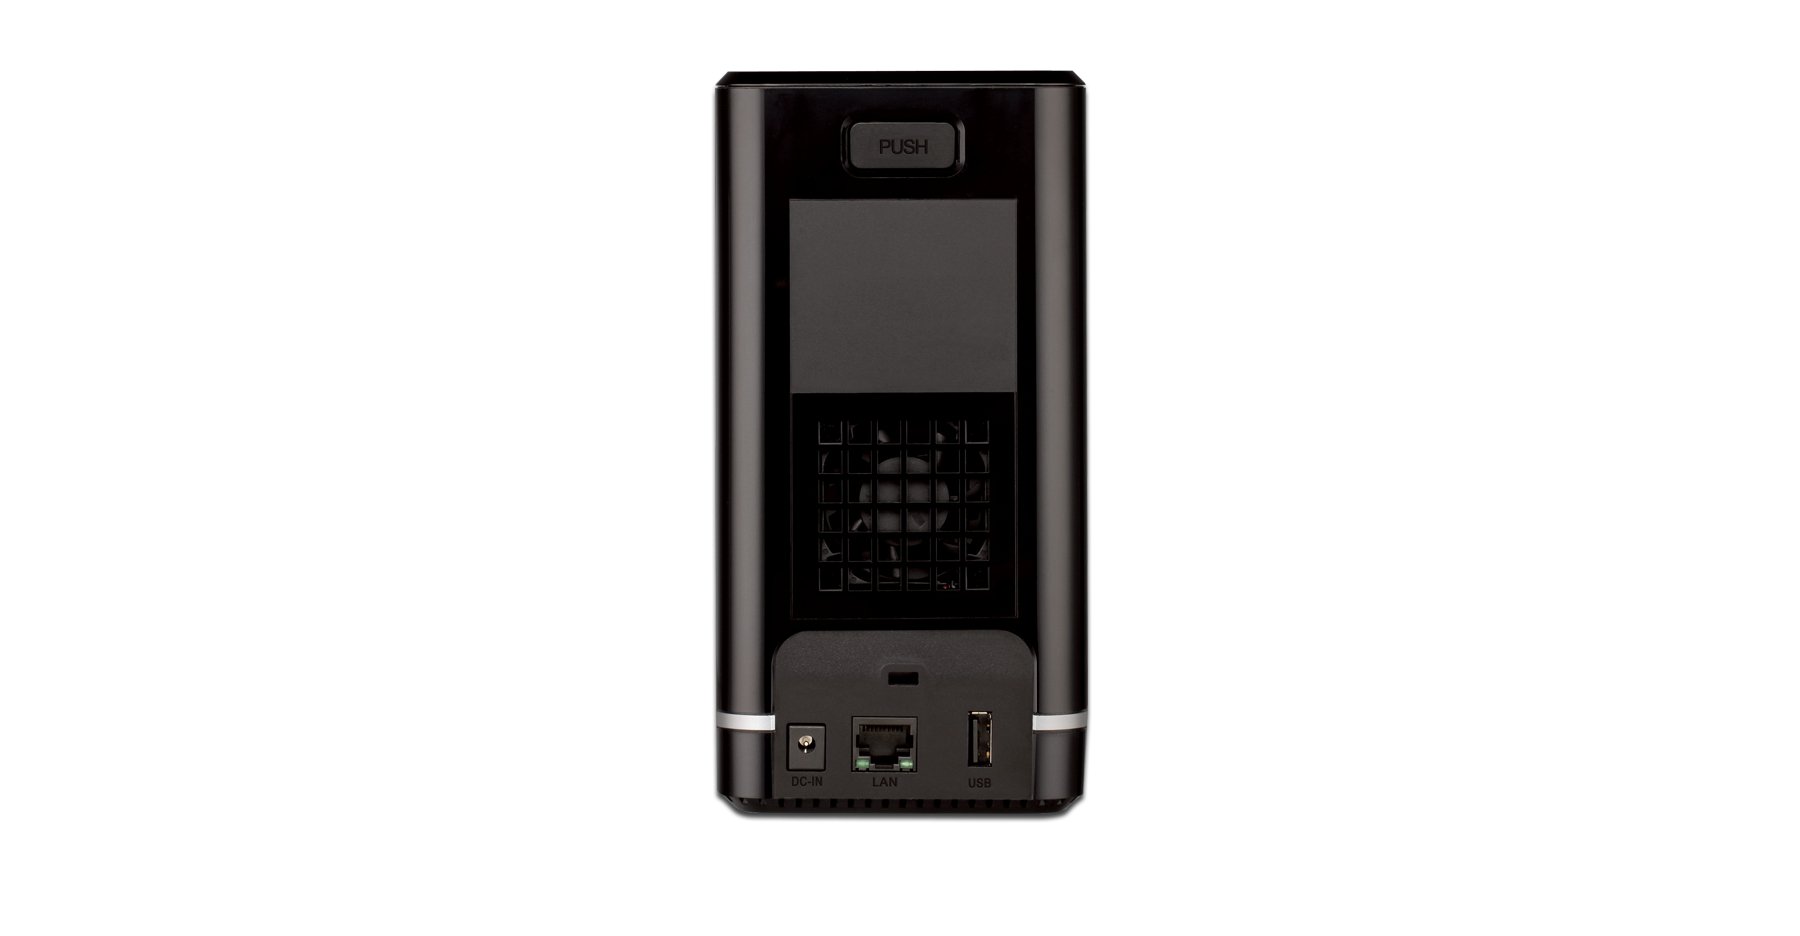
4.2 Арын самбар
- Гигабит Ethernet порт: Connects the NAS to your network router or switch.
- Цахилгаан холбогч: Цахилгаан адаптерийг холбоход зориулагдсан.
- Дахин тохируулах товч: Үйлдвэрийн өгөгдмөл тохиргоог сэргээхэд ашигладаг (цаасны хавчаар эсвэл ижил төстэй үзүүртэй объект шаардлагатай).
- Кенсингтон цоожны үүр: Бие махбодийн аюулгүй байдлын үүднээс.
5. Техник хангамж суурилуулах
This section guides you through installing hard drives and connecting the DNS-320L to your network.
5.1 Хатуу диск суурилуулах
The DNS-320L supports two 3.5-inch SATA hard drives. Ensure your drives are compatible and unformatted for initial setup.
- Ensure the DNS-320L is powered off and disconnected from the power outlet.
- Gently slide open the front cover of the NAS enclosure.
- Slide each hard drive into an available bay until it clicks into place, ensuring the SATA connectors align properly. No screws are typically required for tool-less installation.
- Урд тагийг сайтар хаа.
Figure 5.1: Hard Drive Installation. This image illustrates the process of inserting a 3.5-inch SATA hard drive into one of the bays of the DNS-320L, highlighting the tool-less design.
5.2 Connecting the NAS to Your Network
- Connect one end of the Ethernet cable to the Gigabit Ethernet port on the rear of the DNS-320L.
- Ethernet кабелийн нөгөө үзүүрийг чиглүүлэгч эсвэл сүлжээний унтраалга дээрх боломжтой LAN порт руу холбоно уу.
- Connect the power adapter to the power connector on the rear of the DNS-320L, then plug the adapter into a power outlet.
- Press the Power button on the front panel to turn on the device. The Power LED will illuminate, and the HDD LEDs will flash during startup.
6. Анхны тохиргоо
After hardware installation, you will need to configure the DNS-320L using its web- суурилсан удирдлагын интерфейс.
6.1-д хандах Web Интерфэйс
- Ensure your computer is connected to the same network as the DNS-320L.
- Нээлттэй a web хөтөч (жишээлбэл, Chrome, Firefox, Edge).
- The DNS-320L typically obtains an IP address automatically via DHCP. You can use the D-Link ShareCenter Utility (if provided on the Resource CD or D-Link website) to discover its IP address. Alternatively, try accessing
http://dlinksharecenterorhttp://dlinksharecenter.local. - Өгөгдмөл хэрэглэгчийн нэрийг оруулна уу (ихэвчлэн
admin) and leave the password blank (oradmin) to log in for the first time. You will be prompted to change the password.
6.2 Running the Setup Wizard
Upon first login, a setup wizard will guide you through essential configurations:
- Disk Volume Creation: You will be prompted to create a disk volume. Options typically include:
- Стандарт: Each drive is treated as a separate volume.
- RAID 0 (Зураг зурах): Combines drives for maximum capacity and performance, but offers no data redundancy. If one drive fails, all data is lost.
- RAID 1 (Толь тусгах): Mirrors data across both drives, providing data redundancy. If one drive fails, data is preserved on the other. Capacity is limited to the size of one drive.
- JBOD (Зүгээр л нэг багц диск): Combines drives into a single large volume sequentially. No performance or redundancy benefits.
Choose RAID 1 for data protection. RAID 0 offers speed but no protection.
- User Account Creation: Create at least one user account with administrative privileges.
- Сүлжээний тохиргоо: Confirm or adjust network settings (DHCP or static IP).
- Цагийн бүс: Зөв огноо, цагийг тохируулна уу.
7. Operating the DNS-320L
This section covers common operational tasks for your NAS.
7.1 Accessing Shared Folders
After setup, shared folders will be accessible from your network:
- Windows: Нээлттэй File Explorer, type
\DNS-320L(or its IP address) in the address bar, and press Enter. - макос: In Finder, go to Явж> Сервертэй холбогдох, төрөл
smb://DNS-320L(or its IP address), and click Connect. - Линукс: Таныг ашигла file manager's network browsing feature or mount the share using SMB/CIFS.
7.2 User and Group Management
Manage who can access your NAS and what permissions they have:
- -д нэвтэрнэ үү web interface as an administrator.
- руу шилжих Management > User Management or similar section.
- Create new users, assign passwords, and add them to groups.
- Configure folder permissions for users and groups (Read/Write, Read Only, No Access).
7.3 Cloud Access and Remote Management
The DNS-320L supports D-Link's Cloud features for remote access.
- Register your device with the D-Link Cloud service (if applicable, refer to D-Link's official documentation for specific steps).
- Use the D-Link mobile app (e.g., mydlink ShareCenter) to access files remotely from your smartphone or tablet.
- Configure port forwarding on your router if direct remote access to the web interface is desired (advanced users only, consult your router manual).
7.4 USB Device Functionality
The USB 2.0 port on the front panel can be used for:
- Гадаад санах ой: Connect USB hard drives or flash drives to expand storage or for backup purposes. These devices will appear as shared folders.
- USB Printer: Connect a compatible USB printer to share it across your network.
8. Засвар үйлчилгээ
Regular maintenance ensures the longevity and reliability of your DNS-320L.
8.1 Програм хангамжийн шинэчлэлтүүд
Periodically check for and install firmware updates from the D-Link support website. Firmware updates can provide new features, performance improvements, and security patches.
- Хамгийн сүүлийн үеийн програм хангамжийг татаж авна уу file for your DNS-320L model from the official D-Link support site.
- Log in to the NAS web interface as an administrator.
- руу шилжих Management > Firmware Upgrade or a similar section.
- Татаж авсан програм хангамжийг хайж олоорой file and initiate the upgrade process. Do not power off the device during the update.
8.2 Өгөгдлийн нөөцлөлт
While RAID 1 provides redundancy against a single drive failure, it is not a substitute for a comprehensive backup strategy. Regularly back up critical data from your NAS to an external drive or another storage location.
8.3 Цэвэрлэгээ
Keep the device clean to ensure proper airflow and prevent dust buildup.
- Цэвэрлэхийн өмнө төхөөрөмжийг унтрааж, салга.
- Зөөлөн, хуурай даавуугаар гадна талыг арчина.
- Агааржуулалтын нүхний тоосыг цэвэрлэхийн тулд шахсан агаар ашиглана.
9. Алдаа засах
This section addresses common issues you might encounter with your DNS-320L.
| Асуудал | Боломжит шийдэл |
|---|---|
| Төхөөрөмж асахгүй байна. | Цахилгаан адаптер нь төхөөрөмж болон ажиллаж байгаа цахилгаан залгуурт найдвартай холбогдсон эсэхийг шалгаарай. Залгуурыг өөр төхөөрөмжөөр шалгана уу. |
| Cannot access the NAS on the network. | Verify the Ethernet cable is properly connected. Check network settings on your computer and router. Ensure the NAS has an IP address (use the D-Link utility). Try restarting the NAS and your router. |
| Hard drive LED is red or flashing abnormally. | This may indicate a drive error or failure. Check the NAS web interface for drive status. If a drive has failed in a RAID 1 configuration, replace the faulty drive and rebuild the array. |
| Администраторын нууц үгийг мартсан байна. | Use the reset button on the rear panel to restore factory default settings. Warning: This will erase all configurations, but typically not data on the drives. You will need to reconfigure the NAS. |
| Удаан file дамжуулах хурд. | Ensure all network components (NAS, router, computer) support Gigabit Ethernet. Check for network congestion or faulty cables. |
10. Техникийн үзүүлэлтүүд
Key technical specifications for the D-Link DNS-320L:
| Онцлог | Дэлгэрэнгүй |
|---|---|
| Загварын дугаар | DNS-320L |
| Drive Bays | 2 x 3.5-inch SATA I/II/III HDD |
| RAID дэмжлэг | Standard, JBOD, RAID 0, RAID 1 |
| Сүлжээний интерфейс | 1 х Гигабит Ethernet (10/100/1000 Mbps) |
| USB портууд | 1 x USB 2.0 |
| Техник хангамжийн платформ | Mac, PC |
| Хэмжээ (LxWxH) | 3.54 x 5.68 x 7.61 инч |
| Зүйлийн жин | 1.39 pounds (without drives) |
| Өнгө | Хар |
| Материал | Металл |
| Тохиромжтой төхөөрөмжүүд | CPU, Desktop, Laptop, Server |
11. Баталгаат хугацаа ба дэмжлэг
Баталгаат мэдээллийг авахыг хүсвэл бүтээгдэхүүндээ дагалдаж буй баталгаат картаас эсвэл албан ёсны D-Link-ээс үзнэ үү website. D-Link provides technical support and resources to assist you with your DNS-320L.
- Онлайн дэмжлэг: зочилно уу www.dlink.com/support Түгээмэл асуултууд, алдааг олж засварлах гарын авлага, програм хангамжийн татан авалт, бүтээгдэхүүний баримт бичиг.
- Техникийн дэмжлэг: Contact D-Link technical support for assistance with installation, configuration, or troubleshooting issues that cannot be resolved using this manual or online resources. Contact details are available on the D-Link support webтанай бүс нутагт зориулсан сайт.


