1. Танилцуулга
This manual provides essential information for the proper setup, operation, and maintenance of your Dual DAB 2 A DAB/DAB+ Radio Adapter. Please read these instructions carefully before using the device to ensure optimal performance and safety. The Dual DAB 2 A allows you to upgrade your existing stereo system with digital radio reception (DAB/DAB+) and traditional FM radio.
2. Аюулгүй байдлын мэдээлэл
- Эрчим хүчний эх үүсвэр: Зөвхөн заасан тэжээлийн адаптерийг ашиглана уу. Боть байгаа эсэхийг баталгаажуулна ууtage нь төхөөрөмжийн шаардлагад нийцдэг.
- Ус ба чийг: Төхөөрөмжийг бороо, чийг, дусалж/цацаж буй шингэнд бүү байлга. Ваар гэх мэт шингэнээр дүүргэсэн зүйлсийг төхөөрөмж дээр бүү тавь.
- Агааржуулалт: Тохиромжтой агааржуулалтыг хангах. Агааржуулалтын нүхийг хааж болохгүй.
- Дулаан: Төхөөрөмжийг радиатор, халаалтын төхөөрөмж, зуух болон бусад төхөөрөмж (үүнд ... орно) зэрэг дулааны эх үүсвэрээс хол байлга. ampөргөгч) дулаан үүсгэдэг.
- Цэвэрлэгээ: Цэвэрлэхийн өмнө төхөөрөмжийг цахилгааны залгуураас салга. Зөөлөн, хуурай даавуу ашиглана уу. Шингэн цэвэрлэгч эсвэл аэрозоль цэвэрлэгч бүү хэрэглэ.
- Үйлчилгээ: Энэ бүтээгдэхүүнд өөрөө үйлчлэх гэж бүү оролдоорой. Бүх засвар үйлчилгээг мэргэшсэн үйлчилгээний ажилтнуудад хандаарай.
3. Багцын агуулга
Доор жагсаасан бүх зүйл таны багцад байгаа эсэхийг шалгана уу.
- Dual DAB 2 A Radio Adapter
- Эрчим хүчний адаптер
- External Antenna (wire with connector)
- Алсын удирдлага
- Хэрэглэгчийн гарын авлага (энэ баримт бичиг)
4. Бүтээгдэхүүн дууссанview
4.1 Урд самбар
The front panel features the main display and controls for operating the device.

Зураг 4.1: Урд view of the Dual DAB 2 A radio adapter. The display shows the current time (14:28) and the selected station ("Senderliste #Galaxy"). The "DAB+" logo is visible at the top left, and "Dual" is printed at the bottom center.

Зураг 4.2: Өнцөгтэй урд view of the Dual DAB 2 A, providing a clearer look at the illuminated multi-line LCD display and the device's compact design.
4.2 Арын самбар ба холболтууд
The rear panel contains all necessary connection ports for power, antenna, and audio output.

Зураг 4.3: Арын view of the Dual DAB 2 A. From left to right, the ports are: ШУУД ҮЗ (3.5mm audio jack), DC 6.0V=0.5А (power input), АНТЕНН (coaxial connector for external antenna), and ХҮЧ товч.

Зураг 4.4: Хажуу тал view of the Dual DAB 2 A, illustrating its compact and slightly curved profile.

Зураг 4.5: Өнцөг тал view showing the rear connections, including the Line Out, DC power input, and antenna port.
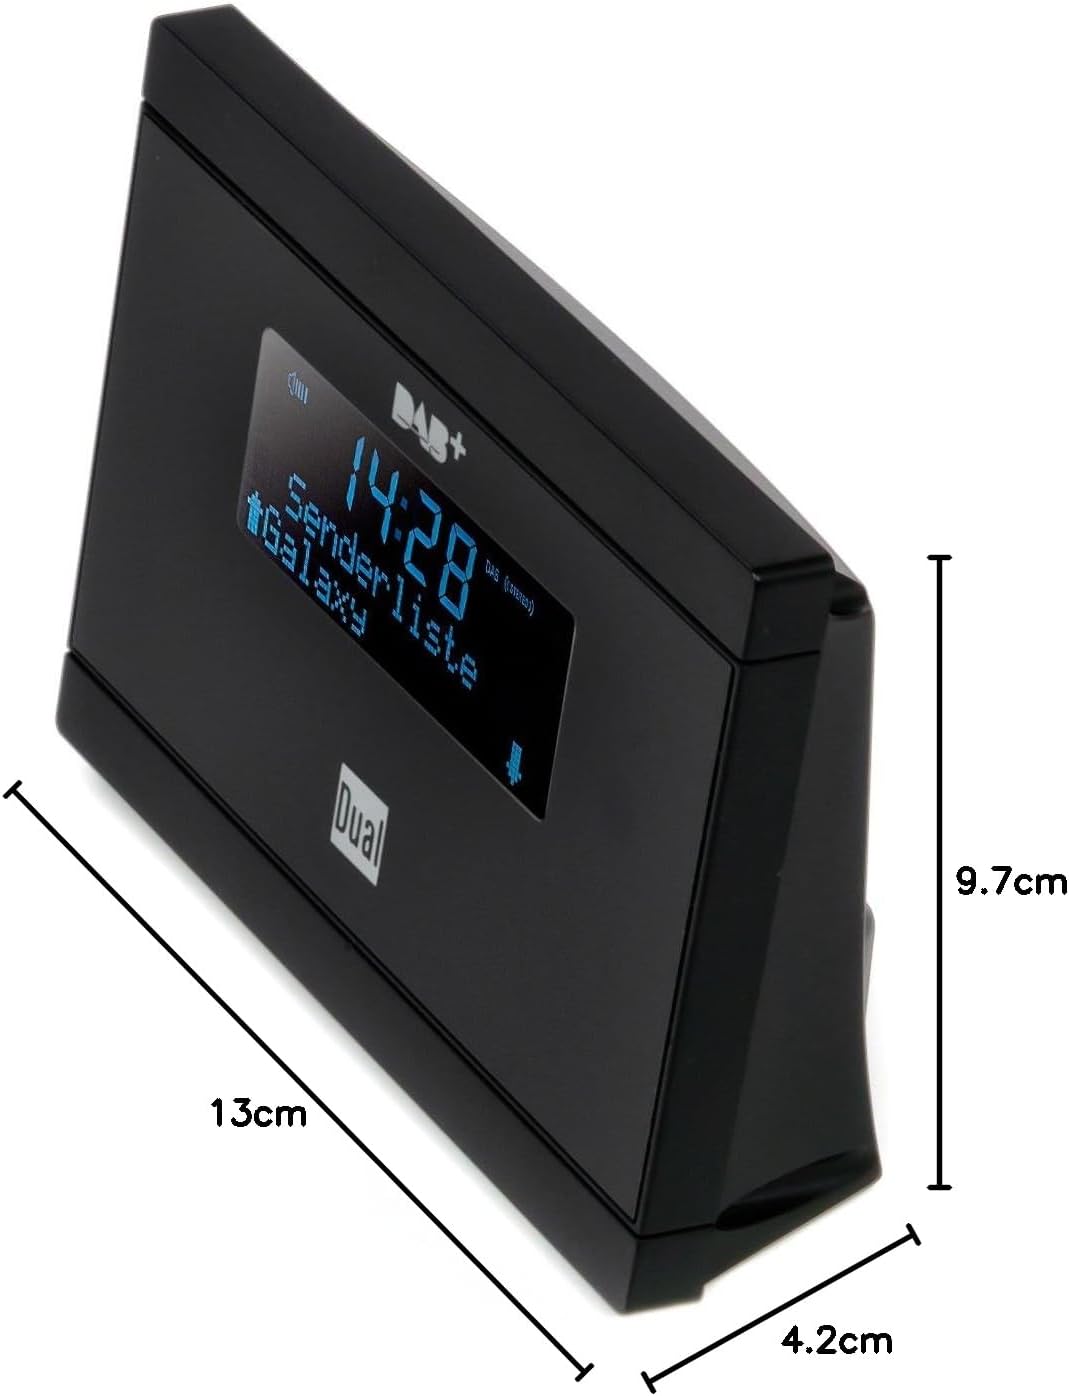
Зураг 4.6: Dimensions of the Dual DAB 2 A: 13 cm (length), 4.2 cm (width), and 9.7 cm (height).
5. Тохиргоо
5.1 Антеныг холбох
- -ийг олох АНТЕНН port on the rear of the DAB 2 A.
- Connect the supplied external wire antenna to this port.
- For optimal reception, position the antenna away from other electronic devices and metallic objects. You may also connect a commercially available external antenna for improved signal quality.
5.2 Connecting to your Stereo System
- -ийг олох ШУУД ҮЗ (3.5mm jack) on the rear of the DAB 2 A.
- Connect an audio cable (not supplied) from the ШУУД ҮЗ of the DAB 2 A to an available audio input (e.g., AUX IN, LINE IN) on your existing stereo system or audio device.
5.3 Эрчим хүчний холболт
- Өгөгдсөн цахилгаан адаптерийг холбоно уу DC 6.0V=0.5А port on the rear of the DAB 2 A.
- Цахилгаан адаптерийг тохирох ханын залгуурт холбоно уу.
6. Ашиглалтын заавар
6.1 Асаах/унтраах
дээр дарна уу ХҮЧ button on the rear of the device or on the remote control to turn the unit on or off.
6.2 Initial Scan (DAB/DAB+)
Upon first power-on, the device will automatically perform a scan for available DAB/DAB+ stations. This process may take a few minutes. Once complete, the first available station will begin playing.
6.3 Switching Between DAB/DAB+ and FM
-г ашиглана уу MODE button on the remote control or the device (if available) to switch between DAB/DAB+ and FM radio modes.
6.4 Tuning and Station Selection
- DAB/DAB+: -г ашиглана уу ДЭЭШ/ДООШ arrow buttons on the remote control or device to navigate through the list of available digital stations.
- FM: FM горимд, ашиглана уу ДЭЭШ/ДООШ arrow buttons to manually tune frequencies or initiate an automatic scan for the next available station.
6.5 Storing and Recalling Presets
The DAB 2 A allows you to store up to 20 favorite stations (DAB/DAB+ and FM combined).
- Хадгалах: Хүссэн станц руугаа тохируулна уу. Товчийг удаан дарна уу УРЬДЧИЛСАН button (or similar, refer to remote control layout) until the display shows a preset number. Use the arrow buttons to select a preset number (1-20) and confirm.
- Дахин сануулах: дээр дарна уу УРЬДЧИЛСАН button briefly, then use the arrow buttons to select the desired preset station.
6.6 Цаг, сэрүүлэг болон унтах функцууд
The device features a clock, alarm, and sleep timer. Refer to the detailed instructions in the full manual for setting these functions. The alarm can be set to wake you with DAB, FM, or a buzzer sound.
7. Засвар үйлчилгээ
- Цэвэрлэгээ: Always unplug the device before cleaning. Use a soft, dry, lint-free cloth to wipe the surfaces. Do not use abrasive cleaners, waxes, or solvents.
- Хадгалах: If not in use for an extended period, unplug the device and store it in a cool, dry place.
8. Алдаа засах
| Асуудал | Боломжит шалтгаан | Шийдэл |
|---|---|---|
| Хүч чадалгүй | Цахилгаан адаптер холбогдоогүй эсвэл залгуур буруу байна. | Цахилгаан адаптер нь төхөөрөмж болон ажиллаж байгаа цахилгааны залгуурт найдвартай холбогдсон эсэхийг шалгаарай. |
| Дуу алга | Audio cable not connected, incorrect input selected on stereo, or volume too low. | Check audio cable connection. Select the correct input on your stereo system. Increase volume on both the DAB 2 A and your stereo. |
| Poor DAB/DAB+ reception or no stations found | Weak signal, antenna not properly connected or positioned. | Ensure the antenna is securely connected and positioned for optimal reception. Try repositioning the antenna. Consider using a higher-gain external antenna. Perform a full scan for stations. |
| FM хүлээн авах чадвар муу байна | Weak signal, antenna not properly connected or positioned. | Extend and reposition the wire antenna. Try a different antenna if available. |
| Алсын удирдлага ажиллахгүй байна | Batteries are dead or incorrectly inserted, or line of sight is blocked. | Replace batteries with new ones, ensuring correct polarity. Remove any obstructions between the remote and the device. |
9. Техникийн үзүүлэлтүүд
| Онцлог | Дэлгэрэнгүй |
|---|---|
| Брэнд | Давхар |
| Загварын дугаар | DAB 2 A |
| Өнгө | Хар |
| Холболтын технологи | Auxiliary (3.5mm Line Out) |
| Онцлог шинж чанарууд | DAB/DAB+ Radio, FM Tuner, Clock, Alarm, Sleep Function |
| Тохиромжтой төхөөрөмжүүд | Devices with 3.5 mm audio connector |
| Бүтээгдэхүүний хэмжээ (L x W x H) | 13 см х 4.2 см х 9.7 см |
| Тааруулах технологи | FM, DAB, DAB+ |
| Эрчим хүчний эх үүсвэр | Electric Cable (DC 6.0V=0.5A) |
| Дэмжигдсэн радио хамтлагууд | FM, DAB, DAB+ |
| Зүйлийн жин | 200 грамм |
10. Баталгаат хугацаа ба дэмжлэг
For warranty information and technical support, please refer to the documentation provided with your purchase or contact Dual customer service. Keep your proof of purchase for any warranty claims.