1. Танилцуулга
This manual provides detailed instructions for the installation, operation, and maintenance of your Advance Darkside 8303B30 Micro ATX PC Case. Please read this manual thoroughly before beginning installation to ensure proper setup and to maximize the performance and longevity of your system components.
The Advance Darkside ATX Mid-Tower PC case features a top panel with a 2.5/3.5 inch SATA HDD docking station, 2 USB 3.0 ports, and 1 USB 2.0 port. It is designed to accommodate Micro ATX motherboards and offers efficient cooling solutions.
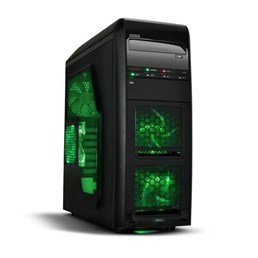
Зураг 1: Урд view of the Advance Darkside 8303B30 PC Case, showcasing its design and front panel features.
2. Бүтээгдэхүүний онцлог
- Загвар: Advance Darkside 8303B30
- Явах эд ангийн материал: SGCC Steel
- Өнгө: Black (interior and exterior)
- Эх хавтангийн нийцтэй байдал: Микро ATX
- Урд самбарын холболт: 2 x USB 3.0, 1 x USB 2.0, Audio Jacks
- Хадгалах онцлог: Top panel 2.5/3.5 inch SATA HDD docking station
- Хөргөх систем: Five 120mm fans included (two LED fans at the front, one LED fan on the side, one fan at the rear, and one fan at the top). Water cooling ready.
- График картын дэмжлэг: Designed for King Size graphics cards
- Хажуугийн самбар: Plexiglass window
3. Тохируулах заавар
3.1. Кейс бэлтгэх
- Unpack the PC case carefully and remove all packaging materials.
- Хэргийг тогтвортой, тэгш гадаргуу дээр тавь.
- Хайрцагны ар талд байгаа эрхий хурууны боолтыг тайлж, хавтангуудыг арагш гулсуулж хажуугийн хавтангуудыг салга.
3.2. Цахилгаан хангамжийн суурилуулалт
- Locate the power supply mounting area at the rear bottom of the case.
- Secure the power supply unit (PSU) using the provided screws. Ensure the PSU fan faces the bottom or top, depending on your PSU and case design for optimal airflow.
3.3. Эх хавтанг суурилуулах
- Install the I/O shield into the cutout at the rear of the case.
- Align the motherboard with the standoffs inside the case. Ensure all standoffs match the motherboard's screw holes.
- Эх хавтанг тохирох боолтоор бэхлэнэ үү.
3.4. Хадгалах диск суурилуулах
- For 3.5-inch HDDs, slide the drive into the drive bay trays. The trays are designed to flex slightly to accommodate the drive without screws in some configurations.
- For 2.5-inch SSDs/HDDs, secure them to the designated mounting points or use adapters if necessary.
- Utilize the top panel SATA docking station for quick access to 2.5/3.5 inch SATA drives. Simply insert the drive into the slot until it clicks into place.
3.5. График карт болон өргөтгөлийн картын суурилуулалт
- Хайрцагны ар талд шаардлагатай тэлэлтийн үүрний тагийг ав.
- Insert the graphics card or other expansion cards into the appropriate PCIe slots on the motherboard.
- Secure the cards with screws or retention clips.
3.6. Кабелийн менежмент
Route all cables (power, SATA, front panel connectors) through the designated cutouts and tie-down points behind the motherboard tray to ensure clean airflow and an organized interior.
4. Ашиглалтын заавар
4.1. Системээ асаах
- Ensure all components are correctly installed and cables are securely connected.
- Цахилгааны кабелийг цахилгаан тэжээлийн хэсэг болон ханын залгуурт холбоно уу.
- Кейсийн урд самбар дээр байрлах цахилгаан товчийг дарна уу.
4.2. Using Front Panel Ports
- USB 3.0/2.0 портууд: Connect USB devices such as keyboards, mice, external drives, or flash drives.
- Аудио залгуурууд: Connect headphones, microphones, or speakers.
- HDD Docking Station: Insert a 2.5-inch or 3.5-inch SATA HDD/SSD into the top docking slot for quick data access. Ensure the drive is properly seated.
5. Засвар үйлчилгээ
5.1. Хайрцгийг цэвэрлэх
- Гэрийн гадна талыг зөөлөн, d аргаар тогтмол цэвэрлэж байгаарайamp даавуу. Зүлгүүрийн цэвэрлэгчээс зайлсхий.
- Use compressed air to remove dust from fan filters and internal components.
5.2. Сэнсний засвар үйлчилгээ
- Periodically check the case fans for dust buildup. Clean them gently with compressed air or a soft brush.
- Ensure no cables are obstructing fan blades.
6. Алдаа засах
6.1. Систем асахгүй байна
- Цахилгааны кабель нь цахилгаан тэжээлийн хэсэг болон ханын залгуурт найдвартай холбогдсон эсэхийг шалгана уу.
- PSU унтраалга 'ON' байрлалд байгаа эсэхийг шалгаарай.
- Урд талын самбарын цахилгаан товчлуурын кабель эх хавтантай зөв холбогдсон эсэхийг шалгана уу.
6.2. Хэт халалтын асуудлууд
- Ensure all case fans are spinning correctly and are not obstructed.
- Check for excessive dust buildup on fans and heatsinks.
- Verify proper cable management to allow for unobstructed airflow.
6.3. Урд талын самбарын USB/Аудио ажиллахгүй байна
- Confirm that the front panel USB and audio cables are correctly connected to the corresponding headers on the motherboard.
- Check motherboard drivers for USB and audio.
7. Техникийн үзүүлэлтүүд
| Онцлог | Дэлгэрэнгүй |
|---|---|
| Брэнд | Урьдчилгаа |
| Загварын дугаар | 8303В30 |
| Өнгө | Хар |
| Явах эд ангийн материал | Alloy Steel (SGCC Steel) |
| Эх хавтангийн нийцтэй байдал | Микро ATX |
| Хэмжээ (L x W x H) | 48 x 19.5 x 48.2 см |
| Бүтээгдэхүүний жин | 5.8 кг |
| Урд самбарын портууд | 2 x USB 3.0, 1 x USB 2.0, Audio Jacks |
| Хадгалах цэг | Top panel 2.5/3.5 inch SATA HDD docking station |
| Фэнүүд багтсан | 5 x 120mm (2 front LED, 1 side LED, 1 rear, 1 top) |
| Хөргөлтийн дэмжлэг | Water cooling ready |
| Хажуугийн самбар | Plexiglass |
| Зөвлөмж болгож буй хэрэглээ | Тоглоом |
8. Баталгаат хугацаа ба дэмжлэг
8.1. Үйлдвэрлэгчийн баталгаа
This product comes with a manufacturer's warranty of 1 year from the date of purchase. Please retain your proof of purchase for warranty claims. The warranty covers defects in materials and workmanship under normal use.
8.2. Хэрэглэгчийн дэмжлэг
For technical assistance, troubleshooting, or warranty inquiries, please contact Advance customer support. Refer to the official Advance webхамгийн сүүлийн үеийн холбоо барих мэдээлэл, тусламжийн эх сурвалжийг авах сайт.


