1. Танилцуулга
This manual provides essential information for the safe and efficient use of your Hitachi CP-EX251N XGA 3LCD Projector. Please read this manual thoroughly before operating the projector and keep it for future reference. The CP-EX251N is designed for clear, bright projections with 2700 lumens brightness and XGA (1024x768) native resolution, featuring 3LCD technology and a long-life lamp.
2. Аюулгүй байдлын мэдээлэл
Гал түймэр, цахилгаан цочрол, гэмтэл бэртлээс урьдчилан сэргийлэхийн тулд дараах аюулгүй байдлын арга хэмжээг дагаж мөрдөнө үү.
- Эрчим хүчний эх үүсвэр: Use only the power supply specified for this unit. Ensure the power cord is securely plugged into an outlet.
- Агааржуулалт: Агааржуулалтын нүхийг хааж болохгүй. Хэт халалтаас урьдчилан сэргийлэхийн тулд проекторын эргэн тойронд зохих агаарын урсгалыг хангах хангалттай зайг ханга.
- Дулаан: Проектор лamp becomes very hot during operation. Allow the projector to cool down before handling or performing maintenance.
- Lamp: l байх үед проекторын линз рүү шууд харж болохгүйamp тод гэрэл таны нүдийг гэмтээж болзошгүй тул асаалттай байна.
- Чийг: Гал болон цахилгаан цочролоос сэргийлэхийн тулд проекторыг бороо, чийгэнд бүү тавь.
- Үйлчилгээ: Бүх засвар үйлчилгээг мэргэшсэн үйлчилгээний ажилтнуудад даатга. Проекторыг өөрөө нээх эсвэл засах гэж бүү оролд.
3. Багцын агуулга
Бүх зүйл багцад байгаа эсэхийг шалгана уу:
- Hitachi CP-EX251N Projector
- Цахилгааны утас
- Батерейтай алсын удирдлага
- VGA кабель
- Хэрэглэгчийн гарын авлага (энэ баримт бичиг)
4. Бүтээгдэхүүн дууссанview

Зураг 4.1: Өнцөг view of the Hitachi CP-EX251N Projector, showing the lens, control panel, and ventilation.
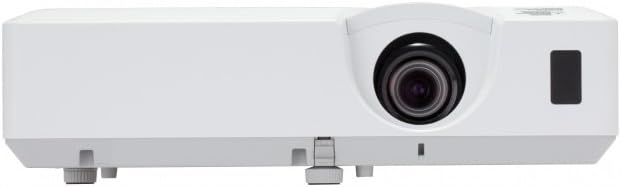
Зураг 4.2: Урд view of the Hitachi CP-EX251N Projector, highlighting the projection lens and front IR receiver.
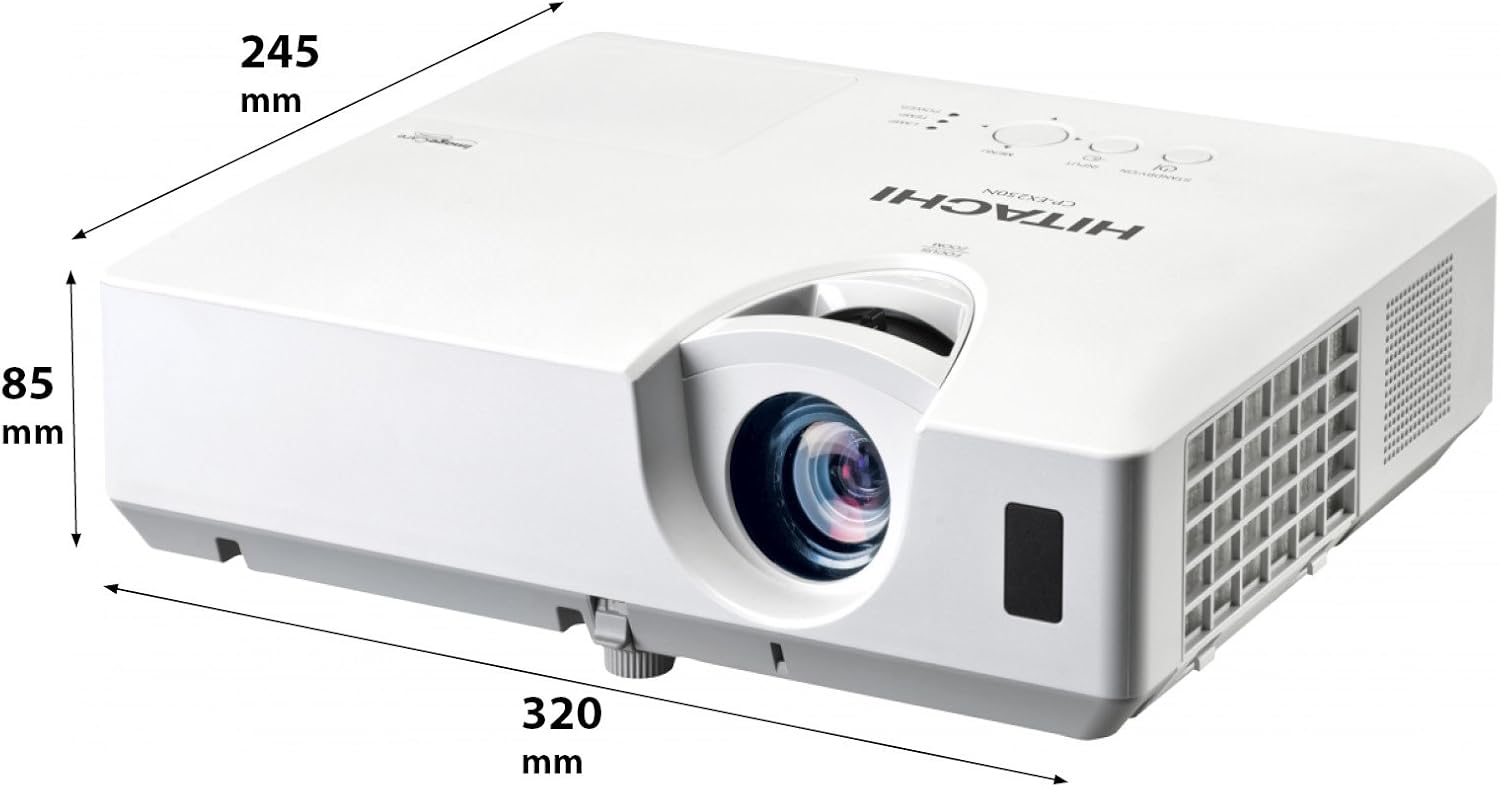
Зураг 4.3: Өнцөг view of the projector illustrating its approximate dimensions (320mm length, 245mm width, 85mm height).
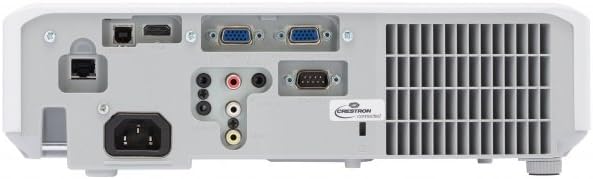
Figure 4.4: Rear panel of the projector, showing various input and output ports including HDMI, VGA, Composite, RS232C, and RJ45.
5. Тохиргоо
5.1 Байршил
Position the projector on a stable, flat surface or mount it securely. Ensure the projector is at an appropriate distance from the screen to achieve the desired image size. Maintain clear space around the projector for ventilation.
5.2 Цахилгааныг холбох
- Цахилгааны утсыг проекторын AC оролттой холбоно уу.
- Цахилгааны утасны нөгөө үзүүрийг газардуулсан цахилгааны залгуурт холбоно.
5.3 Оролтын эх үүсвэрүүдийг холбох
The CP-EX251N offers multiple connectivity options:
- HDMI: Connect an HDMI cable from your source device (e.g., laptop, Blu-ray player) to the projector's HDMI port.
- VGA: Connect a VGA cable from your computer to one of the projector's VGA ports (VGA1 or VGA2).
- Нийлмэл видео: Use an RCA composite video cable to connect devices like DVD players to the composite video input.
- Аудио: Connect audio cables to the corresponding audio input jacks if using analog video sources.
- Хяналт: For remote control and monitoring, connect an RS232C serial cable or an RJ45 Ethernet cable to a control system.
5.4 Анх асаах болон дүрсний тохируулга
- Press the Power button on the projector or remote control. The power indicator will light up.
- -ийг тохируулна уу Фокус цагираг on the lens until the image is sharp.
- -ийг тохируулна уу Томруулах бөгж on the lens to achieve the desired image size.
- Хэрэв зураг нь трапец хэлбэртэй харагдаж байвал үүнийг ашиглана уу Тулгуур чулууг засах function (usually found in the projector menu or via dedicated buttons on the remote) to square the image.
6. Ажиллаж байгаа
6.1 Асаах/унтраах
- Асаахын тулд: Цахилгаан товчийг нэг удаа дарна уу.
- Унтраахын тулд: Press the Power button twice. The projector will enter a cooling cycle before shutting down completely. Do not unplug the projector during the cooling cycle.
6.2 Оролтын сонголт
Press the 'Input' or 'Source' button on the remote control or projector control panel to cycle through available input sources (HDMI, VGA1, VGA2, Composite).
6.3 Цэсийн навигаци
Use the 'Menu' button to access the on-screen display (OSD) menu. Navigate using the arrow buttons and confirm selections with the 'Enter' button. The menu allows adjustment of picture settings, audio, display options, and system settings.
6.4 Зургийн тохируулга
Within the OSD menu, you can adjust:
- Гэрэлтүүлэг: Зургийн ерөнхий цайвар эсвэл бараан өнгийг тохируулна уу.
- Эсрэг заалт: Adjust the difference between the light and dark areas of the image.
- Өнгөний горим: Select from various preset modes (e.g., Standard, Dynamic, Cinema, sRGB) or customize settings.
- Харьцаа: Change the display ratio (e.g., 4:3, 16:9).
6.5 Эко горим
Activate Eco Mode to reduce lamp brightness, conserve energy, and extend lamp life up to 10,000 hours. This setting can be found in the projector's OSD menu.
7. Засвар үйлчилгээ
7.1 Линзийг цэвэрлэх
Проекторын линзийг оптик гадаргууд зориулсан зөөлөн, хөвөнгүй даавуугаар зөөлөн арчина. Зүлгүүрийн цэвэрлэгч эсвэл хэт их хүч хэрэглэж болохгүй.
7.2 Агаар шүүгчийг цэвэрлэх
Regularly clean the air filter to maintain optimal performance and prevent overheating. Refer to the projector's OSD menu for filter usage time. Remove the filter cover and gently clean the filter with a soft brush or vacuum cleaner. Replace the filter if it is damaged or excessively dirty.
7.3 лamp Солих
Проектор лamp has a long lifespan, but will eventually require replacement. When the lamp indicator lights up or the image becomes dim, replace the lamp. Always use a genuine Hitachi replacement lamp. Allow the projector to cool completely before attempting lamp replacement. Consult the full service manual for detailed lamp солих заавар.
7.4 Хадгалалт
When storing the projector for an extended period, ensure it is powered off and cooled down. Store it in a cool, dry place, away from direct sunlight and extreme temperatures.
8. Алдаа засах
| Асуудал | Боломжит шалтгаан | Шийдэл |
|---|---|---|
| Хүч чадалгүй | Power cord disconnected; Power outlet faulty; Projector in standby mode. | Check power cord connection; Try a different outlet; Press the Power button. |
| Зураг харагдахгүй байна | Input source not selected; Cable not connected properly; Source device not outputting signal. | Select correct input source; Reconnect video cable; Check source device settings. |
| Image distorted or blurry | Focus/Zoom not adjusted; Keystone not corrected; Projector not perpendicular to screen. | Adjust Focus and Zoom rings; Use Keystone correction; Reposition projector. |
| Дуу алга | Audio cable not connected; Volume too low; Mute function active. | Connect audio cable (if applicable); Increase volume; Deactivate mute. |
| Алсын удирдлага ажиллахгүй байна | Batteries depleted; Obstruction between remote and projector; Remote sensor blocked. | Replace batteries; Remove obstructions; Ensure clear line of sight to IR sensor. |
9. Техникийн үзүүлэлтүүд
| Онцлог | Тодорхойлолт |
|---|---|
| Загварын дугаар | CP-EX251N |
| Дэлгэцийн технологи | 3LCD |
| Гэрэлтүүлэг | 2700 люмен |
| Төрөлхийн тогтоол | XGA (1024 x 768) |
| Lamp Амьдрал | Up to 10,000 hours (in Eco Mode) |
| Холболт | HDMI x 1, VGA x 2, Component (Shared) x 2, Composite x 1, RS232C, RJ45 |
| Аудио гаралт | 16W спикер |
| Зүйлийн жин | 6.83 фунт (ойролцоогоор 3.1 кг) |
| Бүтээгдэхүүний хэмжээс | 6 x 12 x 14 инч (ойролцоогоор 15.2 x 30.5 x 35.6 см) |
| Зөвлөмж болгож буй хэрэглээ | Бизнес, Боловсрол, Тоглоом, Гэрийн кино театр |
| Онцлог шинж чанар | Зөөврийн |
10. Баталгаат хугацаа ба дэмжлэг
Баталгаат мэдээллийг авахыг хүсвэл бүтээгдэхүүндээ дагалдсан баталгаат картаас эсвэл албан ёсны Hitachi-д зочилно уу website. For technical support, service, or inquiries about replacement parts, please contact Hitachi customer service through their official channels.
Онлайн дэмжлэг: www.hitachi.com/support (Жишээ ньample link, please refer to actual product documentation for correct URL)


