Танилцуулга
This manual provides essential instructions for the setup, operation, and maintenance of your Gigaset Handset and Charging Station. This product is compatible with various Gigaset phone systems, including models S2, S44, S200, S440, S445, S645, SX440, and SX445. Please read this manual carefully to ensure proper use and to maximize the lifespan of your device.
1. Тохиргоо
1.1 Сав баглаа боодол, анхны үзлэг
Carefully unpack all components. Ensure that the handset, charging station, and power adapter are present and undamaged. If any items are missing or damaged, contact your retailer.
1.2 Connecting the Charging Station
- Connect the power adapter cable to the charging station.
- Цахилгаан адаптерийг ердийн цахилгаан залгуурт холбоно уу.
- Place the charging station on a flat, stable surface, away from heat sources and direct sunlight.

Зураг 1.1: Дээд талд view of the Gigaset charging station. This image shows the compact design of the charging station, ready to receive the handset.
1.3 Inserting the Battery and Charging the Handset
- Гар утасны арын хэсэгт байрлах зайны тасалгааны тагийг нээнэ үү.
- Цэнэглэдэг батерейг зөв туйлшралыг хангана.
- Зайны тасалгааны тагийг хаа.
- Place the handset into the charging station. Ensure it is seated correctly and the charging indicator (if present) illuminates.
- Батерейг бүрэн хүчин чадлаар нь хангахын тулд анх ашиглахаасаа өмнө утсаа дор хаяж 6-8 цаг цэнэглээрэй.
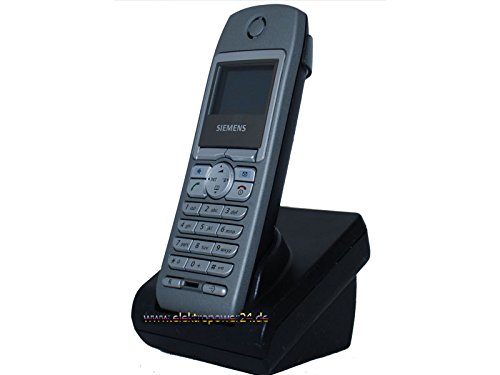
Зураг 1.2: Урд view of the Gigaset handset securely placed in its charging station. The display shows "Wahlvorbereitung" (dialing preparation) and a phone number, indicating it's powered on and ready.
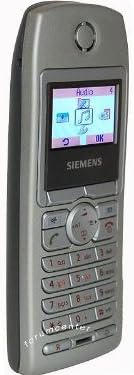
Зураг 1.3: Хажуу тал view of the Gigaset handset, highlighting its ergonomic design and button layout. The display shows menu options like "Audio" and "OK".

Зураг 1.4: Буцах view of the Gigaset handset, showing the smooth casing and the location of the battery compartment cover.
1.4 Registering the Handset to a Base Station
This handset is designed to be compatible with various Gigaset base stations. The registration process may vary slightly depending on your specific base station model. Refer to your base station's manual for detailed instructions. Generally, the steps involve:
- Activate registration mode on your Gigaset base station (usually by pressing and holding a registration button).
- On the handset, navigate to the "Settings" or "Registration" menu.
- Select "Register Handset" and follow the on-screen prompts. You may need to enter a PIN (default is usually 0000).
- Once registered, the handset display will confirm successful connection to the base station.
2. Ашиглалтын заавар
2.1 Үндсэн функцууд
- Дуудлага хийх: Enter the phone number and press the green call key.
- Дуудлагад хариулах: Press the green call key when the phone rings.
- Дуудлага дуусгах: Press the red end call key.
- Гар чөлөөтэй дуудлага: During a call, press the dedicated hands-free key (often backlit) to activate the speakerphone.
2.2 Утасны дэвтэр (Лавлах)
The handset features a directory capable of storing up to 200 phone numbers and names.
- Бичлэг нэмэх: Navigate to the "Directory" or "Phonebook" menu, select "New Entry," and enter the name and number.
- Calling from Directory: Open the directory, scroll to the desired entry, and press the green call key.
2.3 Дэлгэц ба үзүүлэлтүүд
The handset features a 5-line illuminated graphic display. Key indicators include:
- Огноо/Цаг харуулах: Always visible on the idle screen.
- CLIP Function (Call Display): Shows the caller's number or name (if stored in the directory) for incoming calls.
- Зайны үзүүлэлт: Батерейны одоогийн цэнэгийн түвшинг харуулна.
- Дохионы хүч чадлын үзүүлэлт: Displays the connection quality to the base station.
3. Засвар үйлчилгээ
3.1 Цэвэрлэгээ
- Wipe the handset and charging station with a soft, damp даавуу.
- Зүлгүүрийн цэвэрлэгч, уусгагчийг бүү ашигла.
- Төхөөрөмжийн нүхэнд шингэн орохгүй байхыг баталгаажуул.
3.2 Батерейны арчилгаа
- Always use the original or approved replacement rechargeable batteries.
- Батерейг хэт өндөр температурт байлгахаас зайлсхий.
- Хэрэв гар утсыг удаан хугацаагаар ашиглахгүй бол батерейг нь салга.
4. Алдаа засах
| Асуудал | Боломжит шалтгаан | Шийдэл |
|---|---|---|
| Handset does not turn on. | Батерейг зөв оруулаагүй эсвэл цэнэггүй болсон. | Check battery insertion. Place handset in charging station for several hours. |
| Залгах аялгуу алга. | Handset not registered to base station or out of range. | Ensure handset is registered. Move closer to the base station. Check base station power. |
| Дуудлагын чанар муу. | Interference or handset too far from base station. | Move away from other electronic devices. Move closer to the base station. |
| Дуудлага хийх эсвэл хүлээн авах боломжгүй. | Line issue or base station problem. | Check your telephone line connection. Restart the base station by unplugging and replugging its power. |
5. Техникийн үзүүлэлтүүд
- Брэнд: Гигасет
- Тохиромжтой загварууд: Gigaset S2, S44, S200, S440, S445, S645, SX440, SX445
- Утасны дэвтрийн багтаамж: Up to 200 entries (names and numbers)
- Дэлгэц: 5-line illuminated graphic display
- Онцлогууд: Backlit hands-free key, Date/Time display, CLIP function (Call Display)
- Үйлдвэрлэгч: Гигасет
- ASIN: B0102FULTW
Note: Information regarding spare parts availability and guaranteed software updates is not provided. This product is currently not listed as discontinued by the manufacturer.
6. Баталгаат хугацаа ба дэмжлэг
Specific warranty details for this Gigaset Handset and Charging Station are not provided within the available product information. For warranty claims, technical support, or service inquiries, please refer to the documentation included with your original purchase or visit the official Gigaset webтанай бүс нутагт зориулсан сайт.
You may also contact your retailer for assistance.


