1. Танилцуулга
This manual provides detailed instructions for the safe and effective operation of the Extech EX355 True RMS Multimeter. The EX355 is a professional digital multimeter designed for a wide range of electrical measurements, including AC/DC voltage, current, resistance, capacitance, frequency, duty cycle, and temperature. It features True RMS for accurate readings of non-sinusoidal waveforms, Non-Contact Voltage (NCV) detection for enhanced safety, Low Impedance (LoZ) mode to prevent ghost voltage readings, and a Low Pass Filter (LPF) for noise reduction in electrical environments.
Please read this manual thoroughly before using the device to ensure proper function and to prevent potential hazards.
2. Аюулгүй байдлын мэдээлэл
Always adhere to the following safety precautions to avoid personal injury or damage to the multimeter:
- Бүх зааврыг уншина уу: Familiarize yourself with the operation and safety features before use.
- Observe all warnings: Pay close attention to all warnings and cautions marked on the meter and in this manual.
- Use proper range: Always select the correct function and range for your measurement.
- Inspect test leads: Before each use, check test leads for damaged insulation or exposed metal. Replace if damaged.
- Do not exceed maximum input limits: Хэзээ ч бүү хэрэглээрэйtage or current that exceeds the specified maximum limits for the meter.
- Avoid live circuits: Do not measure resistance, continuity, or diode on live circuits.
- Өндөр дуугаар болгоомжтой хэрэглээрэйtages: Be extremely careful when working with voltag60V DC эсвэл 30V AC RMS-ээс дээш хүчдэлтэй байдаг тул эдгээр нь цахилгаан цочролын аюул учруулдаг.
- Do not operate if damaged: If the meter appears damaged or is not operating properly, discontinue use immediately.
- Зай солих: Replace batteries as soon as the low battery indicator appears to ensure accurate readings.
- CAT III 600V: This meter is designed for measurements in CAT III 600V environments.
3. Бүтээгдэхүүн дууссанview
The Extech EX355 is a versatile True RMS Multimeter equipped with several advanced features for accurate and safe electrical testing.
Гол онцлогууд:
- 12 Measurement Functions: Includes AC/DC voltage, гүйдэл, эсэргүүцэл, багтаамж, давтамж, ажлын мөчлөг болон температур.
- True RMS Accuracy: Ensures precise readings for both standard and distorted electrical waveforms.
- Холбоо барихгүй ботьtage (NCV) илрүүлэх: Allows for quick and safe detection of AC voltage шууд холбоогүй.
- Бага импеданс (LoZ) горим: Prevents false readings caused by ghost voltagхэлхээнд байна.
- Бага нэвтрүүлэх шүүлтүүр (LPF): Reduces high-frequency noise for stable and accurate measurements in noisy environments.
- Дэлгэц: 4000 count LCD display with backlight.
- Data Hold, Min/Max, Relative Mode: For capturing and analyzing measurements.
- Автомат унтрах: Зайны ашиглалтын хугацааг хэмнэдэг.
- Continuity and Diode Test: Essential for circuit diagnostics.

Figure 1: The Extech EX355 True RMS Multimeter. This image shows the front view of the multimeter, highlighting its display, rotary dial, function buttons, and input jacks.
4. Тохиргоо
4.1 Батерей суурилуулах
The Extech EX355 requires two (2) AA batteries for operation. These are typically included with the device.
- Мультиметр унтарсан эсэхийг шалгаарай.
- Төхөөрөмжийн ар талд байрлах батерейны тасалгааны тагийг олоорой.
- Unscrew the retaining screw(s) and carefully remove the cover.
- Insert two AA batteries, observing the correct polarity (+ and -) as indicated inside the compartment.
- Зайны тасалгааны тагийг сольж, боолтоор нь бэхлээрэй.
Жич: Replace batteries immediately when the low battery indicator appears on the display to maintain measurement accuracy.
4.2 Туршилтын утсыг холбох
Always connect the test leads correctly for the desired measurement function.
- Ихэнх ботьtage, resistance, continuity, diode, capacitance, and frequency measurements, insert the red test lead into the VΩHzCAP Жек болон хар туршилтын хөтлөгч рүү COM Жак.
- For current measurements up to 10A, insert the red test lead into the 10 А Жек болон хар туршилтын хөтлөгч рүү COM Жак.
- 400мА хүртэлх гүйдлийн хэмжилтийн хувьд улаан туршилтын утсыг залгуурт оруулна уу мАмА Жек болон хар туршилтын хөтлөгч рүү COM Жак.
- Ensure test leads are fully inserted into the jacks.
5. Ашиглалтын заавар
This section details how to perform various measurements using the Extech EX355 multimeter.
5.1 AC/DC Voltage Хэмжилт
- Эргэдэг товчлуурыг тохируулна уу V~ (AC Volttage) эсвэл V- (DC ботьtagд) байрлал.
- Туршилтын улаан утсыг залгуур руу холбоно уу VΩHzCAP Жэк болон Блэк нар туршилтын хөтлөгч рүү хөтөлдөг COM Жак.
- Туршилтын датчикуудыг хэлхээний цэгүүдэд хүрнэ үү, тэнд вольт байнаtage хэмжинэ.
- боть уншина ууtagДэлгэц дээрх e утга.
5.2 AC/DC гүйдлийн хэмжилт
Анхааруулга: Мультиметрийг хэзээ ч вольтметртэй зэрэгцээ холбож болохгүйtagГүйдлийг хэмжих үед эх үүсвэрийг e. Ачаалалтай үргэлж цуваа холбоно.
- Set the rotary dial to the appropriate A~ (Хувьсах гүйдэл) эсвэл A- (DC Current) range (e.g., 10A or mAµA).
- Туршилтын улаан утсыг залгуур руу холбоно уу 10 А or мАмА Жэк болон Блэк нар туршилтын хөтлөгч рүү хөтөлдөг COM Жак.
- Гүйдлийг хэмжих хэлхээг нээж, туршилтын датчикуудыг цуваа холбоно уу.
- Дэлгэц дээрх одоогийн утгыг уншина уу.
5.3 Эсэргүүцлийн хэмжилт
Анхааруулга: Эсэргүүцлийг хэмжихээс өмнө хэлхээг хүчдэлгүй болгосон эсэхийг шалгаарай.
- Эргэдэг товчлуурыг тохируулна уу Ω (эсэргүүцэл) байрлал.
- Туршилтын улаан утсыг залгуур руу холбоно уу VΩHzCAP Жэк болон Блэк нар туршилтын хөтлөгч рүү хөтөлдөг COM Жак.
- Хэмжих гэж буй эд анги эсвэл хэлхээний сегмент дээрх туршилтын датчикуудад хүрнэ үү.
- Дэлгэц дээрх эсэргүүцлийн утгыг уншина уу.
5.4 Хүчин чадлын хэмжилт
Анхааруулга: Discharge capacitors before measuring to prevent damage to the meter.
- Эргэдэг товчлуурыг тохируулна уу CAP (Багтаамж) байрлал.
- Туршилтын улаан утсыг залгуур руу холбоно уу VΩHzCAP Жэк болон Блэк нар туршилтын хөтлөгч рүү хөтөлдөг COM Жак.
- Конденсаторын терминалууд дээрх туршилтын датчикуудад хүрнэ үү.
- Дэлгэц дээрх багтаамжийн утгыг уншина уу.
5.5 Давтамж ба ажлын мөчлөгийн хэмжилт
- Эргэдэг товчлуурыг тохируулна уу Гц /% (Давтамж/Үүргийн мөчлөг) байрлал.
- Туршилтын улаан утсыг залгуур руу холбоно уу VΩHzCAP Жэк болон Блэк нар туршилтын хөтлөгч рүү хөтөлдөг COM Жак.
- Touch the test probes to the signal source.
- дээр дарна уу Гц /% button to toggle between frequency and duty cycle readings.
5.6 Температурын хэмжилт
The EX355 includes a general purpose bead wire temperature probe.
- Эргэдэг товчлуурыг тохируулна уу Температур (температур) байрлал.
- Insert the temperature probe into the VΩHzCAP (эерэг) ба COM (negative) jacks, observing polarity.
- Place the tip of the temperature probe on or in the object to be measured.
- Read the temperature value on the display. The unit can display in Celsius or Fahrenheit.

Figure 2: Using the Extech EX355 to measure temperature in an HVAC vent. The image shows a person holding the multimeter and inserting the temperature probe into an air conditioning vent.
5.7 Холбоо барихгүй ботьtage (NCV) илрүүлэх
NCV mode allows for quick detection of AC voltagшууд хүрэлцэхгүй, аюулгүй байдлыг сайжруулна.
- Эргэдэг товчлуурыг тохируулна уу NCV байр суурь.
- Move the top of the multimeter near a conductor or outlet.
- The NCV indicator light will illuminate and an audible beep will sound if AC voltage is detected. The intensity of the beep and light may increase with stronger fields.
5.8 Бага импеданс (LoZ) горим
LoZ mode helps eliminate false readings caused by ghost voltages.
- Эргэдэг товчлуурыг тохируулна уу LoZ V байр суурь.
- Connect the test leads as for standard voltage хэмжилт.
- The meter will present a low impedance load to the circuit, dissipating ghost voltages and providing a more accurate reading of actual voltage.
5.9 Бага нэвтрүүлэх шүүлтүүр (LPF)
The LPF function is used to filter out high-frequency noise, providing stable readings in variable frequency drive (VFD) applications or other noisy electrical environments.
- Set the rotary dial to an AC Voltage (V~) or AC Current (A~) хүрээ.
- дээр дарна уу LPF button to activate the low pass filter. The LPF icon will appear on the display.
- Perform your measurement as usual. The meter will now display readings with high-frequency noise attenuated.
- дээр дарна уу LPF button again to deactivate the filter.
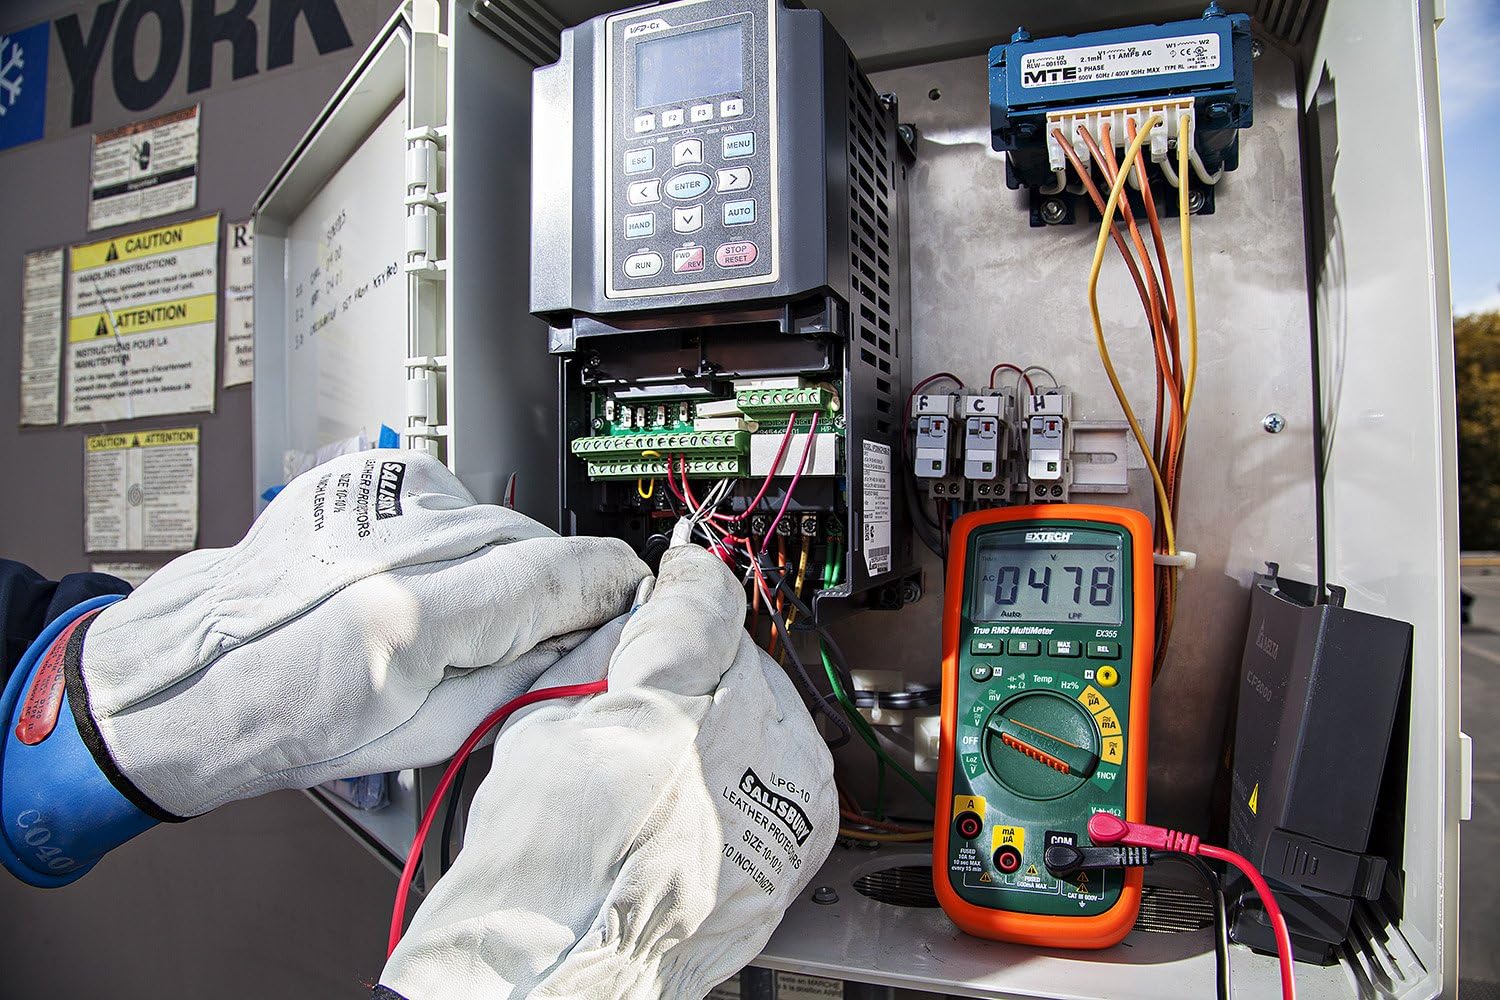
Figure 3: The Extech EX355 Multimeter in use, connected to an electrical control panel. This image demonstrates the multimeter's application in industrial or commercial electrical diagnostics.

Figure 4: The Extech EX355 Multimeter connected to a fuse box. This image illustrates the multimeter being used for testing within a residential or commercial electrical distribution system.
5.10 Data Hold, Min/Max, Relative Mode
- Өгөгдөл хадгалах: дээр дарна уу БАРЬ Дэлгэц дээрх одоогийн заалтыг царцаах товчийг дарна уу. Суллахын тулд дахин дарна уу.
- Мин/Макс: дээр дарна уу MIN / MAX button to enter Min/Max recording mode. The meter will display the maximum reading. Press again to cycle through minimum and average readings. Hold the button to exit.
- Харьцангуй горим: дээр дарна уу REL button to store the current reading as a reference value. Subsequent measurements will be displayed as a difference from this reference. Press again to exit.
5.11 Continuity and Diode Test
Анхааруулга: Ensure the circuit is de-energized before performing continuity or diode tests.
- Тасралтгүй байдал: Эргэдэг товчлуурыг тохируулна уу Ω (Resistance) position and press the СОНГОХ button until the continuity symbol (♫) appears. A continuous beep indicates a low resistance path (continuity).
- Диодын туршилт: Эргэдэг товчлуурыг тохируулна уу Ω (Resistance) position and press the СОНГОХ button until the diode symbol (→|) appears. Connect the red lead to the anode and black lead to the cathode for forward bias voltage drop. Reverse leads for reverse bias.
6. Засвар үйлчилгээ
6.1 Батерейг солих
Refer to section 4.1 for detailed instructions on replacing the two AA batteries. Always use fresh, high-quality AA batteries.
6.2 Гал хамгаалагч солих
If the current measurement functions cease to work, the fuse may need replacement. This procedure should only be performed by qualified personnel.
- Ensure the multimeter is powered off and all test leads are disconnected.
- Remove the battery compartment cover and batteries.
- Unscrew the case screws and carefully separate the two halves of the meter casing.
- Locate the blown fuse(s). The EX355 typically uses two fuses: a 0.5A/600V fast-blow fuse for the mA/µA input and a 10A/600V fast-blow fuse for the 10A input.
- Replace the fuse(s) with fuses of the exact same type and rating. Never use a fuse with a different rating.
- Carefully reassemble the meter casing, ensuring all screws are tightened. Reinstall batteries and the battery cover.
6.3 Цэвэрлэгээ ба хадгалах
- Clean the meter regularly with a damp даавуу, зөөлөн угаалгын нунтаг. Зүлгүүр, уусгагчийг бүү ашигла.
- Хэрэглэхийн өмнө тоолуур бүрэн хуурай байгаа эсэхийг шалгаарай.
- When storing the meter for extended periods, remove the batteries to prevent leakage.
- Тоолуурыг сэрүүн, хуурай газар, нарны шууд тусгал болон хэт өндөр температураас хол хадгална уу.
7. Алдаа засах
| Асуудал | Боломжит шалтгаан | Шийдэл |
|---|---|---|
| Дэлгэц байхгүй эсвэл бүдэг дэлгэц | Дуусах эсвэл бага батарей | Зайг солих (4.1-р хэсгийг үзнэ үү). |
| Буруу уншилтууд | Incorrect function/range selected; Damaged test leads; External interference; Blown fuse (for current) | Verify function/range; Inspect/replace test leads; Move away from strong electromagnetic fields; Check/replace fuses (refer to Section 6.2). |
| Тасралтгүй дохио байхгүй | Open circuit; High resistance; Incorrect mode | Ensure circuit is closed; Check for high resistance; Verify continuity mode is selected. |
| Одоогийн хэмжилт ажиллахгүй байна | Blown fuse; Incorrect lead connection | Check and replace appropriate fuse (refer to Section 6.2); Ensure leads are in the correct current jacks. |
| NCV нь эзэлхүүнийг илрүүлж чадахгүй байнаtage | AC боть байхгүйtage present; Weak field; Incorrect mode | AC боть бататгахtage with direct contact method; Ensure NCV mode is selected; Move closer to the conductor. |
8. Техникийн үзүүлэлтүүд
The following table outlines the key specifications for the Extech EX355 True RMS Multimeter:
| Параметр | Үнэ цэнэ |
|---|---|
| Загварын дугаар | EX355 |
| Хэмжилтийн функцууд | AC/DC Voltage, AC/DC Current, Resistance, Capacitance, Frequency, Duty Cycle, Temperature, Diode, Continuity |
| Жинхэнэ RMS | Тиймээ |
| Холбоо барихгүй ботьtage (NCV) | Тиймээ |
| Бага эсэргүүцэл (LoZ) | Тиймээ |
| Бага нэвтрүүлэх шүүлтүүр (LPF) | Тиймээ |
| Үйл ажиллагааны дээд хэмжээtage | 600 вольт |
| Хэмжилтийн нарийвчлал | +/-0.5% (typical, varies by function/range) |
| Дэлгэц | 4000 Count LCD |
| Эрчим хүчний эх үүсвэр | 2 х АА батерей (дагсан) |
| Хэмжээ (L x W x H) | 8.1 x 4.8 x 17 см (3.2 x 1.9 x 6.7 инч) |
| Зүйлийн жин | 372 гр (0.82 фунт) |
| Материал | ABS |
| Баталгаажуулалт | IEC 61010-1, CE, CAT III 600V |
| Оруулсан бүрэлдэхүүн хэсгүүд | Test leads, two AA batteries, general purpose bead wire temperature probe |

Figure 5: Extech EX355 Multimeter with approximate dimensions shown in inches and centimeters. This image provides a visual reference for the physical size of the device.
9. Баталгаат хугацааны мэдээлэл
Extech provides a warranty for its products. Specific warranty terms and conditions, including duration and coverage, may vary by region and product. For detailed warranty information, please refer to the warranty card included with your product or visit the official Extech webсайт. Худалдан авалтын баримтаа аливаа баталгаат нэхэмжлэлийг худалдан авсан баримт болгон хадгална уу.
10. Хэрэглэгчийн дэмжлэг
For technical assistance, troubleshooting, or service inquiries regarding your Extech EX355 Multimeter, please contact Extech customer support. You can typically find contact information, including phone numbers and email addresses, on the official Extech webсайт эсвэл таны бүтээгдэхүүнд өгөгдсөн баримт бичигт.
Онлайн нөөцүүд: Visit the official Extech website for FAQs, product downloads, and additional support resources.


