1. Танилцуулга
Thank you for choosing the XTUGA BK510 Single Channel Wireless In-Ear Monitor System. This system is designed to provide professional-grade audio monitoring for musicians, performers, and presenters. It features UHF wireless technology with 100 selectable channels, ensuring clear and reliable sound transmission. This manual will guide you through the setup, operation, and maintenance of your new in-ear monitor system.
2. Аюулгүй байдлын мэдээлэл
Please read and understand all safety instructions before operating this device. Keep this manual for future reference.
- FCC дагаж мөрдөх: Most users do not need a license to operate this wireless microphone system. However, operation is subject to certain restrictions: the system must not cause harmful interference, must operate at a low power level (not exceeding 50 milliwatts), and has no protection from interference received from any other device.
- FCC дүрэм: Purchasers should be aware that the FCC is currently evaluating the use of wireless microphone systems, and these rules are subject to change. For more information, contact the FCC at 1-888-CALL-FCC (TTY: 1-888-TELL-FCC) or visit the FCC's wireless microphone webсайт: fcc.gov/cgb/wirelessmicrophones.
- Цахилгааны аюулгүй байдал: To prevent electric shock, do not open the device casing. Бүх үйлчилгээг мэргэшсэн боловсон хүчинд шилжүүлээрэй.
- Эрчим хүчний эх үүсвэр: Зөвхөн өгсөн тэжээлийн адаптерийг ашиглана уу. Боть байгаа эсэхийг баталгаажуулна ууtage нь төхөөрөмжийн шаардлагад нийцдэг.
- Ус ба чийг: Төхөөрөмжийг ус, бороо эсвэл хэт их чийгэнд бүү гарга.
- Дулаан: Төхөөрөмжийг радиатор, халаалтын төхөөрөмж, зуух эсвэл бусад дулаан ялгаруулдаг төхөөрөмж зэрэг дулааны эх үүсвэрээс хол байлга.
- Агааржуулалт: Ensure proper ventilation around the transmitter unit. Do not block any ventilation openings.
- Чихэвчний дууны түвшин: Сонсголыг гэмтээхгүйн тулд өндөр дууны түвшинд удаан хугацаагаар сонсохоос зайлсхий.
3. Багцын агуулга
Доор жагсаасан бүх зүйл таны багцад байгаа эсэхийг шалгаарай. Хэрэв ямар нэг зүйл дутуу эсвэл эвдэрсэн бол жижиглэн худалдаалагчтайгаа холбоо барина уу.
- 1x XTUGA BK510 Transmitter Unit
- 1x XTUGA BK510 Bodypack Receiver
- 1x Detachable Antenna
- 1x Power Adapter (DC 12V-18V)
- 2x Audio Cables (1/4" TS to 1/4" TS)
- 1x Pair of Earbud Headphones (White)

Зураг: XTUGA BK510 Single Channel Wireless In-Ear Monitor System package contents, showing the transmitter, bodypack receiver, antenna, power adapter, two audio cables, and white earbud headphones.
4. Бүтээгдэхүүн дууссанview
4.1 Дамжуулагчийн нэгж
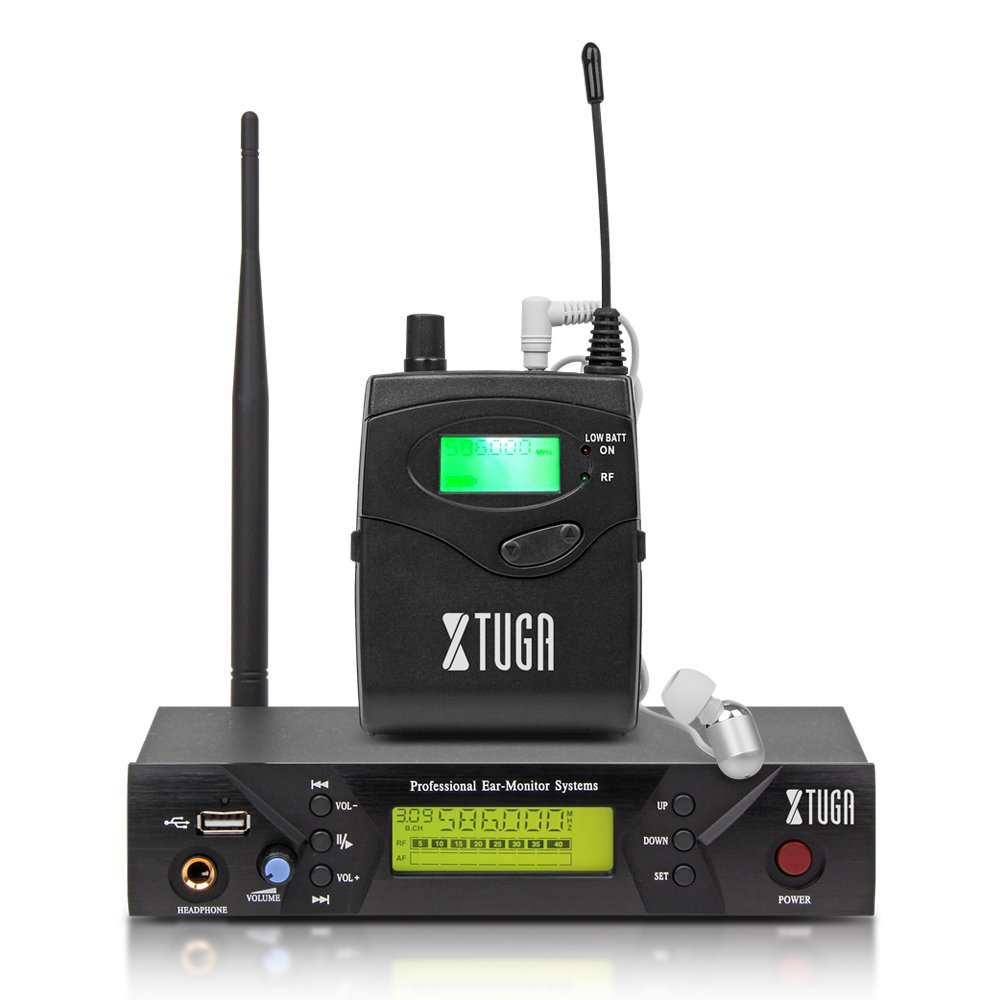
Зураг: Front panel of the XTUGA BK510 transmitter unit, featuring a USB port, headphone output, volume control, channel selection buttons (UP/DOWN), SET button, power button, and an LCD display.
- USB порт: For connecting USB devices (e.g., for playback or recording, specific functionality may vary).
- HEADPHONE Output: 3.5mm jack for wired headphone monitoring directly from the transmitter.
- Дууны эзлэхүүн: Adjusts the output volume for the HEADPHONE output.
- ДЭЭШ/ДООШ товчлуурууд: Used to navigate and select channels or frequencies.
- SET товчлуур: Сонголтуудыг баталгаажуулах эсвэл тохиргооны цэс рүү орно.
- Асаах товч: Turns the transmitter unit on or off.
- LCD дэлгэц: Shows current channel, frequency, and other operational information.

Зураг: Rear panel of the XTUGA BK510 transmitter unit, showing the DC IN power input, AF IN (L) and AF IN (R) combo XLR/TRS inputs, AF LEVEL (Left/Right) adjustment knobs, and the ANTENNA connector.
- DC IN (12V-18V): Дагалдах цахилгаан адаптерийн тэжээлийн оролт.
- AF IN (L)/(R): Combo XLR/TRS inputs for connecting audio sources (e.g., mixer output).
- AF LEVEL (Left/Right): Rotary knobs to adjust the input audio level for each channel.
- ANTENNA Connector: For attaching the detachable antenna.
4.2 Bodypack Receiver

Зураг: Урд view of the XTUGA BK510 bodypack receiver, showing the LCD display, LOW BATT indicator, RF indicator, and control buttons.
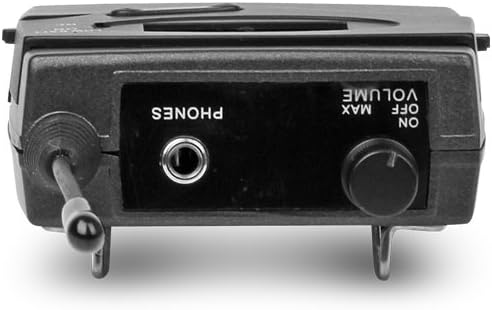
Зураг: Топ view of the XTUGA BK510 bodypack receiver, showing the PHONES output jack and the ON/OFF/VOLUME knob.

Зураг: XTUGA BK510 bodypack receiver with the battery compartment open, showing slots for two AA batteries and the belt clip on the back.
- LCD дэлгэц: Shows current channel, frequency, and battery status.
- LOW BATT Indicator: Батерейны цэнэг бага байх үед гэрэлтдэг.
- RF үзүүлэлт: Illuminates when receiving a radio frequency signal from the transmitter.
- ON/OFF/VOLUME Knob: Turns the receiver on/off and adjusts the headphone volume.
- УТАСНЫ ГАРАЛТ: 3.5mm jack for connecting in-ear headphones.
- Зайны тасалгаа: Хоёр АА батерейтай.
- Туузан хавчаар: For attaching the bodypack to clothing or a belt.
5. Тохируулах гарын авлага
- Connect Transmitter Antenna: Screw the detachable antenna onto the ANTENNA connector on the rear panel of the transmitter unit. Ensure it is securely fastened.
- Дамжуулагчийг асаах: Connect the provided power adapter to the DC IN (12V-18V) port on the rear of the transmitter, then plug the adapter into a suitable power outlet.
- Аудио эх сурвалжийг холбох: Use the included 1/4" TS cables (or XLR cables, not included) to connect your audio source (e.g., mixer's auxiliary output, monitor send) to the AF IN (L) and/or AF IN (R) inputs on the transmitter's rear panel. For mono operation, typically use AF IN (L).
- Хүлээн авагчийн батерейг суурилуулах: Open the battery compartment on the bodypack receiver and insert two AA batteries, observing correct polarity (+/-). Close the compartment securely.
- Чихэвчийг хүлээн авагчтай холбох: Plug your in-ear headphones into the PHONES output jack on the bodypack receiver.
6. Ашиглалтын заавар
- Дамжуулагчийг асаах: Press the POWER button on the transmitter's front panel. The LCD display will illuminate.
- Хүлээн авагчийг асаах: Rotate the ON/OFF/VOLUME knob on the bodypack receiver clockwise until it clicks and the LCD display illuminates.
- Select Channel/Frequency (Transmitter):
- Use the UP/DOWN buttons on the transmitter to browse through the available 100 UHF channels.
- Press the SET button to confirm your desired channel. The display will show the selected frequency.
- Choose a channel that is clear of interference in your operating environment.
- Sync Receiver to Transmitter: The bodypack receiver should automatically sync to the transmitter's frequency. If not, consult the receiver's specific instructions (often involves holding a SET or SYNC button on the receiver while the transmitter is broadcasting). Ensure the RF indicator on the receiver is lit, indicating a successful connection.
- Adjust Audio Input Level (Transmitter): Play audio through your connected source. Adjust the AF LEVEL (Left/Right) knobs on the rear of the transmitter until the audio level is appropriate without clipping (distortion). Monitor the audio through the transmitter's HEADPHONE output if desired.
- Adjust Monitoring Volume (Receiver): Put on your in-ear headphones. Slowly rotate the ON/OFF/VOLUME knob on the bodypack receiver to adjust the listening volume to a comfortable level. Avoid excessively high volumes to protect your hearing.
- Begin Monitoring: Your XTUGA BK510 system is now ready for use.
7. Засвар үйлчилгээ
- Цэвэрлэгээ: Төхөөрөмжүүдийг зөөлөн, хуурай даавуугаар арчина. Шингэн цэвэрлэгч эсвэл уусгагч хэрэглэж болохгүй.
- Зай солих: When the LOW BATT indicator on the bodypack receiver illuminates, replace both AA batteries with fresh ones. Remove batteries if the receiver will not be used for an extended period.
- Хадгалах: Системийг нарны шууд тусгал, хэт температураас хол, сэрүүн, хуурай газар хадгална.
- Антенны арчилгаа: Handle the antenna carefully to avoid bending or breaking.
8. Алдаа засах
| Асуудал | Боломжит шалтгаан | Шийдэл |
|---|---|---|
| Хүлээн авагчаас дуу гарахгүй. |
|
|
| Хөндлөнгийн оролцоо эсвэл статик. |
|
|
| Low audio quality (e.g., lack of bass). |
|
|
| LOW BATT indicator on receiver is lit. | Батерей бага байна. | Хоёр АА батерейг нэн даруй солино уу. |
9. Техникийн үзүүлэлтүүд
| Онцлог | Дэлгэрэнгүй |
|---|---|
| Загвар | BK510 |
| Брэнд | XTUGA |
| Холболтын технологи | Wired, Wireless (RF) |
| Утасгүй холбоо | UHF (100 Channels) |
| Transmitter Material | Металл |
| Bodypack Receiver Batteries | 2 АА батерей (шаардлагатай) |
| Дамжуулагчийн тэжээлийн оролт | DC 12V-18V |
| Дамжуулагчийн хэмжээс | 17.72 x 11.81 x 4.72 инч |
| Барааны жин (ойролцоогоор) | 3.34 фунт (нийт багц) |
| Онцлог шинж чанарууд | Lightweight (receiver), Volume Control |
| Үйлдвэрлэгч | Хятадад үйлдвэрлэсэн |
10. Баталгаат хугацаа ба дэмжлэг
Баталгаат хугацаа: No specific warranty information is provided within this user manual. For details regarding warranty coverage, terms, and conditions, please refer to the product packaging, the purchase receipt, or contact the manufacturer directly.
Дэмжлэг: For technical assistance, troubleshooting beyond this guide, or inquiries about your XTUGA BK510 system, please contact XTUGA customer support. You may find contact information on the official XTUGA webсайт эсвэл анхны худалдан авалтын цэгээр дамжуулан.
FCC мэдээлэл: For regulatory questions concerning wireless microphone systems, you can contact the FCC at 1-888-CALL-FCC (TTY: 1-888-TELL-FCC) or visit fcc.gov/cgb/wirelessmicrophones.


