1. Танилцуулга
This manual provides comprehensive instructions for the setup, operation, and maintenance of your HyperDrive Ultimate 11-in-1 USB C Hub. This versatile adapter is designed to expand the connectivity of your USB-C enabled devices, including MacBooks and PCs, by providing 11 essential ports through a single USB-C connection.

Image 1.1: The HyperDrive Ultimate 11-in-1 USB C Hub, showcasing авсаархан загвар, олон порттой.
2. Үндсэн шинж чанарууд
The HyperDrive Ultimate 11-in-1 USB C Hub offers a wide array of features to enhance your device's capabilities:
- Нийтэд нийцтэй байдал: Designed for seamless integration with MacBook, PC (Surface, HP, Dell, Lenovo, etc.), and most USB-C devices.
- 11-in-1 Port Expansion: Transforms a single USB-C connection into 11 distinct ports:
- Thunderbolt USB-C with Power Delivery (PD)
- VGA порт
- HDMI порт
- Мини DisplayPort
- Гигабит Ethernet порт
- 3x USB 3.1 порт
- SD карт уншигч
- microSD карт уншигч
- 3.5mm Аудио Жак
- Үр ашигтай цахилгаан нийлүүлэлт: Supports charging of your connected MacBook, PC, or other devices while the hub is in use.
- 4K видео гаралт: Connect to HDMI, Mini DisplayPort, and VGA displays with resolutions up to 4K. Supports one 4K30Hz display on Mac/PC or two 1080p60Hz displays on PC.
- Гигабит Ethernet: Provides a stable and fast wired internet connection up to 1Gbps.
- Өндөр хурдны өгөгдөл дамжуулах: Three USB 3.1 ports offer data transfer speeds of up to 5Gbps.
- Нэгдсэн карт уншигч: Convenient access to SD and microSD cards for photo and video transfer.
- Удаан эдэлгээтэй барилга: Features a stylish and robust aluminum enclosure with a 170mm/6.7" flexible USB-C connector cable.
- Зөөврийн дизайн: Compact and lightweight, ideal for on-the-go productivity.

Зураг 2.1: Хэт ихview of the HyperDrive Ultimate 11-in-1 USB C Hub's various ports and their specifications.
3. Тохируулах заавар
Follow these steps to set up your HyperDrive Ultimate 11-in-1 USB C Hub:
- Hub-г төхөөрөмждөө холбоно уу: Plug the integrated USB-C cable of the HyperDrive hub into an available USB-C port on your MacBook, PC, or other compatible device. Ensure the connection is secure.
- Цахилгаан холболт (заавал биш боловч санал болгож байна): For optimal performance and to charge your host device, connect your device's original USB-C power adapter to the USB-C Power Delivery port on the HyperDrive hub.
- Дагалдах төхөөрөмжүүдийг холбох: Plug your desired peripherals (e.g., external monitors, USB drives, Ethernet cable, SD cards, headphones) into the corresponding ports on the HyperDrive hub.
- Драйвер суурилуулах: In most cases, the hub is plug-and-play and does not require additional drivers. Your operating system should automatically recognize the connected devices. If any issues arise, ensure your operating system and device drivers are up to date.
Тохиромжтой байдал
The HyperDrive Ultimate 11-in-1 USB C Hub is compatible with:
- MacBook Devices: MacBook Pro (13-inch, 2016 and later), MacBook Pro (15-inch, 2016 and later), MacBook Pro (16-inch, 2019 and later), MacBook Pro (14-inch, 2021 and later), MacBook Air (2018 and later).
- Windows PC: Laptops with USB-C ports supporting data transfer and power delivery.
- ChromeOS Laptops: Chromebooks with USB-C ports supporting data transfer and power delivery.
Note: Requires DisplayPort over USB-C + charge + data for full functionality.

Image 3.1: Detailed compatibility information for the HyperDrive USB C Hub.
4. Төвийг ажиллуулах
This section details the functionality of each port on your HyperDrive hub.
4.1 Video Output Ports (HDMI, Mini DisplayPort, VGA)
The hub supports connecting to external displays via HDMI, Mini DisplayPort, and VGA. Ensure your display cables are securely connected to the hub and your monitor.
- HDMI: Supports up to 4K resolution at 30Hz.
- Mini DisplayPort: Supports up to 4K resolution at 30Hz.
- VGA: 60Гц давтамжтайгаар 1920 x 1200 хүртэлх нягтралыг дэмждэг.
Ашиглах заавар: HDMI and Mini DisplayPort only work with the same video port type monitor. It must be direct HDMI to HDMI connection or direct Mini DisplayPort to Mini DisplayPort / DisplayPort connection between HyperDrive hub and display device. The video ports will only work if your device supports video output over USB C (DisplayPort Alternate Mode). While Thunderbolt 2 port and Mini DisplayPort look alike, video output to Thunderbolt 2 display is not supported on this hub. When using two extended displays with Windows laptop, the maximum video resolution output that can be supported is 2K. Due to a large variety of Windows computer models and specifications, please ensure that USB-C port/ports on the computer support DisplayPort Alternate mode with MST. Please contact the manufacturer of your computer to check if it's supported. VGA and HDMI ports cannot work together.
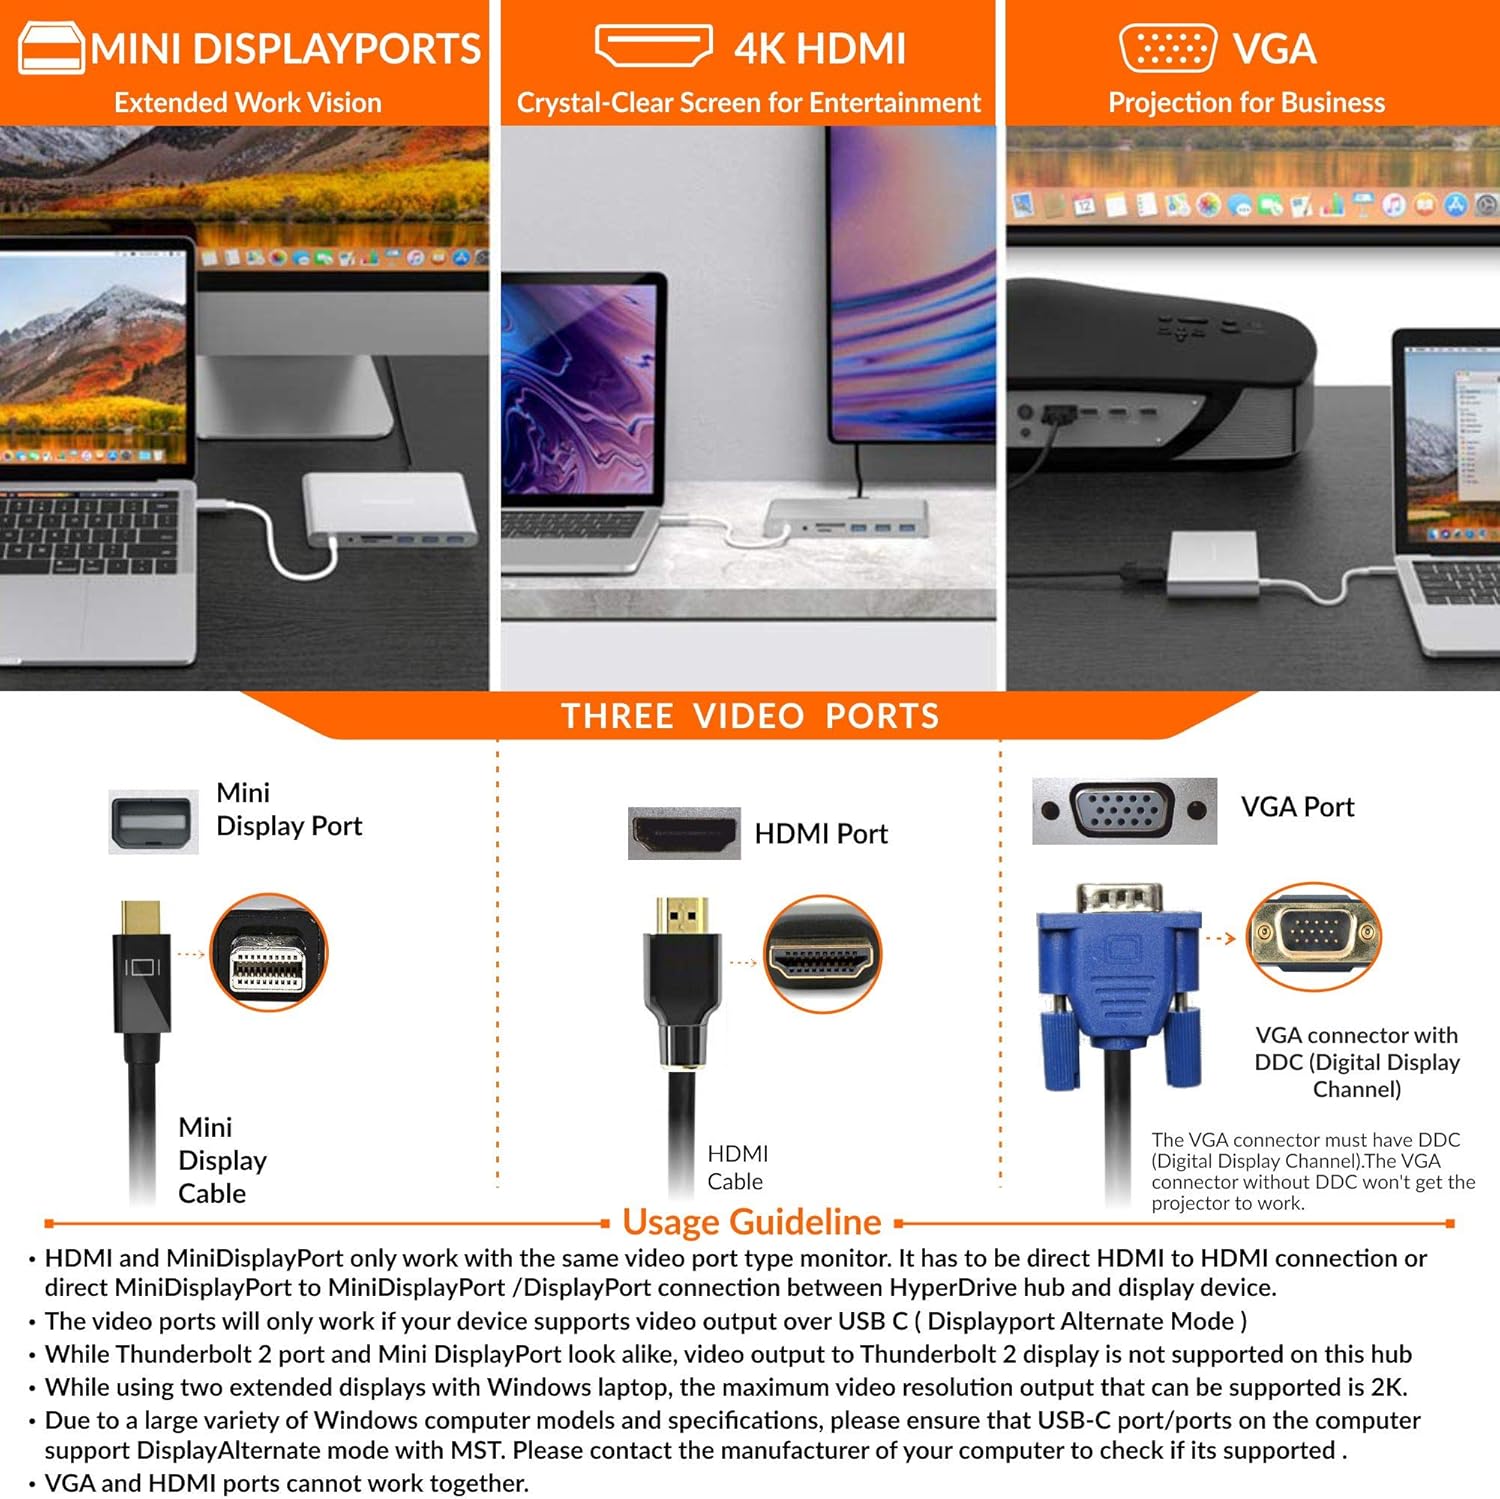
Image 4.1: Visual guide for connecting displays via Mini DisplayPort, HDMI, and VGA.
4.2 Гигабит Ethernet порт
Connect an Ethernet cable to this port for a stable and high-speed wired internet connection up to 1Gbps.
Ашиглах заавар: The Gigabit Ethernet port of HyperDrive may not work on some USB Type C devices due to hardware or software limitations on them. Please check your device specifications to ensure whether it supports wired network connections. The maximum speed of data transfer also depends on the type of LAN cable used.

Image 4.2: Connecting to a stable Ethernet network via the hub.
4.3 USB 3.1 Ports (3x)
These three USB-A ports allow you to connect various USB devices such as external hard drives, keyboards, mice, and USB flash drives. They support data transfer speeds of up to 5Gbps.
Ашиглах заавар: USB ports do not support Apple Superdrive. USB ports will not charge an iPad. Two storage devices having same storage name will not be recognized by iPad Pro at the same time. In case your external storage drive is not detected on your device, please reformat your external storage drive to compatible formats. Use NTFS format if external storage drive is connected to Windows PCs. NTFS is read only on macOS and not supported on iPadOS. Use APFS format if external storage drive is connected to Mac. APFS is not supported on iPadOS and Windows. Use exFAT format if external storage drive is shared between Mac and Windows. exFAT also works on iPadOS. To avoid reformatting your external storage drive, you can try to access it by using additional drivers (Paragon drivers) on your computer.

Image 4.3: Utilizing the triple USB 3.1 ports for various peripherals.
4.4 SD and microSD Card Slots
Insert your SD or microSD cards into the respective slots for quick access to photos and videos. Both slots support UHS-I speeds up to 104 MB/s.
Ашиглах заавар: This HyperDrive hub can access up to UHS-I microSD and SD cards. iPad Pro can access one card at a time only. If both SD and MicroSD card is inserted to HyperDrive hub, it detects the card that is inserted first. A click sound is heard when Micro SD card is pressed all the way in. To eject it, press in the card again. In case your external memory card is not detected on your Mac, please reformat your external memory card to compatible formats. Use APFS format if external memory card is connected to Mac only. APFS is not supported on iPadOS and Windows. Use exFAT format if external memory card is used on Mac and Windows platforms. exFAT also works on iPadOS. NTFS file format only supports read only mode on macOS.

Image 4.4: Inserting SD and microSD cards into the dedicated slots.
4.5 3.5mm аудио Жак
Connect your headphones or speakers to this universal audio jack for crystal clear sound output.
Ашиглах заавар: If you are unable to hear any sound through the audio port of HyperDrive then please go to System Preferences > Sound > check on the USB Audio device instead of the internal speaker. Once you have configured this setting, you will be able to hear sound through the audio port of HyperDrive.

Image 4.5: Connecting audio devices to the 3.5mm audio jack.
4.6 USB-C Port with Power Delivery
This port allows you to charge your host device (MacBook, PC) while simultaneously using the hub's other functions. It supports up to 60W Power Delivery.
Ашиглах заавар: The USB C port of HyperDrive hub does not support data transfer. If you are using a low power (wattage) charger to charge your device through USB C port of HyperDrive, it may result in slow charging of your device because some power from the charger is consumed by HyperDrive hub. Some USB Type C devices come with their own proprietary charger and may not support charging through the USB C port of this HyperDrive hub. On your laptop settings panel, please check your settings to ensure it is set to receive power through USB C Power mode.

Image 4.6: Powering your device through the USB-C Power Delivery port.
5. Засвар үйлчилгээ, арчилгаа
To ensure the longevity and optimal performance of your HyperDrive Ultimate 11-in-1 USB C Hub, follow these maintenance guidelines:
- Цэвэрлэгээ: Use a soft, dry, lint-free cloth to clean the hub. Avoid using abrasive cleaners, solvents, or aerosol sprays, which may damage the surface or internal components.
- Хадгалах: Ашиглаагүй үед төвийг сэрүүн, хуурай газар, нарны шууд тусгал болон хэт өндөр температураас хол хадгална уу.
- Харьцуулах: Handle the hub with care. Avoid dropping it or subjecting it to strong impacts. Do not bend or excessively pull the integrated USB-C cable.
- Дулаан: It is normal for the hub to become warm during extended use, especially when multiple ports are active or when power delivery is in use. Ensure adequate ventilation around the hub.
- Чийг: Keep the hub away from water and other liquids. If the hub comes into contact with liquid, disconnect it immediately and allow it to dry completely before reuse.
6. Алдаа засах
If you encounter issues with your HyperDrive hub, refer to the following common problems and solutions:
| Асуудал | Боломжит шалтгаан | Шийдэл |
|---|---|---|
| No display output or glitchy video. | Incorrect cable type, incompatible display settings, or host device not supporting DisplayPort Alternate Mode. |
|
| USB devices not recognized or not working. | Insufficient power, incompatible device, or incorrect file system format for storage. |
|
| Ethernet холболтын асуудал. | Host device limitations or cable issues. |
|
| SD/microSD card not detected. | Incorrect insertion, incompatible format, or multiple cards inserted. |
|
| No audio from 3.5mm jack. | Audio output settings on host device. |
|
| Hub gets warm during use. | Normal operation, especially under heavy load or with power delivery. |
|
7. Техникийн үзүүлэлтүүд
| Онцлог | Дэлгэрэнгүй |
|---|---|
| Загварын дугаар | GN30B-GRAY |
| Брэнд | Гипер |
| Портууд | 11 (USB-C PD, VGA, HDMI, Mini DisplayPort, Gigabit Ethernet, 3x USB 3.1, SD, microSD, 3.5mm Audio Jack) |
| Видео гаралт | HDMI (4K@30Hz), Mini DisplayPort (4K@30Hz), VGA (1920x1200@60Hz) |
| Ethernet хурд | 1 Gbps хүртэл |
| USB өгөгдөл дамжуулах | USB 3.1 (5 Gbps) |
| Эрчим хүчний нийлүүлэлт | USB-C PD портоор дамжуулан 60Вт хүртэл |
| Карт уншигчийн хурд | UHS-I (up to 104 MB/s) |
| Техник хангамжийн платформ | Зөөврийн компьютер, компьютер |
| Үйлдлийн системийн нийцтэй байдал | Mac OS, Windows, ChromeOS (with DisplayPort Alt Mode) |
| Зүйлийн жин | 7.7 унц |
| Бүтээгдэхүүний хэмжээ (LxWxH) | 3.03 x 0.07 x 5.39 инч |
| Материал | Хөнгөн цагаан хашлага |
8. Баталгаат хугацаа ба дэмжлэг
Hyper products are designed for reliability and performance. For specific warranty details, please refer to the warranty card included with your purchase or visit the official Hyper website. For technical support, product registration, or frequently asked questions, please visit the Hyper support page or contact their customer service directly.
Албан ёсны Hyper Webсайт: www.hyper.com
Тайлбар: Баталгаат нөхцөл болон дэмжлэг үзүүлэх боломж нь бүс нутгаас хамаарч өөр өөр байж болно.
9. Бүтээгдэхүүний видео
Энэ загварын өгөгдсөн мэдээлэлд худалдагчийн албан ёсны бүтээгдэхүүний видео олдсонгүй.


