1. Танилцуулга
This instruction manual provides detailed guidance for the safe and effective use of your Orion Motor Tech AC Manifold Gauge Set. This professional automotive AC tool kit is designed for measuring system pressure, evacuating, and refilling coolant in R134a, R12, R22, and R502 refrigerant systems. Please read this manual thoroughly before operation to ensure proper usage and to prevent damage to the equipment or injury.

Figure 1: Orion Motor Tech AC Manifold Gauge Set. This image displays the complete gauge set, including the manifold, gauges, and color-coded hoses, ready for use in an automotive engine bay.
2. Багцын агуулга
Доор жагсаасан бүх зүйл таны багцад байгаа эсэхийг шалгаарай.
- 1 x 3-Way Gauge Manifold
- 3 x Color-Coded Hoses (5FT each)
- 2 x Adjustable 1/4'' Quick Couplers (High and Low Pressure)
- 1 x 1/4'' Male to 1/2'' Acme Adapter
- 1 x Puncturing Style Can Tap
- 1 x Self-Sealing Style Can Tap

Figure 2: Components of the AC Manifold Gauge Set. This image shows the individual parts of the kit, including the quick couplers, can taps, and adapter, laid out for inspection.
3. Бүтээгдэхүүний онцлог
- Complete Gauge Set: Includes a 3-way gauge, 3 color-coded hoses, 2 adjustable 1/4'' quick couplers, a 1/4'' to 1/2'' Acme adapter, and both self-sealing and puncture-style can taps for comprehensive AC service.
- Hybrid Anti-Shock Gauges: The 68 mm high and low-pressure gauges feature an oil-filled core for shock resistance and a dry dial for improved winter performance, ensuring ±1.6% accuracy.
- Өнгөөр кодлогдсон хоолойнууд: Blue for low pressure, red for high pressure, and yellow for charging. These PVC hoses have 4 reinforced layers, designed to withstand daily pressures up to 600 psi (3000 psi burst pressure).
- Өргөн хэрэглээний програм: Compatible with R134a, R12, R22, and R502 refrigerants, making it suitable for various automotive and HVAC maintenance tasks.
- Dual Can Taps: Equipped with both puncture-style and self-sealing can taps to accommodate different refrigerant canister types.
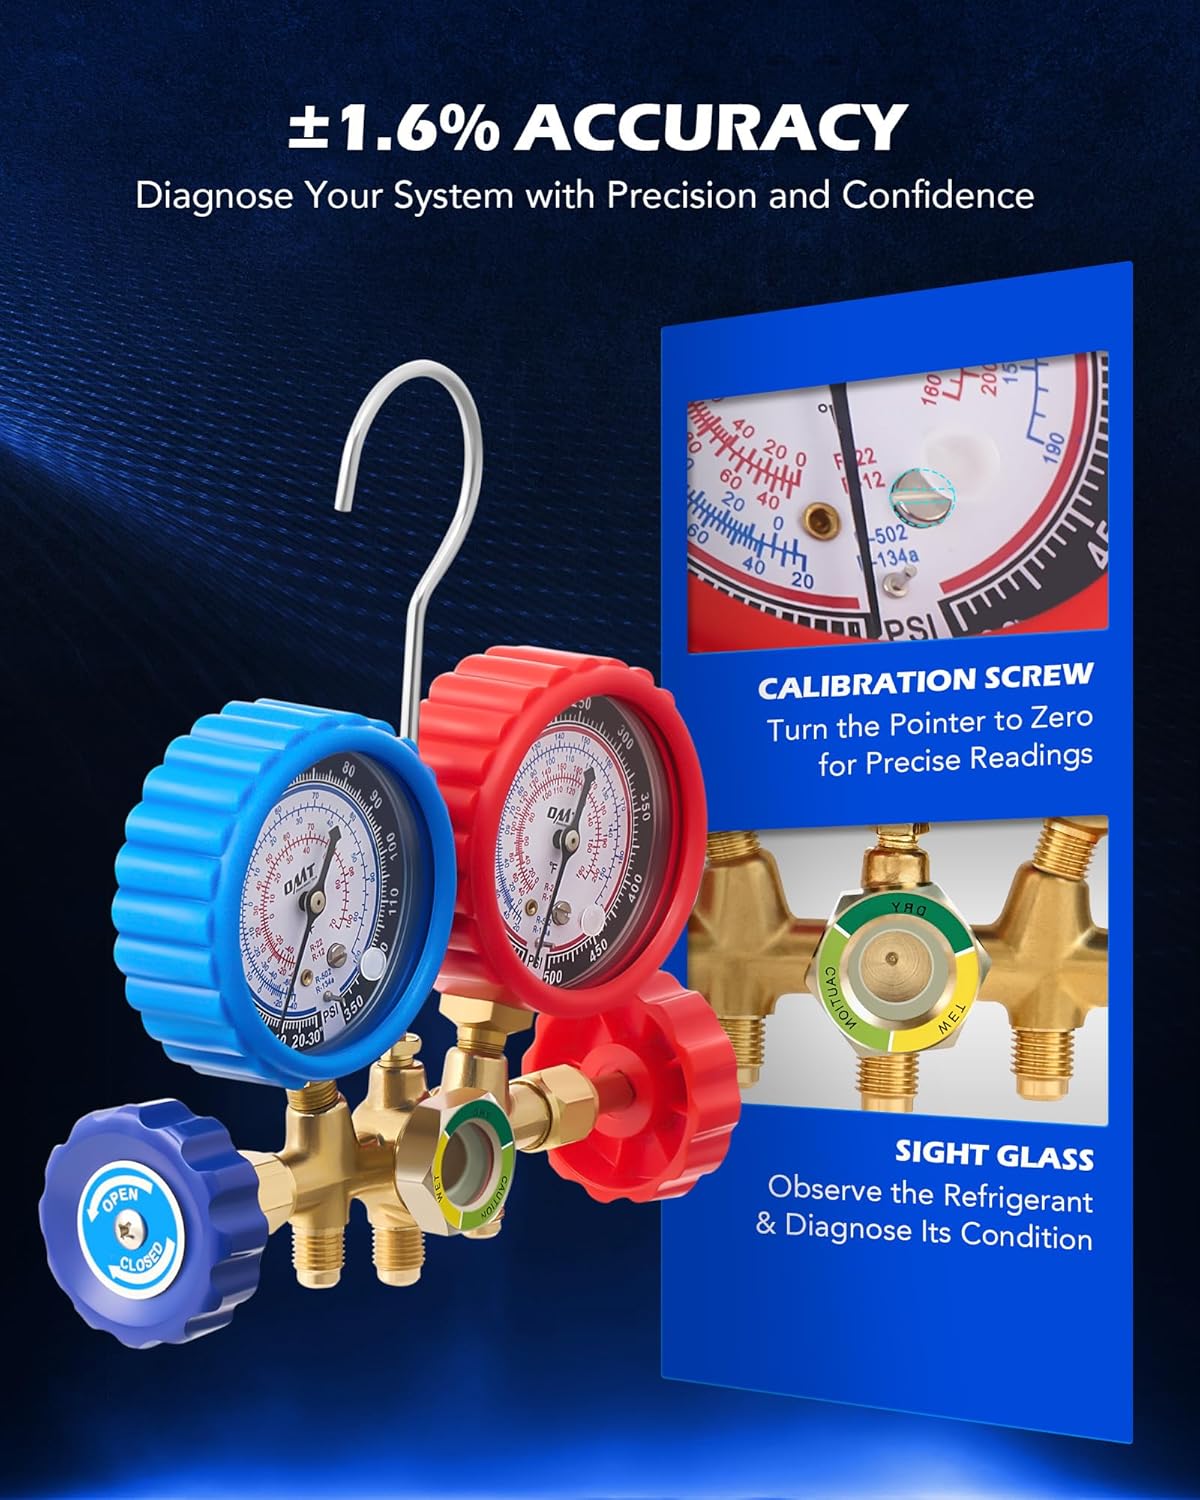
Figure 3: Gauge Detail. This close-up shows the precision gauges with their protective rubber casings, calibration screws, and the sight glass for monitoring refrigerant flow and condition.

Figure 4: Hose Construction. An exploded view of the hose layers, detailing the synthetic rubber, polyester fiber, chlorinated butyl rubber, and nylon resin layers that provide strength and prevent leaks.

Figure 5: Durable Design. This image highlights the robust construction of the manifold, including the convenient hanging hook, durable rubber casing around the gauges, and brass/copper fittings for longevity.
4. Аюулгүй байдлын мэдээлэл
WARNING: Refrigerants can cause severe frostbite and eye damage. Always wear appropriate personal protective equipment (PPE), including safety glasses and gloves, when handling refrigerants.
- Ensure adequate ventilation when working with refrigerants.
- Do not expose refrigerant containers to direct sunlight or temperatures above 120°F (49°C).
- Never mix different types of refrigerants in the same system.
- Always follow local regulations for refrigerant handling and disposal.
- Хүүхэд, тэжээвэр амьтдыг ажлын талбайгаас хол байлга.
- Refer to your vehicle's service manual for specific AC system procedures and refrigerant capacities.
5. Тохиргоо ба холболт
Before beginning any AC service, ensure your vehicle's engine is off and cool. Identify the high and low-pressure service ports on your vehicle's AC system.
- Connect Hoses to Manifold:
- Connect the red hose to the high-pressure port on the manifold.
- Connect the blue hose to the low-pressure port on the manifold.
- Connect the yellow hose to the center service port on the manifold.
- Түргэн холбогчийг холбох:
- Attach the red quick coupler to the free end of the red hose.
- Attach the blue quick coupler to the free end of the blue hose.
- Тээврийн хэрэгсэлд холбогдох:
- Connect the blue quick coupler to the vehicle's low-pressure service port.
- Connect the red quick coupler to the vehicle's high-pressure service port.
- Ensure both couplers are securely attached and their valves are closed before proceeding.
- Prepare Can Tap/Vacuum Pump: Depending on your task, connect the appropriate can tap or a vacuum pump to the free end of the yellow service hose.
Video 1: AC Manifold Gauge Set for R134a R12 R502 Refrigerant. This video provides a visual guide on setting up and using the AC Manifold Gauge Set for various refrigerant types, including R134a, R12, and R502.
Video 2: Orion Motor Tech AC Gauge Set. This video demonstrates the components of the Orion Motor Tech AC Gauge Set and how to connect the hoses and couplers for AC system service.
6. Үйл ажиллагаа
The Orion Motor Tech AC Manifold Gauge Set can be used for various AC system operations. Below are general steps for common tasks. Always consult your vehicle's service manual for specific pressure values and procedures.
6.1. Checking System Pressure
- Ensure the manifold valves (blue and red knobs) are closed.
- Connect the quick couplers to the vehicle's high and low-pressure service ports as described in the Setup section.
- Start the vehicle's engine and turn on the AC to its maximum setting with the fan on high. Allow the system to run for a few minutes to stabilize.
- Observe the readings on the blue (low-pressure) and red (high-pressure) gauges. Compare these readings to your vehicle's specifications.
- Once readings are taken, turn off the vehicle's engine and AC. Close the quick coupler valves before disconnecting them from the service ports.
6.2. Vacuuming the AC System
Vacuuming removes air and moisture from the AC system, which is crucial for proper operation.
- Ensure the manifold valves are closed.
- Connect the quick couplers to the vehicle's high and low-pressure service ports.
- Connect a vacuum pump to the free end of the yellow service hose.
- Open both the blue (low-pressure) and red (high-pressure) manifold valves.
- Start the vacuum pump. The low-pressure gauge should drop into the vacuum range (below 0 PSI).
- Run the vacuum pump for at least 30-60 minutes, or as recommended by your vehicle's service manual, to ensure thorough evacuation.
- After the recommended time, close both manifold valves and turn off the vacuum pump.
- Monitor the low-pressure gauge for at least 15-30 minutes. If the needle rises, it indicates a leak in the system that needs to be addressed before recharging.
6.3. Recharging the AC System (R134a Exampлэ)
This procedure assumes the system has been successfully vacuumed and holds a vacuum.
- Ensure the manifold valves are closed.
- Disconnect the vacuum pump from the yellow service hose.
- Attach the appropriate can tap (piercing or self-sealing) to a refrigerant can and then connect it to the yellow service hose.
- Slightly open the can tap valve to allow refrigerant to flow into the yellow hose, then quickly purge any air from the yellow hose by briefly loosening its connection at the manifold's center port until refrigerant vapor escapes. Retighten immediately.
- Start the vehicle's engine and turn on the AC to its maximum setting with the fan on high.
- Slowly open the blue (low-pressure) manifold valve to allow refrigerant to enter the system. Keep the red (high-pressure) valve closed during charging.
- Monitor the low-pressure gauge and the sight glass on the manifold. Charge in short bursts, allowing the system to stabilize between additions.
- Continue charging until the low-pressure gauge reaches the recommended pressure for your vehicle (refer to your vehicle's service manual). Do not overcharge.
- Once charging is complete, close the can tap valve, then close the blue manifold valve.
- Turn off the vehicle's engine and AC. Close the quick coupler valves before disconnecting them from the service ports.

Figure 6: System Application. This image demonstrates the manifold gauge set connected to a vehicle's AC system, illustrating its use for diagnostic checks, recharging, and coolant recovery.
Video 3: Orion Motor Tech R134a Manifold Gauge Set. Watch this video for a practical demonstration of using the Orion Motor Tech R134a Manifold Gauge Set to diagnose and recharge an automotive AC system.
7. Засвар үйлчилгээ
- Цэвэрлэгээ: After each use, wipe down the gauges, hoses, and fittings with a clean, dry cloth to remove any refrigerant residue or dirt.
- Хадгалах: Store the manifold gauge set in its original case in a cool, dry place, away from direct sunlight and extreme temperatures.
- O-цагираг ба жийргэвч: Periodically inspect all O-rings and gaskets for wear or damage. Replace them as needed to ensure a leak-free seal.
- Хэмжигч тохируулга: While the gauges are designed for accuracy, if you suspect a reading error, they can be recalibrated using the small screw on the face of each gauge. Refer to a professional for precise calibration if necessary.
8. Алдаа засах
| Асуудал | Боломжит шалтгаан | Шийдэл |
|---|---|---|
| Gauges show no pressure or incorrect readings. |
|
|
| System does not hold vacuum. |
|
|
| Refrigerant not flowing during charge. |
|
|
9. Техникийн үзүүлэлтүүд
| Онцлог | Дэлгэрэнгүй |
|---|---|
| Брэнд | Orion Motor Tech |
| Загварын дугаар | OMTDMG5Y |
| Тохиромжтой хөргөгч | R134a, R12, R22, R502 |
| Хэмжүүрийн төрөл | Hybrid Anti-Shock (Oil-filled core, dry dial) |
| Хэмжүүрийн диаметр | 68 мм |
| Хэмжүүрийн нарийвчлал | ±1.6% |
| Хоолойн урт | 5 фут (1.5 м) |
| Хоолойн ажлын даралт | 600 psi |
| Хоолойн хагарлын даралт | 3000 psi |
| Хоолойн хийц | 4 reinforced layers (PVC) |
| Материал | Aluminum, Brass, Poly Vinyl Chloride, Rubber |
| Хэмжээ (L x W x H) | 12.99 x 9.06 x 3.94 инч |
| Зүйлийн жин | 5.62 фунт |
10. Баталгаат хугацаа ба дэмжлэг
Orion Motor Tech products are designed for quality and durability. For specific warranty information, please refer to the product packaging or contact Orion Motor Tech customer support directly. If you encounter any issues or have questions regarding the use of your AC Manifold Gauge Set, please visit the official Orion Motor Tech webсайт эсвэл тусламж авахын тулд тэдний харилцагчийн үйлчилгээтэй холбогдоно уу.
Тайлбар: Баталгаат зардлаар худалдан авалт хийсэн баримтаа үргэлж авч яваарай.


