1. Танилцуулга
Thank you for choosing the XTUGA EW240 UHF 4-Channel Wireless Microphone System. This professional wireless microphone system is designed to deliver clear and powerful audio performance for various applications, including family parties, stages, churches, and karaoke. This manual provides detailed instructions for setup, operation, maintenance, and troubleshooting to ensure optimal performance and longevity of your system.
2. Аюулгүй байдлын чухал мэдээлэл
- Бүтээгдэхүүнийг хэрэглэхийн өмнө бүх зааврыг анхааралтай уншина уу.
- Энэ гарын авлагыг цаашид лавлах зорилгоор хадгална уу.
- Гал болон цахилгаан цочролоос сэргийлэхийн тулд төхөөрөмжийг бороо, чийгэнд бүү тавь.
- Агааржуулалтыг зөв хийж, агааржуулалтын нүхийг бүү бөглөрүүл.
- Зөвхөн төхөөрөмжид дагалддаг тэжээлийн адаптерийг ашиглана уу.
- Төхөөрөмжийг задлах, өөрчлөхийг бүү оролдоорой. Бүх үйлчилгээг мэргэшсэн боловсон хүчинд шилжүүлээрэй.
- Орон нутгийн дүрмийн дагуу батерейг хаях.
3. Багцын агуулга
Бүх зүйл байгаа эсэхийг шалгахын тулд багцыг шалгана уу:
- 1 x 4-Channel Receiver
- 1 х хэрэглэгчийн гарын авлага
- 4 x Bodypack дамжуулагч
- 4 x Lavalier Microphones
- 4 х чихэвчний микрофон
- 1 x 110V/220V тэжээлийн адаптер
4. Бүтээгдэхүүн дууссанview
4.1 Хүлээн авагчийн нэгж
The receiver is the central unit of the wireless microphone system, featuring a durable metal design and individual volume controls for each of its four channels. It includes four receiving antennas for stable signal reception and an LCD display for monitoring operating status.


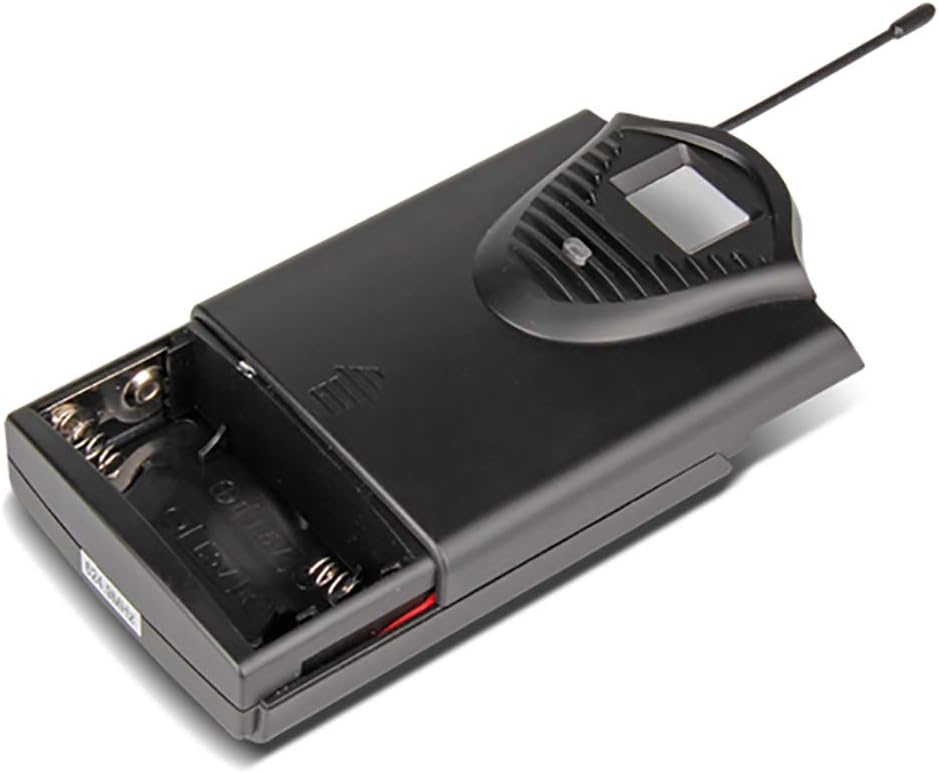
4.2 биеийн багц дамжуулагч
The system includes four bodypack transmitters, each designed for use with either a lavalier or headset microphone. These transmitters are compact, feature an LCD display for battery and operating status, and are powered by two 1.5V batteries, offering up to 8 hours of continuous use.


5. Тохируулах заавар
5.1 Хүлээн авагчийн тохиргоо
- Байршил: Place the receiver on a stable, flat surface, away from potential sources of interference (e.g., computers, Wi-Fi routers). Ensure adequate ventilation around the unit.
- Антенны холболт: Screw the four included antennas onto the ANT A, ANT B, ANT C, and ANT D connectors on the rear panel of the receiver. Position them vertically for optimal signal reception.
- Эрчим хүчний холболт: Connect the supplied power adapter to the DC 16V, 400mA input on the rear of the receiver, then plug it into a suitable power outlet.
- Аудио гаралт: Хүлээн авагчийг холигчдоо холбоно уу. amplifier, or sound system using either the 6.3cm (1/4 inch) mixed output or the individual 6.3cm (1/4 inch) outputs for each channel (OUT A, OUT B, OUT C, OUT D).


5.2 Дамжуулагчийн тохиргоо
- Батерей суурилуулах: Open the battery compartment of each bodypack transmitter. Insert two 1.5V AA batteries, ensuring correct polarity. Close the compartment securely.
- Микрофон холболт: Plug the lavalier or headset microphone into the input jack on the bodypack transmitter.
- Асаах: Turn on the power switch on the bodypack transmitter. The LCD display will illuminate, showing the channel and battery status.
6. Ашиглалтын заавар
- Системийг асаах: First, power on the receiver. Then, power on each bodypack transmitter.
- Дууны тохируулга: Use the individual volume control knobs on the receiver for each channel (CH 01, CH 02, CH 03, CH 04) to adjust the microphone levels. Start with the volume low and gradually increase it to avoid feedback.
- Дохионы үзүүлэлтүүд: The receiver's LCD display will show the active channel frequencies. The RF (Radio Frequency) and AF (Audio Frequency) indicators will light up when a signal is being received and audio is present, respectively.
- Хэрэглээ: Position the lavalier microphone approximately 6-8 inches from your mouth, or wear the headset microphone comfortably. Speak clearly into the microphone.
- Унтраах: When finished, first turn off the bodypack transmitters, then power off the receiver. This helps prevent pops or thumps through your sound system.
7. Засвар үйлчилгээ
- Цэвэрлэгээ: Use a soft, dry cloth to clean the receiver and transmitters. Do not use liquid cleaners or solvents.
- Зай солих: Replace batteries in the bodypack transmitters when the low battery indicator appears on the LCD display. Always use fresh, high-quality 1.5V AA batteries.
- Хадгалах: Store the system in a cool, dry place when not in use. Remove batteries from transmitters if storing for extended periods to prevent leakage.
- Антенны арчилгаа: Handle antennas carefully. Avoid bending them excessively.
8. Алдаа засах
| Асуудал | Боломжит шалтгаан | Шийдэл |
|---|---|---|
| Микрофоноос дуу гарахгүй | Transmitter or receiver not powered on; low batteries; microphone not connected; receiver output not connected to sound system; volume too low. | Ensure all units are powered on. Replace batteries. Check microphone connection to transmitter. Verify receiver output is connected and sound system is on. Increase receiver and sound system volume. |
| Дууны чанар муу/хөндлөнгийн оролцоо | Interference from other wireless devices; transmitter too far from receiver; antennas not positioned correctly; low batteries. | Move away from other wireless devices. Ensure line of sight between transmitter and receiver. Position antennas vertically. Replace batteries. |
| Богино үйл ажиллагааны хүрээ | Obstructions between transmitter and receiver; antennas not positioned correctly; environmental interference. | Ensure clear line of sight. Position antennas vertically. Avoid using in areas with high RF interference. |
| Receiver LCD not displaying | Receiver not powered on; power adapter faulty. | Check power connection and ensure receiver is switched on. Try a different power outlet. |
9. Техникийн үзүүлэлтүүд
9.1 General System
- Сувгийн тоо: 4 суваг
- Тогтвортой байдал: ± 0.006%
- Normal Deviation: ± 22 кГц
- S/N харьцаа: <120 дБ
- THD: <0.6 %
- Давтамжийн хариу: 50 Гц - 15 кГц
- Хүрээ: 65 метр
9.2 Хүлээн авагч
- Мэдрэмж: > 80 дБ
- Аудио гаралт: Balanced and Unbalanced (6.3cm mixed output, four 6.3cm individual outputs)
- Эрчим хүчний шаардлага: AC 16 V, 400 mA
- Хэмжээ: 440 x 210 x 40 мм
- Жин: Ойролцоогоор 1.3 кг
- Материал: Металл
9.3 Wireless Microphone (Transmitter)
- Савны төрөл: Динамик
- RF гаралт: <10 мВт
- Normal Deviation: ± 22 кГц
- Хамгийн их хазайлт: ± 80 кГц
- Зай: 2 х 1.5 В АА батерей
- Зайны хугацаа: 8 цаг
10. Баталгаат хугацаа ба дэмжлэг
XTUGA products are designed for reliability and performance. For warranty information and technical support, please refer to the contact details provided with your purchase or visit the official XTUGA webсайт. Худалдан авалтын баримтаа аливаа баталгаат нэхэмжлэлийг худалдан авсан баримт болгон хадгална уу.


