1. Танилцуулга
This manual provides essential instructions for the safe and effective use of your DT321B Digital Multimeter. This portable device is designed for measuring AC/DC voltage, DC current, resistance, and includes features for diode testing, continuity, battery testing, and transistor (hFE) measurements. Please read this manual thoroughly before operation and retain it for future reference.
2. Аюулгүй байдлын мэдээлэл
Always observe basic safety precautions when using this multimeter to reduce the risk of fire, electric shock, or personal injury.
- Боть бүү хэрэглээрэйtagмультиметрийн заасан дээд хязгаараас давсан гүйдэл эсвэл e.
- Ensure the test leads are in good condition and properly connected before making any measurements.
- Never use the multimeter if it appears damaged or if the test leads are damaged.
- Ботьтой ажиллахдаа болгоомжтой байгаарайtag30V AC RMS, 42V оргил эсвэл 60V DC-ээс дээш. Эдгээр ботьtagцочролын аюул учруулж байна.
- Always disconnect power to the circuit under test before measuring resistance or continuity.
- Do not operate the multimeter in explosive atmospheres.
- Батерей бага байгаагийн индикатор гарч ирэхэд батерейг зөв уншихын тулд солино уу.
3. Бүтээгдэхүүн дууссанview
The DT321B Digital Multimeter features a clear LCD display and a rotary switch for selecting various measurement functions. Input jacks are provided for connecting test leads.

Зураг 3.1: Урд view of the DT321B Digital Multimeter with key components labeled. The display shows numerical readings, the hold button freezes the current reading, and the rotary switch selects measurement functions. The '10A' jack is for high current measurements, 'COM' is the common ground, and 'VΩmA' is for voltage, resistance, and low current measurements.
The multimeter includes a blue backlight for improved visibility in low-light conditions and a data hold function to freeze the displayed reading.
4. Тохиргоо
4.1 Батерей суурилуулах
The DT321B Digital Multimeter requires two 1.5V batteries (Type 7, typically AAA) for operation. To install or replace batteries:
- Мультиметр унтарсан эсэхийг шалгаарай.
- Төхөөрөмжийн арын хэсэгт зайны тасалгааны тагийг олоорой.
- Хадгалах эрэг(үүд)-ийг тайлж, тагийг ав.
- Insert the two 1.5V batteries, observing the correct polarity (+ and -) as indicated inside the compartment.
- Зайны тасалгааны тагийг сольж, боолтоор нь бэхлээрэй.
5. Ашиглалтын заавар
Before making any measurements, ensure the test leads are securely plugged into the correct input jacks.

Figure 5.1: The DT321B Multimeter with test probes connected. The black probe is connected to the 'COM' (common) jack, and the red probe is connected to the 'VΩmA' jack for most voltage, resistance, and low current measurements.
5.1 Тогтмол гүйдлийг хэмжих Voltage (V–)
- Insert the red test lead into the 'VΩmA' jack and the black test lead into the 'COM' jack.
- Эргэдэг унтраалгыг хүссэн DC Vol-д тохируулна ууtage (V–) range (e.g., 200m, 2, 20, 200, 1000V). If the voltage is unknown, start with the highest range and work downwards.
- Хэмжих гэж буй эд анги эсвэл хэлхээнд туршилтын датчикуудыг холбоно уу.
- боть уншина ууtagLCD дэлгэц дээрх e утга.
5.2 Хувьсах гүйдлийг хэмжих Voltage (V∼)
- Insert the red test lead into the 'VΩmA' jack and the black test lead into the 'COM' jack.
- Эргэдэг унтраалгыг хүссэн AC Vol-д тохируулна ууtage (V∼) range (e.g., 200, 750V).
- Хэмжих гэж буй эд анги эсвэл хэлхээнд туршилтын датчикуудыг холбоно уу.
- боть уншина ууtagLCD дэлгэц дээрх e утга.
5.3 Measuring DC Current (A–)
АНХААРУУЛГА: To avoid damage to the multimeter or the circuit, never connect the test leads in parallel across a voltage source when measuring current. Always connect in series.
- For currents up to 200mA, insert the red test lead into the 'VΩmA' jack. For currents up to 10A, insert the red test lead into the '10A MAX' jack. The black test lead always goes into the 'COM' jack.
- Set the rotary switch to the desired DC Current (A–) range (e.g., 200u, 2m, 20m, 200m, 10A).
- Open the circuit where current is to be measured and connect the multimeter in series with the circuit.
- LCD дэлгэц дээрх одоогийн утгыг уншина уу.
5.4 Measuring Resistance (Ω)
АНХААРУУЛГА: Ensure the circuit under test is completely de-energized before measuring resistance.
- Insert the red test lead into the 'VΩmA' jack and the black test lead into the 'COM' jack.
- Set the rotary switch to the desired Resistance (Ω) range (e.g., 200, 2k, 20k, 200k, 2M).
- Хэмжих гэж буй эд анги дээр туршилтын датчикуудыг холбоно уу.
- LCD дэлгэц дээрх эсэргүүцлийн утгыг уншина уу.
5.5 Диодын туршилт
- Insert the red test lead into the 'VΩmA' jack and the black test lead into the 'COM' jack.
- Set the rotary switch to the diode symbol (→|).
- Улаан датчикийг анод руу, хар датчикийг диодын катод руу холбоно. Дэлгэц дээр урагшлах боть гарч ирнэtage уналт.
- Reverse the probes. The display should show 'OL' (open loop) for a good diode.
5.6 Тасралтгүй байдлын туршилт
- Insert the red test lead into the 'VΩmA' jack and the black test lead into the 'COM' jack.
- Set the rotary switch to the continuity symbol (♫).
- Connect the test probes across the circuit or component. If continuity exists (resistance below a certain threshold), the buzzer will sound.
5.7 Battery Testing (1.5V / 9V)
- Insert the red test lead into the 'VΩmA' jack and the black test lead into the 'COM' jack.
- Set the rotary switch to the '1.5V BATT' or '9V BATT' position.
- Connect the red probe to the positive terminal and the black probe to the negative terminal of the battery.
- Зайны ботийг уншина ууtage дэлгэц дээр.
5.8 Транзисторын (hFE) туршилт
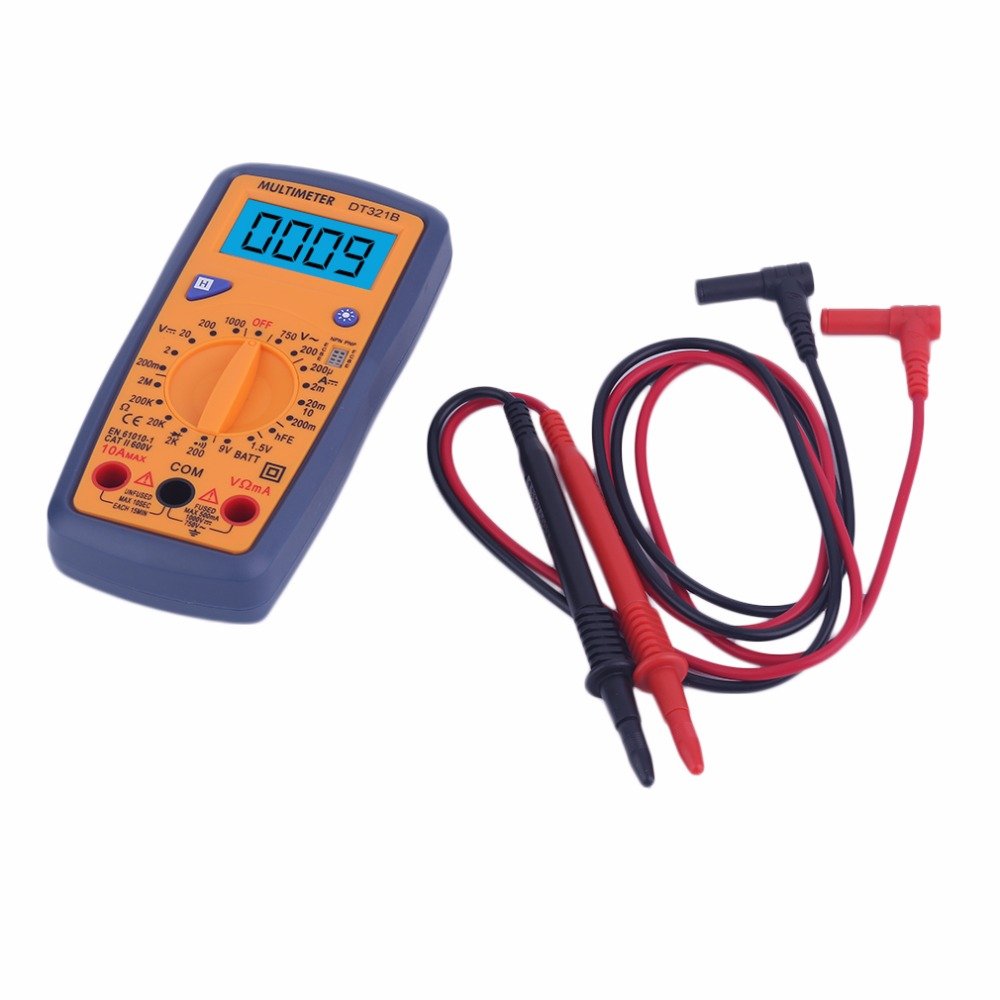
Figure 5.2: The DT321B Multimeter in use, with an inset showing a transistor being tested. The multimeter can measure the hFE (current gain) of NPN and PNP transistors.
- Set the rotary switch to the 'hFE' position.
- Identify the NPN or PNP type of the transistor.
- Insert the transistor leads (Emitter, Base, Collector) into the corresponding sockets in the 'hFE' test socket on the multimeter.
- Read the hFE value on the LCD display.
5.9 Өгөгдөл хадгалах функц
Press the 'Hold' button to freeze the current reading on the display. Press it again to release the hold function and resume live readings.
5.10 Арын гэрэлтүүлгийн функц
The multimeter features a blue backlight. Press the backlight button (often integrated with the 'Hold' button or a separate button with a light symbol) to turn the backlight on or off for improved visibility.
6. Засвар үйлчилгээ
6.1 Цэвэрлэгээ
Зар сурталчилгаагаар хэргийг арчихamp даавуу болон зөөлөн угаалгын нунтаг. Зүлгүүрийн бодис эсвэл уусгагч хэрэглэж болохгүй. Мультиметрийг хэрэглэхийн өмнө бүрэн хуурай байгаа эсэхийг шалгаарай.
6.2 Батерейг солих
When the low battery symbol appears on the display, replace the batteries as described in Section 4.1. Remove batteries if the multimeter is not used for extended periods to prevent leakage.
7. Алдаа засах
- Дэлгэц байхгүй эсвэл бүдэг дэлгэц: Батерейны суурилуулалт болон цэнэглэлтийг шалгана уу. Шаардлагатай бол батерейг солино уу.
- Буруу уншилтууд: Ensure the rotary switch is set to the correct function and range. Check test lead connections. Verify the circuit under test is properly prepared (e.g., de-energized for resistance).
- 'OL' (Хэт ачаалал) харагдана: The measured value exceeds the selected range. Switch to a higher range or check for an open circuit.
- Тасралтгүй дуут дохио байхгүй: Ensure the multimeter is in continuity mode and the circuit is closed.
8. Техникийн үзүүлэлтүүд
| Хэмжилт | Хүрээ | Нарийвчлал |
|---|---|---|
| DC ботьtage | 200мВ, 2В, 20В, 200В, 1000В | ±0.5% |
| AC ботьtage | 200V, 750V | ±1.0% |
| DC гүйдэл | 200uA, 2mA, 20mA, 200mA, 10A | ±1.8% |
| Эсэргүүцэл | 200Ω, 2кОм, 20кОм, 200кОм, 2МΩ | ±1.0% |
Ерөнхий үзүүлэлтүүд:
- LCD дэлгэцийн хэмжээ: 45x23 мм
- Бүтээгдэхүүний хэмжээ: 160x76x32мм
- Эрчим хүчний хангамж: 2 x 1.5V batteries (Type 7 / AAA)
- Бага ботьtage Symbol Display: Тиймээ
- Хэт ачааллын хамгаалалт: Тиймээ
- Диод илрүүлэлт: Тиймээ
- On-off Detection & Buzzer: Тиймээ
- Батерейны хүчин чадлыг илрүүлэх: 1.5V / 9V
- Transistor Detection (hFE): Тиймээ
- Мэдээлэл хадгалах: Тиймээ
- Арын гэрэлтүүлгийн дэлгэц: Тиймээ
9. Баталгаат хугацаа ба дэмжлэг
Specific warranty and support information for the DT321B Digital Multimeter is not available in the provided product details. Please refer to the retailer or manufacturer's website for any applicable warranty terms or customer support contacts.


