1. Танилцуулга
The EPEVER Tracer1210AN MPPT Solar Charge Controller is designed to efficiently manage power from your solar panels to charge batteries. It features advanced Maximum Power Point Tracking (MPPT) technology, ensuring high tracking efficiency of over 99.5%. This controller supports 12V and 24V battery systems automatically and can handle a maximum PV input voltage of 100V. It is compatible with various battery types, including sealed lead-acid, gel, flooded, and lithium batteries. The built-in LCD screen displays key charging parameters, and multiple connectivity options allow for personalized settings and monitoring via remote meter, mobile app, or PC software.
2. Бүтээгдэхүүний онцлог
The Tracer1210AN controller integrates several features for optimal performance and user interaction.

- LCD дэлгэц: Shows real-time operating data and fault information.
- Сонгох товч: Used to navigate through different display interfaces.
- Нэвтрэх товч: Used to confirm selections or enter settings menus.
- Холбох нүх: For secure installation of the controller.
- Temperature Sensor Port: Connects the Remote Temperature Sensor (RTS) for accurate battery temperature compensation.
- Solar Panel Terminals: Connects to the solar panel array.
- Зайны терминалууд: Зайны банкинд холбогдоно.
- Load Terminals: DC ачаалалтай холбогддог.
- COM Port (RS485): For communication with accessories like the MT50 remote meter, PC software, or mobile app.

3. Тохиргоо ба суурилуулалт
Proper installation is crucial for the safe and efficient operation of your solar charge controller. Follow these steps carefully.
3.1 Хайрцагнаас задлах ба бүрэлдэхүүн хэсгүүд
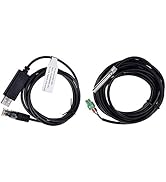
Before installation, ensure all components are present and undamaged. The package typically includes the Tracer1210AN controller, an MT50 remote meter, a Remote Temperature Sensor (RTS), and an RS485 PC communication cable.

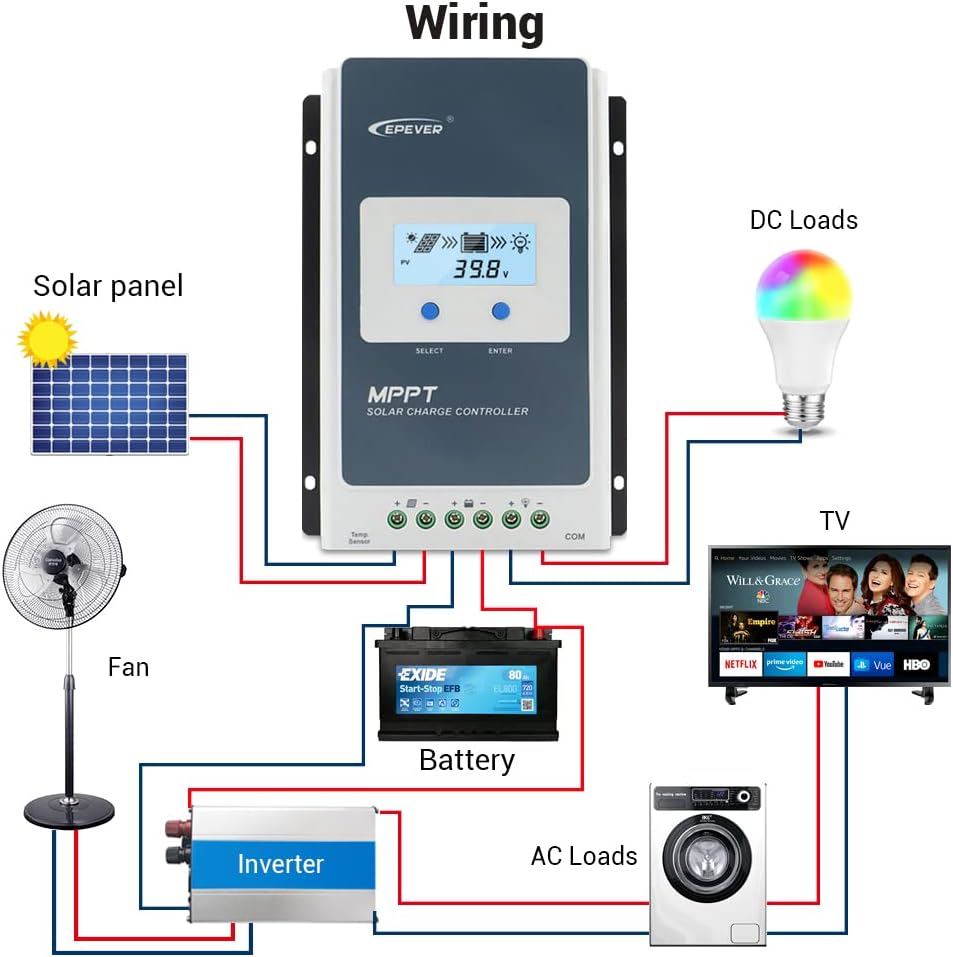
3.2 Холболтын схем
Connect the components in the specified order to prevent damage. The connection order is: Battery → Solar Panel → Load. The disassembly order is the reverse: Load → Solar Panel → Battery.
3.3 Communication Ports and Accessories
The controller features various ports for enhanced monitoring and control.

- Remote Temperature Sensor (RTS): Connect the RTS300R47K3.81A to the designated port for accurate battery temperature compensation. The standard cable length is 3m.
- RS485 холбооны порт: This RJ45 port allows connection to various accessories for monitoring and parameter setting.
3.4 Суурилуулалтын үе шатууд
- Mount the controller securely using the provided mounting holes.
- Батерейг удирдлагын батерейны терминалуудтай холбоно уу. Зөв туйлшралыг шалгана уу.
- Connect the solar panel to the controller's solar panel terminals. Ensure correct polarity.
- Connect the DC loads to the controller's load terminals. Ensure correct polarity.
- Connect the temperature sensor probe to the controller.
3.5 Video: Unboxing and Installation
Watch this video for a visual guide on unboxing and installing the EPEVER Tracer-AN controller and its accessories.
4. Ашиглалтын заавар
This section covers basic operation and how to configure essential settings on your controller.
4.1 Manual Control Mode
The controller supports manual control of the load. Press the 'ENTER' button to toggle the load on or off.
4.2 Setting the Battery Type
It is essential to set the correct battery type for optimal charging and battery longevity. The controller supports various battery types including Sealed (default), Gel, Flooded, and different Lithium battery configurations.

Батерейны төрлийг тохируулахын тулд:
- Press and hold the 'ENTER' button for 5 seconds when the battery voltage interface is displayed.
- Press the 'SELECT' button when the battery type interface is flashing to cycle through available battery types.
- Press the 'ENTER' button to confirm your selection.
4.3 Setting the Load Mode
The load working mode determines how the connected DC loads operate. Options include Light ON/OFF, various timer settings, test mode, and manual mode.
To set the load mode:
- Press and hold the 'ENTER' button for 5 seconds when the load mode interface is displayed.
- Press the 'SELECT' button when the load mode interface is flashing to cycle through available modes.
- Press the 'ENTER' button to confirm your selection.
5. Техникийн үзүүлэлтүүд
Below are the technical specifications for the Tracer1210AN MPPT Solar Charge Controller.
| Параметр | Value (Tracer1210AN) |
|---|---|
| Системийн нэрлэсэн ботьtage | 12 / 24VDC авто |
| Нэрлэсэн цэнэгийн гүйдэл | 10 А |
| Нэрлэсэн цэнэгийн гүйдэл | 10 А |
| Батерейны эзлэхүүнtage Хамрах хүрээ | 8~32V |
| Макс. PV Open Circuit Voltage | 100V (25°C орчны температурт) |
| МАН-ын ботьtage Хамрах хүрээ | Батерейны эзлэхүүнtage +2V ~ 72V |
| Макс. PV оролтын хүч | 130W/12V, 260W/24V |
| Өөрийгөө хэрэглэх | ≤12мА |
| Цэнэглэх хэлхээний ботьtage Дусал | ≤0.23V |
| Temperature Compensate | -3mV/°C/2V (Өгөгдмөл) |
| Газардуулга | Нийтлэг сөрөг |
| RS485 интерфейс | 5VDC / 100mA |
| LCD арын гэрэлтүүлгийн цаг | 60S (Анхдагч) |
6. Дагалдах хэрэгсэл
The EPEVER Tracer1210AN controller is often bundled with or compatible with several accessories to enhance its functionality.
- MT50 алсын зайн тоолуур: This remote meter can display various operating data and fault information. It features easy-to-operate buttons and a clear numeric display. It is used for monitoring and setting controller parameters.
- Алсын температур мэдрэгч (RTS300R47K3.81A): Acquires battery temperature for accurate temperature compensation of control parameters. The standard length of the cable is 3m.
- USB-ээс RS485 кабель (CC-USB-RS485-150U): Used to connect the controller to a PC for monitoring and setting parameters via Solar Station PC software. The cable length is 1.5m.
- OTG Cable (OTG-12CM): Used to connect a mobile communication cable to achieve real-time monitoring and parameter modification via a mobile APP.
- WiFi цуваа адаптер (eBox-WiFi-01): Allows monitoring and setting parameters via mobile APP software through WiFi signals.
- RS485-аас Bluetooth адаптер руу (eBox-BLE-01): Enables monitoring and setting parameters via mobile APP software through Bluetooth signals.
- Бүртгэл хөтлөгч (eLOG01): Records the operating status of the controller for later review.

7. Алдаа засах
If you encounter issues with your EPEVER Tracer1210AN controller, refer to the following common troubleshooting tips:
- LCD дээр дэлгэц байхгүй: Зайны холболтыг шалгаж, зайны цэнэгийг шалгана ууtage нь үйл ажиллагааны хүрээнд байна.
- Цэнэглэхгүй: Verify solar panel connections and ensure sufficient sunlight. Check for any shading on the solar panels. Confirm the battery type setting is correct.
- Ачаалах ажиллахгүй байна: Check load connections and ensure the load mode is set correctly (e.g., Manual ON, Light ON/OFF). Verify that the battery voltage нь бага хэмжээнээс дээгүүр байнаtage салгах босго.
- Температурыг буруу унших: Ensure the Remote Temperature Sensor (RTS) is properly connected and positioned near the battery.
- Харилцааны асуудлууд: Check the RS485 cable connections to the remote meter, PC, or adapter. Ensure drivers are installed for PC communication.
For more detailed troubleshooting, consult the full product manual or contact EPEVER customer support.
8. Засвар үйлчилгээ
Regular maintenance helps ensure the longevity and optimal performance of your solar charge controller.
- Цэвэр байдал: Удирдагчийг тоос шороо, хог хаягдалгүй цэвэр байлгаарай. Цэвэрлэхийн тулд хуурай даавуу ашиглана уу.
- Холболтууд: Бүх холболтын нягтрал болон зэврэлтийг үе үе шалгаж байгаарай. Сул холболтууд нь хэт халалт, эвдрэлд хүргэж болзошгүй.
- Агааржуулалт: Ensure adequate airflow around the controller to facilitate heat dissipation. Do not block the heat sink fins.
- Батерейны эрүүл мэнд: Батерейны хэмжээг хянахtage and health regularly. Ensure the battery type setting on the controller matches your battery.
- Програм хангамжийн шинэчлэлтүүд: Үйлдвэрлэгчийг шалгана уу webГүйцэтгэлийг сайжруулах эсвэл шинэ функцуудыг нэмэх боломжтой програм хангамжийн шинэчлэлтүүдийг авах боломжтой сайт.
9. Баталгаат хугацаа ба дэмжлэг
EPEVER products are designed for reliability and performance. For warranty information and technical support, please refer to the official EPEVER webсайт эсвэл орон нутгийн дистрибьютертэй холбогдоно уу.
You can also visit the official iSunergy store on Amazon for product information and support: iSunergy Amazon Store.


