Танилцуулга
The Streamlight 69414 TLR-8 X is a compact and durable tactical weapon light with an integrated red aiming laser, designed for enhanced performance in various environments. It provides 500 lumens of LED brightness and a 5,000 candela peak beam intensity, ensuring superior visibility and precise targeting. This manual provides detailed instructions for the safe and effective use, installation, and maintenance of your TLR-8 X.
Аюулгүй байдлын мэдээлэл
АНХААРУУЛГА:
Энэ бүтээгдэхүүн нь Калифорни мужид хорт хавдар үүсгэх, ургийн гажиг үүсгэх эсвэл нөхөн үржихүйн бусад гэмтэл учруулдаг химийн бодис агуулдаг.
Always ensure the firearm is unloaded and safe before installing, removing, or performing any maintenance on the TLR-8 X. Keep fingers clear of the muzzle.
The laser is rated Class 3R, 640-660nm with an output of <5mW. Avoid direct eye exposure to the laser beam.
Багцын агуулга
- TLR-8 X Flashlight with Integrated Red Aiming Laser
- 1x CR123A Battery
- High and Low Switches (pre-installed or included as options)
- Mounting Kit (includes various keys: UNIV-1, UNIV-2, UNIV-3, 1913-1, 1913-2, 1913-3, 1913-4, and any 1913 key)
- Key Box and Tool
- Хэрэглэгчийн гарын авлага (энэ гарын авлага)
Тохиргоо
1. Зай суурилуулах
The TLR-8 X uses one CR123A battery. To install or replace the battery:
- Ensure the firearm is unloaded and safe.
- Unscrew the face cap of the light by rotating it counter-clockwise.
- Insert the CR123A battery with the positive (+) end facing towards the light head.
- Screw the face cap back on clockwise until it is finger-tight.

Image: The TLR-8 X with its face cap unscrewed, showing the battery compartment and a CR123A battery ready for insertion.
2. Mounting to Firearm
The TLR-8 X features a robust rail clamp system for secure attachment and detachment without tools. Verify compatibility and fitment with your specific handgun model before purchase and installation.
- Ensure the firearm is unloaded and safe.
- Select the appropriate key from the mounting kit that matches your firearm's rail type (e.g., UNIV-1 for most Glock models, 1913-1 for Sig Sauer 320 Compact).
- Төмөр замыг суллах clamp screw on the TLR-8 X.
- Align the TLR-8 X with the firearm's accessory rail and slide it into position.
- Төмөр замыг чангалах clamp screw until the light is securely fastened to the rail. Do not overtighten.

Image: A Streamlight TLR-8 X shown from the front-right angle, illustrating its compact design and rail clamp system for attachment to a firearm.

Зураг: нэг тал view of the Streamlight TLR-8 X, highlighting its profile and the integrated laser emitter.
3. Rear Switch Options
The TLR-8 X comes with interchangeable rear paddle switches (high and low options) to suit user preference and firearm ergonomics. The default switches are typically the "high" profile.
- To change switches, ensure the unit is off and detached from the firearm.
- Carefully remove the existing paddle switches.
- Install the desired high or low profile switches by aligning them with the slots and pressing firmly until they click into place.
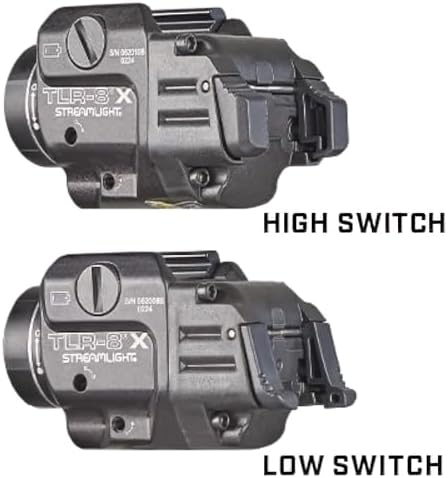
Image: A comparison showing the "High Switch" and "Low Switch" options for the TLR-8 X, illustrating the difference in their paddle profiles.
Ашиглалтын заавар
1. Асаах/унтраах болон горимын сонголт
The TLR-8 X offers three primary modes: LED Light Only, LED Light & Laser, and Laser Only. Switching between modes is intuitive using the ambidextrous rear paddle switches.
- Momentary Activation: Press and hold either paddle switch. Release to turn off.
- Тогтмол асаалттай: Press and release either paddle switch quickly. Press again to turn off.
- Солих горимууд: With the unit on, press and hold one paddle switch, then tap the other paddle switch to cycle through the modes (Light Only → Light & Laser → Laser Only).

Image: The Streamlight TLR-8 X shown with its red aiming laser activated, projecting a visible red dot.
2. Strobe Mode
The TLR-8 X features a user-enabled strobe mode for tactical situations.
- To activate strobe: From the "Constant On" mode, quickly double-tap either paddle switch.
- To deactivate strobe: Press either paddle switch once.
3. Safe Off Feature
The Safe Off feature prevents unintentional activation, conserving battery life and ensuring readiness. To engage Safe Off, rotate the face cap approximately 1/4 turn counter-clockwise until the light no longer activates. To disengage, rotate clockwise until it is finger-tight.
4. Laser Zeroing (Sighting In)
To ensure accurate aiming, the integrated red laser needs to be zeroed to your firearm. This process typically involves adjusting the laser's point of impact to match your firearm's point of aim.
- Ensure the firearm is unloaded and safe.
- Mount the TLR-8 X securely to your firearm.
- Using the small hex wrench provided in the mounting kit, locate the windage (horizontal) and elevation (vertical) adjustment screws on the side and bottom of the unit.
- Make small adjustments to the screws. Turning the screw clockwise typically moves the laser in one direction, and counter-clockwise in the opposite. Test adjustments at a safe range.
- Fire a few rounds at a target to determine the point of impact relative to the laser dot. Adjust the laser until the point of impact aligns with the laser dot at your desired zeroing distance.
- Жич: Be careful not to strip the adjustment screws. Use a properly sized hex wrench.

Зураг: арын хэсэг view of the Streamlight TLR-8 X, indicating the location of the windage and elevation adjustment screws for the laser.
Засвар үйлчилгээ
- Цэвэрлэгээ: Зөөлөн ашиглах, damp cloth to clean the exterior of the light. For the lens, use a lens cleaning cloth and solution designed for optics. Avoid abrasive materials.
- Зай солих: Replace the CR123A battery when the light output diminishes or the laser becomes dim. Always use high-quality batteries.
- О-цагираг: Periodically inspect the O-rings for wear and tear. Lubricate with silicone grease if necessary to maintain water resistance.
- Хадгалах: When storing the TLR-8 X for extended periods, remove the battery to prevent leakage and damage. Engage the Safe Off feature.
Алдааг олж засварлах
| Асуудал | Боломжит шалтгаан | Шийдэл |
|---|---|---|
| Light/Laser does not turn on. | Dead or improperly installed battery; Safe Off engaged. | Replace battery, ensuring correct polarity. Disengage Safe Off by tightening the face cap. |
| Гэрэл бүдэг эсвэл анивчдаг. | Low battery; loose face cap. | Replace battery. Ensure face cap is finger-tight. |
| Laser cannot be zeroed or moves after firing. | Loose mounting; stripped adjustment screws; defective unit. | Ensure unit is securely mounted. Use proper tools for adjustment. If issues persist, contact Streamlight customer service. |
| Горимуудыг солиход хүндрэлтэй. | Буруу товчлуурын дараалал. | Review "Operating Instructions" for correct mode switching procedure. |
Үзүүлэлтүүд
- Загвар: 69414
- Гэрлийн гаралт: 500 люмен
- Оргил цацрагийн эрчим: 5000 Кандела
- Гэрлийн зай: 141 метр
- Runtime (Light Only): 1.5 цаг
- Лазер төрөл: Red Aiming Laser (Class 3R, 640-660nm, <5mW output)
- Эрчим хүчний эх үүсвэр: 1x CR123A Battery (included)
- Материал: Anodized Machined Aluminum
- Усны эсэргүүцэл: IPX4 (Усны хамгаалалттай)
- Хэмжээ: 2.58"D x 1.18"W x 1.5"H
- Жин: 2.56 унц (0.16 фунт)
- Өнгө: Хар
- Суурилуулалт: Rail Clamp System (compatible with UNIV-1, UNIV-2, UNIV-3, 1913-1, 1913-2, 1913-3, 1913-4, and any 1913 key)
Баталгаат болон дэмжлэг
The Streamlight TLR-8 X is backed by a Хязгаарлагдмал насан туршийн баталгаа. For warranty claims, technical support, or service, please contact Streamlight customer service directly. Refer to the official Streamlight website for the most up-to-date contact information and warranty details.
Та мөн нэмэлт эх сурвалж, дэмжлэгийг эндээс олох боломжтой Streamlight Store on Amazon.


