Танилцуулга
This manual provides detailed instructions for the assembly, operation, and maintenance of your Sunnydaze 10x13 Soft Top Patio Gazebo. Please read all instructions carefully before beginning assembly and retain this manual for future reference.

Image: Fully assembled Sunnydaze 10x13 Soft Top Patio Gazebo in tan.
Аюулгүй байдлын мэдээлэл
АНХААРУУЛГА: Эдгээр аюулгүй байдлын зааврыг дагаж мөрдөхгүй байх нь гэмтэл, бүтээгдэхүүнийг гэмтээх аюултай.
- Gazebo-г үргэлж дор хаяж хоёр хүнтэй угсар.
- Ашиглахын өмнө бүх холболтыг найдвартай байлгана уу.
- Do not use the gazebo in strong winds, heavy rain, or snow. Disassemble or secure the canopy during adverse weather conditions to prevent damage.
- Бүх дөл болон дулааны эх үүсвэрийг gazebo даавуунаас хол байлга. Даавуу нь галд тэсвэртэй биш.
- Do not hang heavy objects from the frame.
- Gazebo-ийн эргэн тойронд байгаа хүүхдүүдэд хяналт тавих.
- Periodically check all nuts and bolts for tightness.
- This gazebo is designed for temporary shade and shelter. It is not intended as a permanent structure.
Багцын агуулга
Угсрахаас өмнө доор жагсаасан бүх эд ангиуд байгаа бөгөөд гэмтээгүй эсэхийг шалгаарай. Хэрэв ямар нэгэн эд анги байхгүй эсвэл гэмтсэн бол хэрэглэгчийн дэмжлэгтэй холбогдоно уу.
- 4 х хөл
- 4 х Хөл
- 8 x Beams
- 13 x Trusses
- 4 x Хажуугийн хана
- 4 x Screens (Mosquito Netting)
- 2 x Peak Hubs
- 1 x Main Canopy
- 1 x Upper Canopy
- 4 x Long Net Poles
- 4 x Short Net Poles
- 1 x Hardware Kit (includes nuts, bolts, wrenches, etc.)
Угсрах заавар
Assembly requires two people. Please follow these steps carefully. Refer to the diagrams for visual guidance.
Алхам 1: Суурийн хүрээг угсарна
- Lay out the 4 legs and 4 feet on a flat, level surface.
- Attach the feet to the bottom of each leg using the provided hardware.
- Connect the 8 beams to the top of the legs to form the rectangular base structure. Ensure all bolts are finger-tight at this stage.
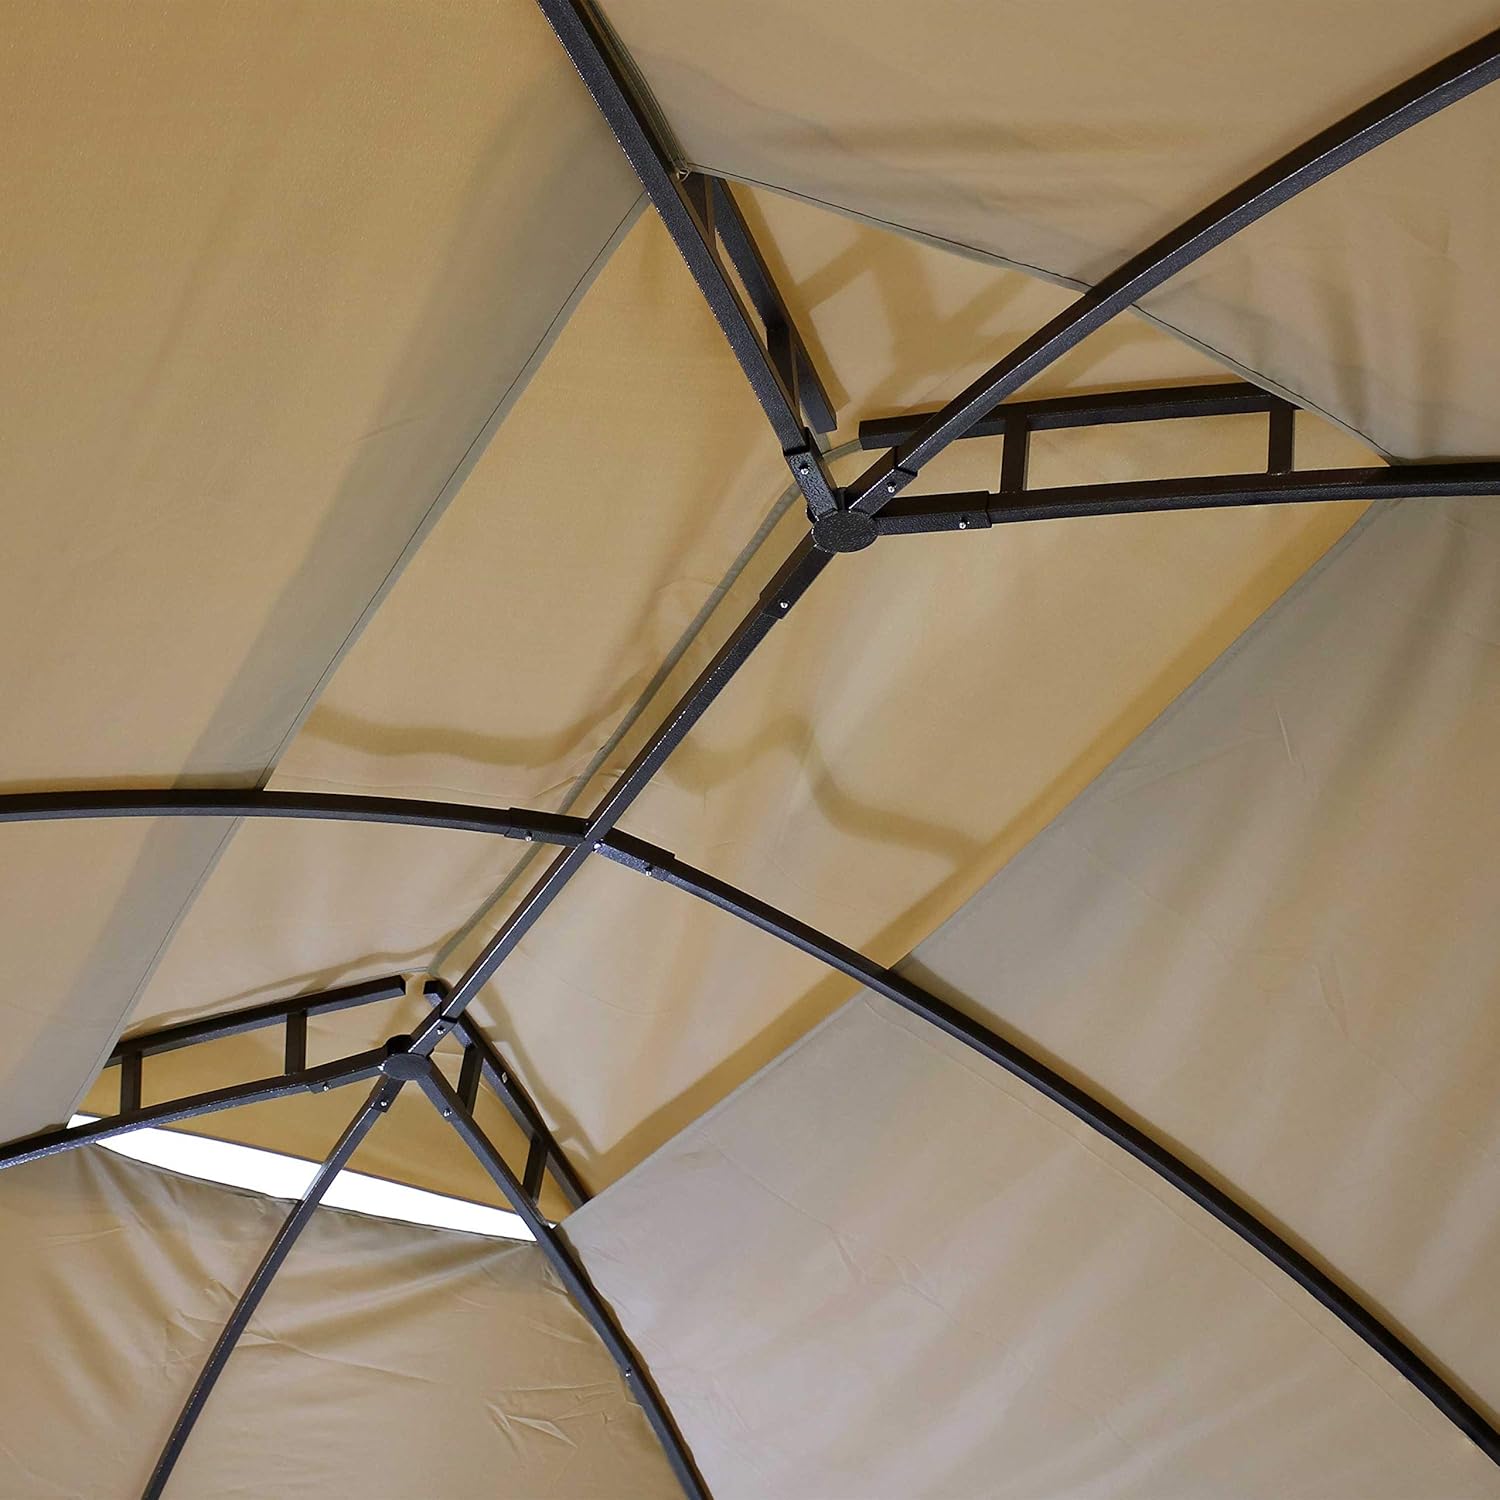
Зураг: Нарийвчилсан view of the steel frame structure.
Step 2: Install the Roof Trusses and Peak Hubs
- Attach the 13 trusses to the beams and connect them to the 2 peak hubs to form the roof structure.
- Бүх холболт найдвартай эсэхийг шалгаарай.
Step 3: Attach the Canopies
- Carefully place the main canopy over the assembled roof frame. Ensure it is centered and all corners are aligned.
- Secure the main canopy to the frame using the integrated fasteners.
- Install the upper canopy onto the smaller top frame, ensuring it is properly seated for ventilation.

Image: Canopy fabric secured to the frame.
Step 4: Install Sidewalls and Screens
- Attach the long and short net poles to the frame as indicated in the diagram.
- Hang the 4 screens (mosquito netting) from the designated tracks or hooks on the frame.
- Hang the 4 sidewalls (privacy curtains) over the screens. The double zippers allow independent operation of screens and sidewalls.
- Use the fabric hook-and-loop fasteners to secure the sidewalls to the legs or tie them back when not in use.
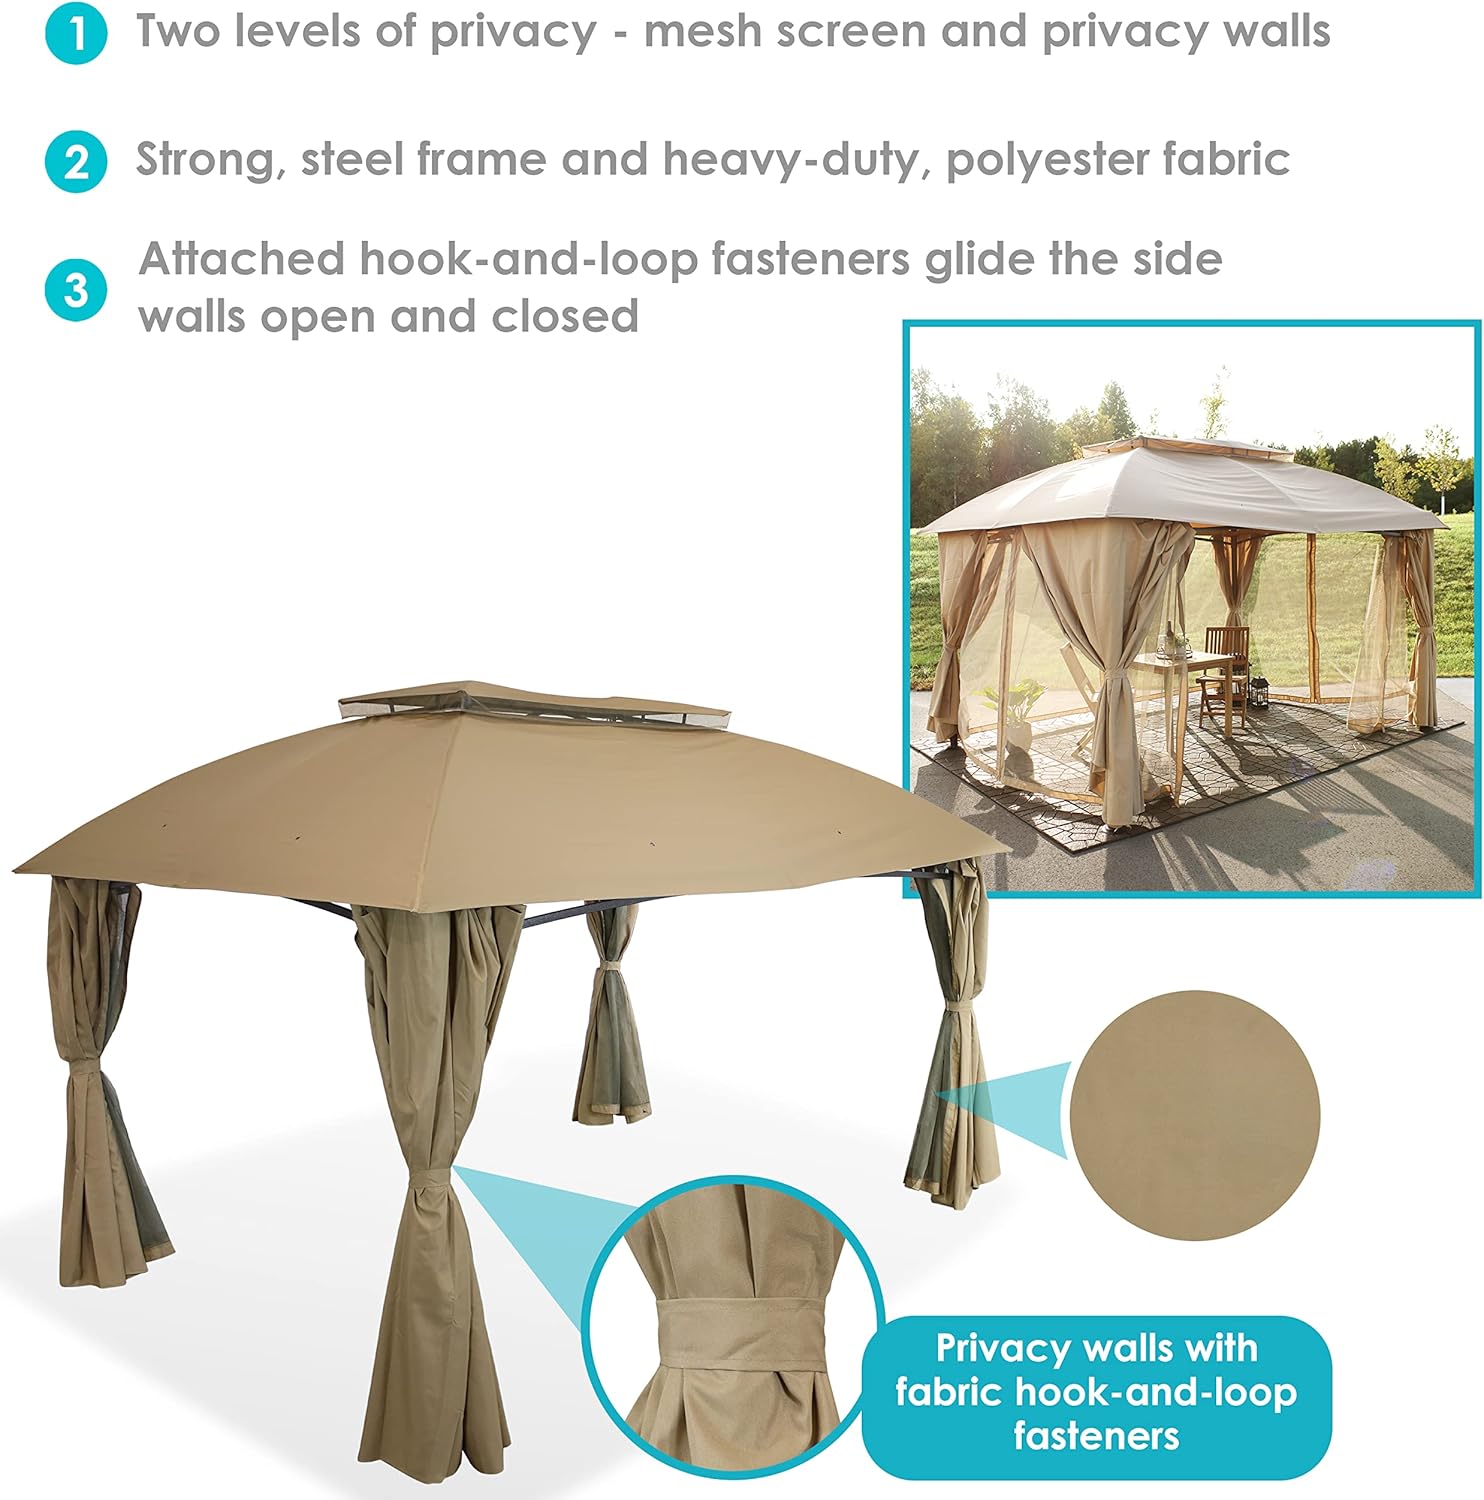
Image: Features of the gazebo including mesh screens and privacy walls.

Image: Detail of privacy wall with fabric hook-and-loop fastener.

Image: Visual comparison of screens versus privacy walls.
Алхам 5: Эцсийн чангаруулах
Once all components are in place, go back and fully tighten all nuts and bolts using the provided tools. Do not overtighten.
Ашиглалтын заавар
Шумуулын торыг ашиглах
The mesh screens are designed to provide ventilation while keeping insects out. They can be zipped closed for full enclosure or tied back to allow open access.
Using the Privacy Curtains
The privacy curtains offer additional shade and privacy. They can be pulled closed over the mesh screens and secured with zippers, or tied back to the gazebo legs using the integrated fabric fasteners when not needed.
Gazebo аюулгүй байдлыг хангах
For added stability, especially in moderate weather, consider using stakes or weights (not included) to secure the gazebo feet to the ground.
Засвар үйлчилгээ
Халхавчны арчилгаа
- Clean the polyester canopy fabric with mild soap and water. Do not use harsh chemicals or abrasive cleaners.
- Allow the canopy to air dry completely before folding and storing to prevent mildew.
- Remove the canopy during strong winds or heavy precipitation to prolong its lifespan.
Хүрээний арчилгаа
- Төмөр хүрээг зараар арчихamp шороо, хог хаягдлыг арилгах даавуу.
- Inspect the frame periodically for any signs of rust or damage. Touch up any scratches with rust-inhibiting paint if necessary.
- Ensure all bolts and connections remain tight.
Улирлын хадгалалт
For prolonged periods of non-use or during winter months, it is recommended to disassemble the gazebo and store all components in a dry, protected area to prevent damage and extend product life.
Алдааг олж засварлах
| Асуудал | Боломжит шалтгаан | Шийдэл |
|---|---|---|
| Canopy does not fit or is too tight. | Incorrect assembly of frame; canopy not stretched evenly; fabric shrinkage. | Ensure frame is assembled correctly and square. Try loosening frame connections slightly, fitting the canopy, then re-tightening. Allow fabric to stretch over time. |
| Халхавч дээр ус хуримтлуулах. | Canopy not taut enough; improper installation of upper canopy; heavy rainfall. | Ensure canopy is stretched tightly over the frame. Verify upper canopy is correctly positioned for drainage. Remove canopy during heavy rain. |
| Gazebo тогтворгүй мэт санагддаг. | Loose connections; not properly anchored. | Check and tighten all bolts and connections. Use ground stakes or weights to secure the gazebo legs. |
| Zippers on sidewalls/screens stick or break. | Dirt or debris in zipper teeth; excessive force. | Clean zipper teeth with a small brush. Apply a zipper lubricant. Operate zippers gently. |
Үзүүлэлтүүд

Image: Dimensional diagram of the gazebo.
| Онцлог | Дэлгэрэнгүй |
|---|---|
| Брэнд | Саннидазе |
| Загварын дугаар | CRE-168 |
| Product Dimensions (Overall/Roof) | 156" L x 116.5" W x 106.5" H |
| Frame Dimensions (Base) | 140" W x 105" D |
| Толгойн цэвэрлэгээ | 75.25" (103.5" at frame peak) |
| Shaded Area | 126.2 хавтгай дөрвөлжин фут хүртэл |
| Зүйлийн жин | 106 фунт |
| Хүрээний материал | Alloy Steel (60mm) |
| Халхавчны материал | 100 GSM Polyester |
| Өнгө | Бор |
| Усны эсэргүүцлийн түвшин | Усанд тэсвэртэй биш |
| Хэт ягаан туяаны хамгаалалт | UPF 30 |
| Угсрах шаардлагатай | Тийм (Хоёр хүн санал болгож байна) |
Баталгаат болон дэмжлэг
Үйлдвэрлэгчийн баталгаа
Sunnydaze Decor нь бүтээгдэхүүнээ дараах байдлаар дэмждэг. Үйлдвэрлэгчийн 1 жилийн баталгаат хугацаа худалдан авсан өдрөөс. Энэхүү баталгаа нь ердийн ашиглалтын үед хийгдсэн материал, хийцийн согогийг хамарна.
Хэрэглэгчийн дэмжлэг
For questions, missing parts, or warranty claims, please contact Sunnydaze Decor customer service. Refer to your purchase documentation or the official Sunnydaze Decor webодоогийн холбоо барих мэдээллийг авах сайт.
Онлайн нөөцүүд: You may find additional support and product information on the Sunnydaze Decor Brand Store.


