MOUNTUP MU0034 дан дэлгэцийн ширээний суурилуулалтын заавар
Брэнд: MOUNTUP | Загвар: MU0034
1. Танилцуулга
This manual provides detailed instructions for the installation, operation, and maintenance of your MOUNTUP MU0034 Single Monitor Desk Mount. Please read this manual thoroughly before installation to ensure correct setup and safe operation. This monitor mount is designed to enhance your workspace ergonomics by providing adjustable positioning for a single monitor.
2. Аюулгүй байдлын мэдээлэл
- Суурилуулахын өмнө бүх эд ангиуд байгаа бөгөөд гэмтээгүй эсэхийг шалгаарай. Хэрэв ямар нэгэн эд анги байхгүй эсвэл гэмтэлтэй бол бүү ашиглаарай.
- This product is intended for monitors weighing up to 17.6 lbs (8 kg) and screen sizes from 17 to 32 inches. Do not exceed the maximum weight capacity.
- Compatible VESA patterns are 75x75mm and 100x100mm. Verify your monitor's VESA pattern before proceeding.
- Ensure the desk surface is stable and strong enough to support the combined weight of the mount and monitor.
- Tighten all screws firmly, but do not overtighten to avoid stripping threads or damaging components.
- Суулгах явцад хүүхэд, тэжээвэр амьтдыг хол байлга.
- Хэрэв та суулгах процессын талаар эргэлзэж байвал мэргэшсэн мэргэжилтэнтэй зөвлөлдөөрэй.
3. Багцын агуулга
Please verify that all parts are included in your package:
- Гарын угсралтыг хянах
- Ширээний Clamp Суурь
- Grommet Base Components
- VESA хавтан
- Тоног төхөөрөмжийн иж бүрдэл (эрэг, угаагч, Аллен түлхүүр)
- Зааварчилгааны гарын авлага
4. Техникийн үзүүлэлтүүд
| Онцлог | Тодорхойлолт |
|---|---|
| Загварын дугаар | MU0034 |
| Материал | Өнгөлсөн хөнгөн цагаан |
| Дэлгэцийн хэмжээтэй нийцтэй байдал | 17" to 32" (flat or curved) |
| Жингийн багтаамж | 17.6 фунт (8 кг) хүртэл |
| VESA нийцтэй байдал | 75х75мм, 100х100мм |
| Өндөр тохируулга | Up to 11" (16.3" total height adjustment range) |
| Налалтын хүрээ | +45°-аас -45° хүртэл |
| Залгих хүрээ | 360° (arm), 180° (monitor plate) |
| Эргүүлэх | 360° (landscape to portrait) |
| Max Desk Thickness (C-clamp) | 3.35" |
| Нүхний диаметр | 0.39" - 3.1" |
5. Тохиргоо ба суурилуулалт
The MOUNTUP MU0034 offers two installation options: C-clamp mounting and Grommet mounting. Choose the method suitable for your desk.
5.1. C-Clamp Суурилуулалт
This method is for desks without existing grommet holes, or if you prefer clamping to the edge of your desk. Ensure your desk thickness is no more than 3.35 inches.
- C-cl-ийг хавсаргана ууamp: Assemble the C-clamp components to the base of the monitor arm. Position the base on the edge of your desk and tighten the clamp screw until it is secure.
- Хяналтанд VESA хавтанг хавсаргана уу: Secure the VESA plate to the back of your monitor using the appropriate screws from the hardware kit. Ensure the screws are tightened securely.
- Slide Monitor onto Arm: Carefully slide the monitor (with the attached VESA plate) onto the monitor arm's VESA head. Ensure it clicks into place or is secured with the provided locking mechanism.
- Хүчдэл тохируулах: Refer to Section 6.1 for adjusting the gas spring tension to match your monitor's weight.

Figure 1: Illustration of C-clamp болон Grommet суурилуулах сонголтууд.amp is shown securing the mount to the desk edge, while the grommet mount uses a desk hole.
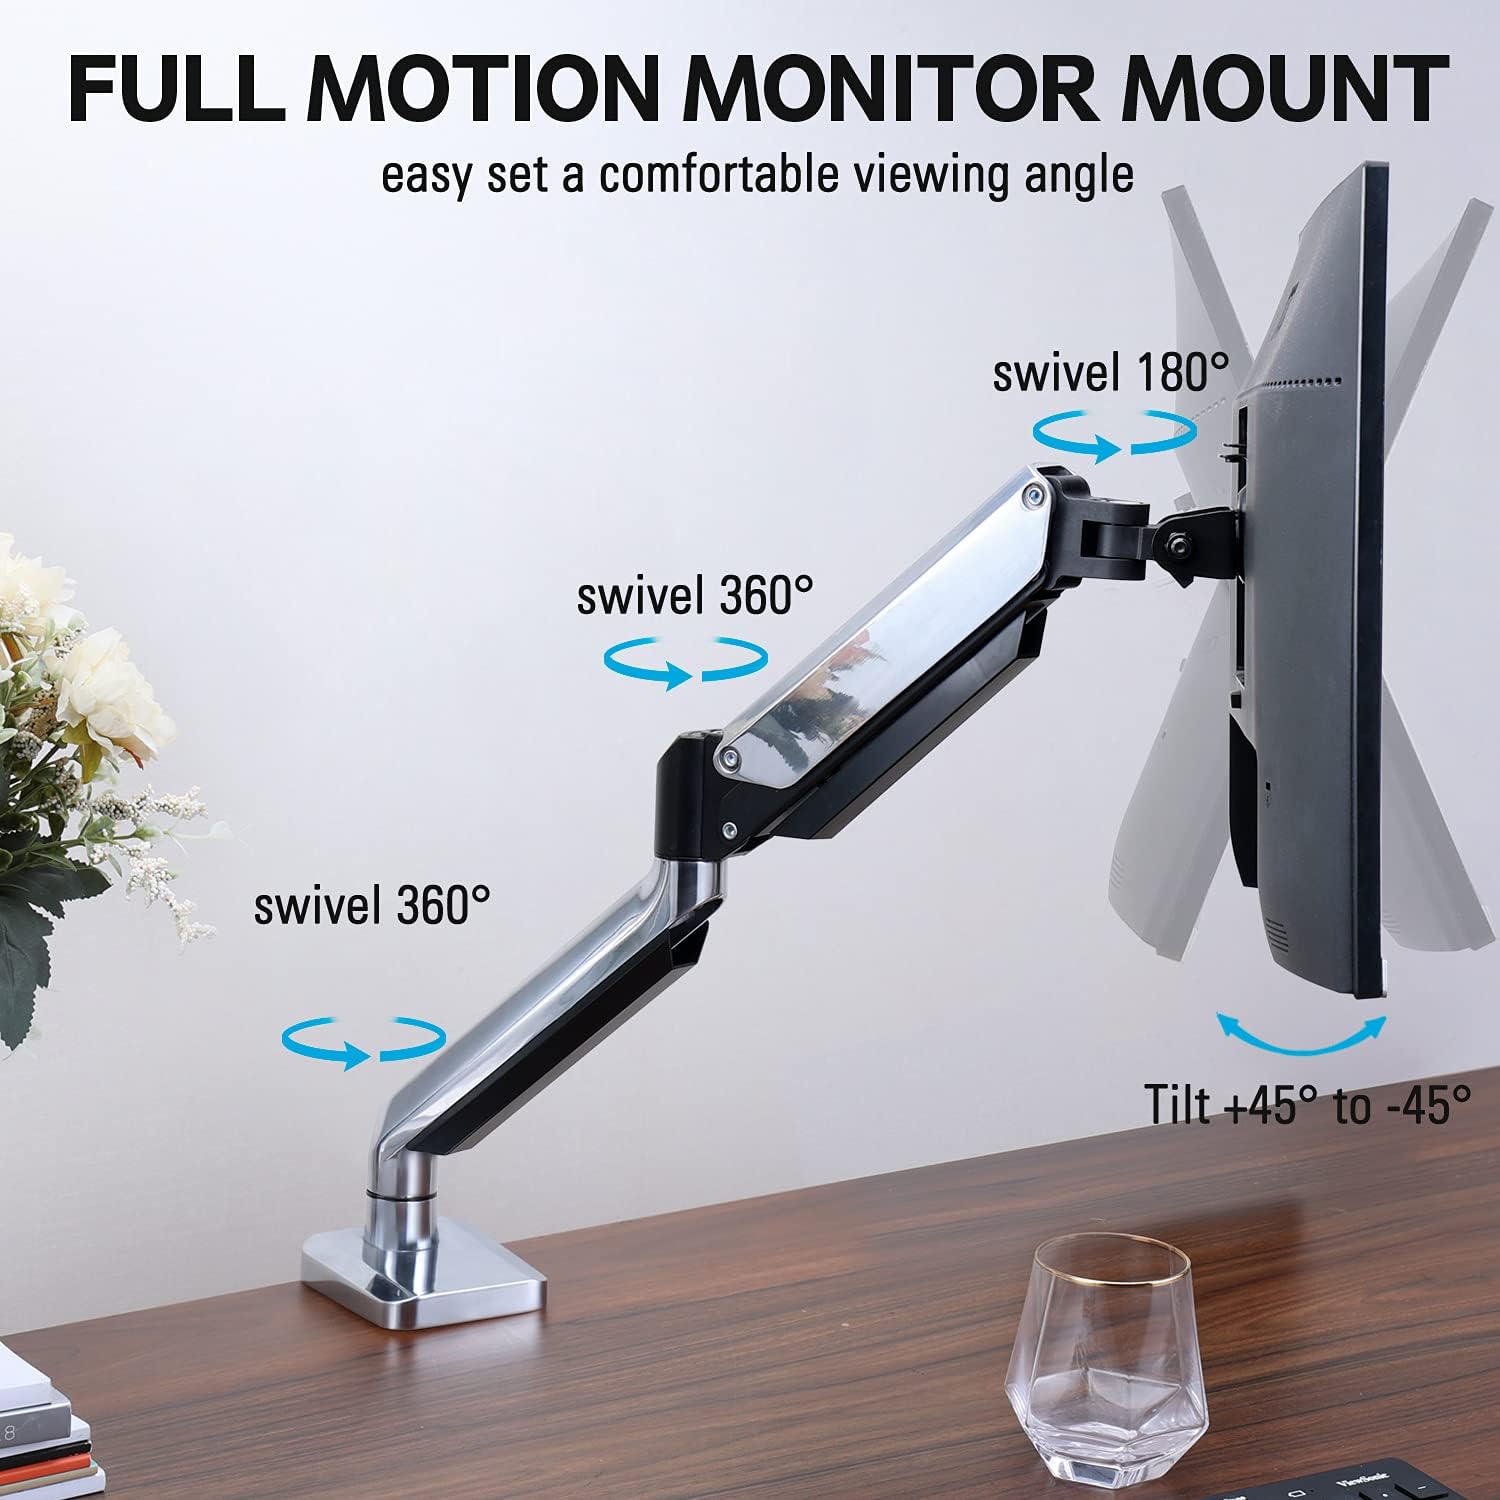
Figure 2: The removable VESA plate being attached to the back of a monitor, then sliding onto the monitor arm for easier installation.
5.2. Холболтын бэхэлгээ
This method utilizes an existing hole in your desk. Ensure your desk thickness is no more than 3.35 inches and the grommet hole diameter is between 0.39 and 3.1 inches.
- Assemble Grommet Base: Insert the grommet base components through the desk hole and secure them from underneath the desk using the provided plate and nut.
- Хяналтанд VESA хавтанг хавсаргана уу: Secure the VESA plate to the back of your monitor using the appropriate screws from the hardware kit. Ensure the screws are tightened securely.
- Slide Monitor onto Arm: Carefully slide the monitor (with the attached VESA plate) onto the monitor arm's VESA head. Ensure it clicks into place or is secured with the provided locking mechanism.
- Хүчдэл тохируулах: Refer to Section 6.1 for adjusting the gas spring tension to match your monitor's weight.
6. Ажиллагаа ба тохируулга
The MOUNTUP MU0034 monitor arm offers various adjustments for optimal viewая тухтай байдал.
6.1. Хийн пүршний хурцадмал байдлын тохируулга
The gas spring tension needs to be adjusted to match the weight of your monitor. This ensures the monitor stays in position once adjusted.
- If the monitor drifts down, turn the adjustment screw (usually located on the arm joint) clockwise ("+") to increase tension.
- If the monitor floats up, turn the adjustment screw counter-clockwise ("-") to decrease tension.
- Adjust gradually until the monitor remains stable at any height.
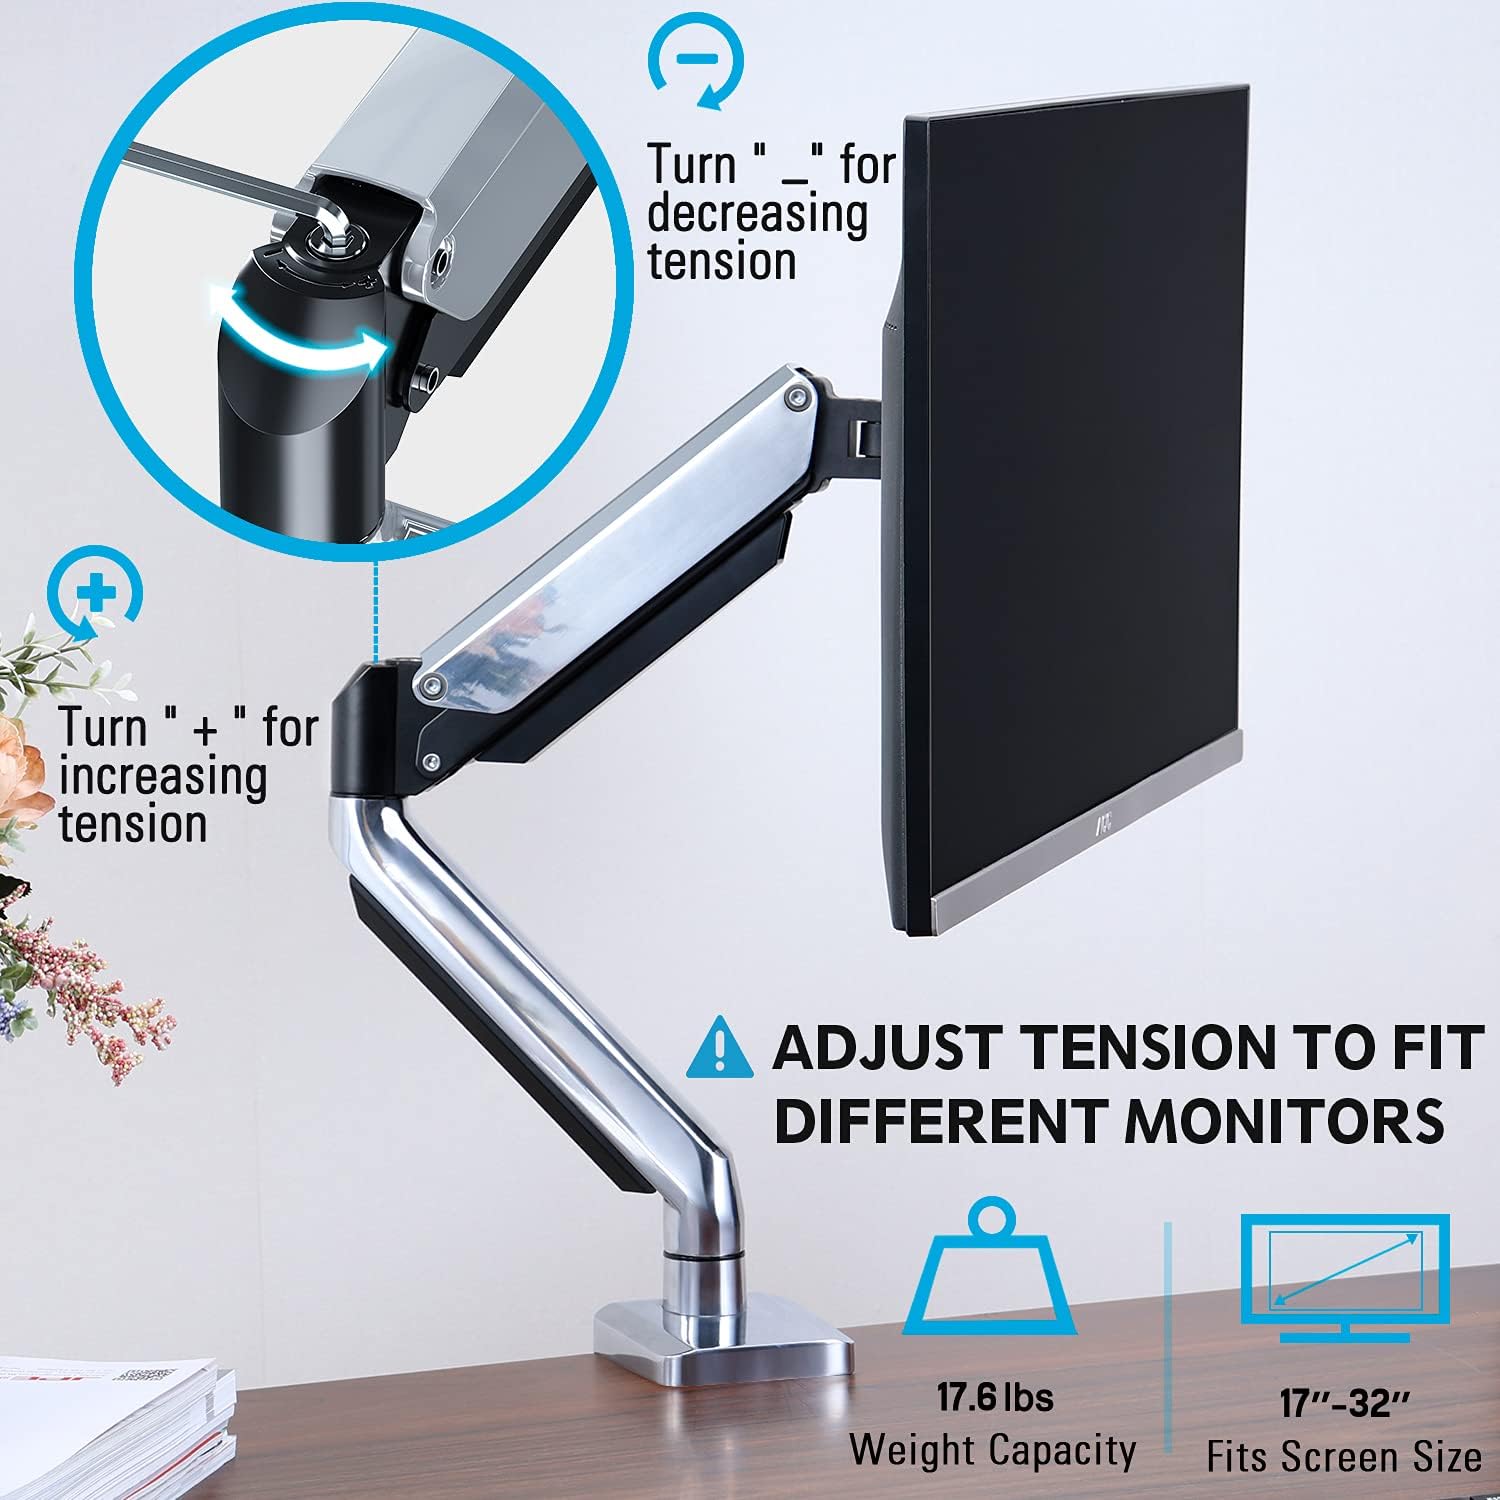
Figure 3: Instructions for adjusting the gas spring tension using an Allen key. Turning clockwise increases tension, counter-clockwise decreases it.
6.2. Өндөр тохируулга
Once the gas spring tension is correctly set, you can easily raise or lower your monitor to your desired ergonomic height. The arm allows for up to 11 inches of vertical adjustment.

Figure 4: Diagram illustrating the maximum height adjustment of 11 inches and maximum extension of 17.5 inches.
6.3. Tilt, Swivel, and Rotation
The monitor arm provides full motion capabilities:
- Хазайлт: Adjust the monitor screen +45° to -45° to reduce glare or find a comfortable viewөнцөг.
- Эргэдэг: The arm can swivel 360° at the base and 360° at the middle joint. The monitor plate itself can swivel 180°. This allows for easy screen sharing or repositioning.
- Эргүүлэх: Хэвтээ болон босоо чиглэлийн хооронд шилжихийн тулд дэлгэцийг 360° эргүүлнэ үү.

Figure 5: Visual representation of the monitor arm's full motion capabilities, including 360° swivel, 180° swivel at the monitor plate, and +45° to -45° tilt.

Figure 6: An image demonstrating the monitor's ability to rotate 360 degrees, allowing for both landscape and portrait viewгоримууд.
7. Кабелийн менежмент
The MOUNTUP MU0034 features integrated cable management to keep your workspace tidy.
- Route your monitor cables (power, video, etc.) along the underside of the arm.
- Use the provided cable clips or covers to secure the cables within the arm channels.
- Утаснууд нь хурцадмал байдалгүйгээр хөдөлгөөнийг бүрэн хэмжээгээр хангахын тулд хангалттай сул байгаа эсэхийг шалгаарай.

Figure 7: Illustration of how cables are routed and organized through the integrated channels on the monitor arm, keeping the desk clear.
8. Засвар үйлчилгээ
- Бүх боолт болон холболтууд чанга байгаа эсэхийг тогтмол шалгаж байгаарай.
- Суурилуулалтыг зөөлөн, d-ээр цэвэрлээрэйamp даавуу. Зүлгүүрийн цэвэрлэгч эсвэл уусгагчаас зайлсхий.
- Do not lubricate the gas spring mechanism.
9. Алдаа засах
| Асуудал | Боломжит шалтгаан | Шийдэл |
|---|---|---|
| Хяналт унжиж эсвэл босож чадахгүй байна | Хийн пүршний хурцадмал байдал нь дэлгэцийн жинд хэт бага байна. | Increase gas spring tension by turning the adjustment screw clockwise ("+"). |
| Monitor floats up or is hard to push down | Хийн пүршний таталт нь дэлгэцийн жинд хэт өндөр байна. | Decrease gas spring tension by turning the adjustment screw counter-clockwise ("-"). |
| Monitor is wobbly | Mount not securely fastened to desk or VESA plate not tight. | Бүх хэсгийг шалгаж, чангална ууamp/grommet screws and VESA plate screws. |
| Difficulty rotating/tilting monitor | Joints are too tight. | Loosen the corresponding joint screws slightly (do not remove). |
10. Баталгаат хугацаа ба дэмжлэг
The MOUNTUP MU0034 Single Monitor Desk Mount is backed by a 3-year support period. For technical assistance, missing parts, or warranty claims, please contact MOUNTUP customer support through their official channels or the retailer where the product was purchased.
Баталгаат хугацаанд худалдаж авсан баримтаа хадгална уу.