Аюулгүй байдлын чухал мэдээлэл
Please read and understand all instructions before beginning installation. Failure to do so may result in electric shock, fire, or other injuries that could be fatal or cause property damage. All electrical connections must be in accordance with local codes, ordinances, or the National Electric Code (NEC). If you are unfamiliar with electrical wiring, consult a qualified electrician.
- Суурилуулалт, засвар үйлчилгээ хийхээс өмнө үндсэн таслуураас цахилгааныг үргэлж салга.
- Санал болгож буй ватаас хэтэрч болохгүйtagчийдэнгийн хувьд e.
- Бүх холболтууд найдвартай, зөв тусгаарлагдсан эсэхийг шалгаарай.
- This fixture is ETL Certified and Damp Rated for indoor locations only.
Багцын агуулга
Carefully unpack the fixture and check that all parts are included. Keep the packaging materials until you are certain all parts are present and in good condition.
- Chandelier Body (9-Light)
- Mounting Hardware (Crossbar, Screws, Wire Nuts)
- Canopy and Chain Assembly
- Clear Glass Shades (9 pieces)
Тохиргоо ба суурилуулалт
This section outlines the general steps for installing your Minka Lavery Camrin Chandelier. Professional installation is recommended.
1. Суулгахад бэлтгэх
- Цахилгааныг унтраах: Locate the main circuit breaker and turn off the power to the junction box where the fixture will be installed.
- Талбайг цэвэрлэх: Ensure the installation area is clear and stable.
- Unpack components: Сав баглаа боодолоос бүх хэсгийг болгоомжтой арилгана.
2. Mount the Crossbar and Canopy
Attach the mounting crossbar to the junction box using the provided screws. Secure the canopy to the crossbar, allowing for wiring access. The fixture includes hardware to mount to an existing junction box (junction box not included).

Image: Chandelier canopy and chain assembly. This image shows the top portion of the chandelier, including the ceiling canopy, the hanging chain, and the ring that connects to the main support rod of the fixture.
3. Adjust Hanging Height
The chandelier's hanging height is adjustable from a minimum of 29.88 inches to a maximum of 100.38 inches. Determine the desired length of the chain and remove any excess links using appropriate tools. Feed the electrical wires through the chain and canopy.
4. Цахилгааны холболтууд
Connect the fixture's wires to the house wiring using the provided wire nuts. Ensure proper polarity:
- Бэхэлгээнээс гарч буй хар утсыг уулзвар хайрцагнаас гарч буй хар (халуун) утсанд холбоно уу.
- Бэхэлгээний цагаан утсыг уулзвар хайрцагнаас цагаан (төвийг сахисан) утас руу холбоно.
- Бэхэлгээнээс гарсан нүцгэн зэс эсвэл ногоон газардуулгын утсыг уулзвар хайрцагнаас гарсан газардуулгын утастай холбоно уу.
After making connections, carefully tuck all wires into the junction box.
5. Secure the Fixture Body and Shades
Once wiring is complete, secure the chandelier body to the canopy. Then, carefully install each of the nine clear glass shades onto their respective sockets. Ensure they are seated firmly but do not overtighten.

Image: Chandelier light sockets and glass shades. This image provides a close-up view of the individual light arms, the E26 bulb sockets, and the clear, textured glass shades.
6. Булцууг суурилуулах
Screw in nine A19 medium base (E26) bulbs, up to a maximum of 60 watts each. Do not exceed the maximum wattage. This fixture is dimmable, so compatible dimmable bulbs and a dimmer switch can be used for adjustable light output.
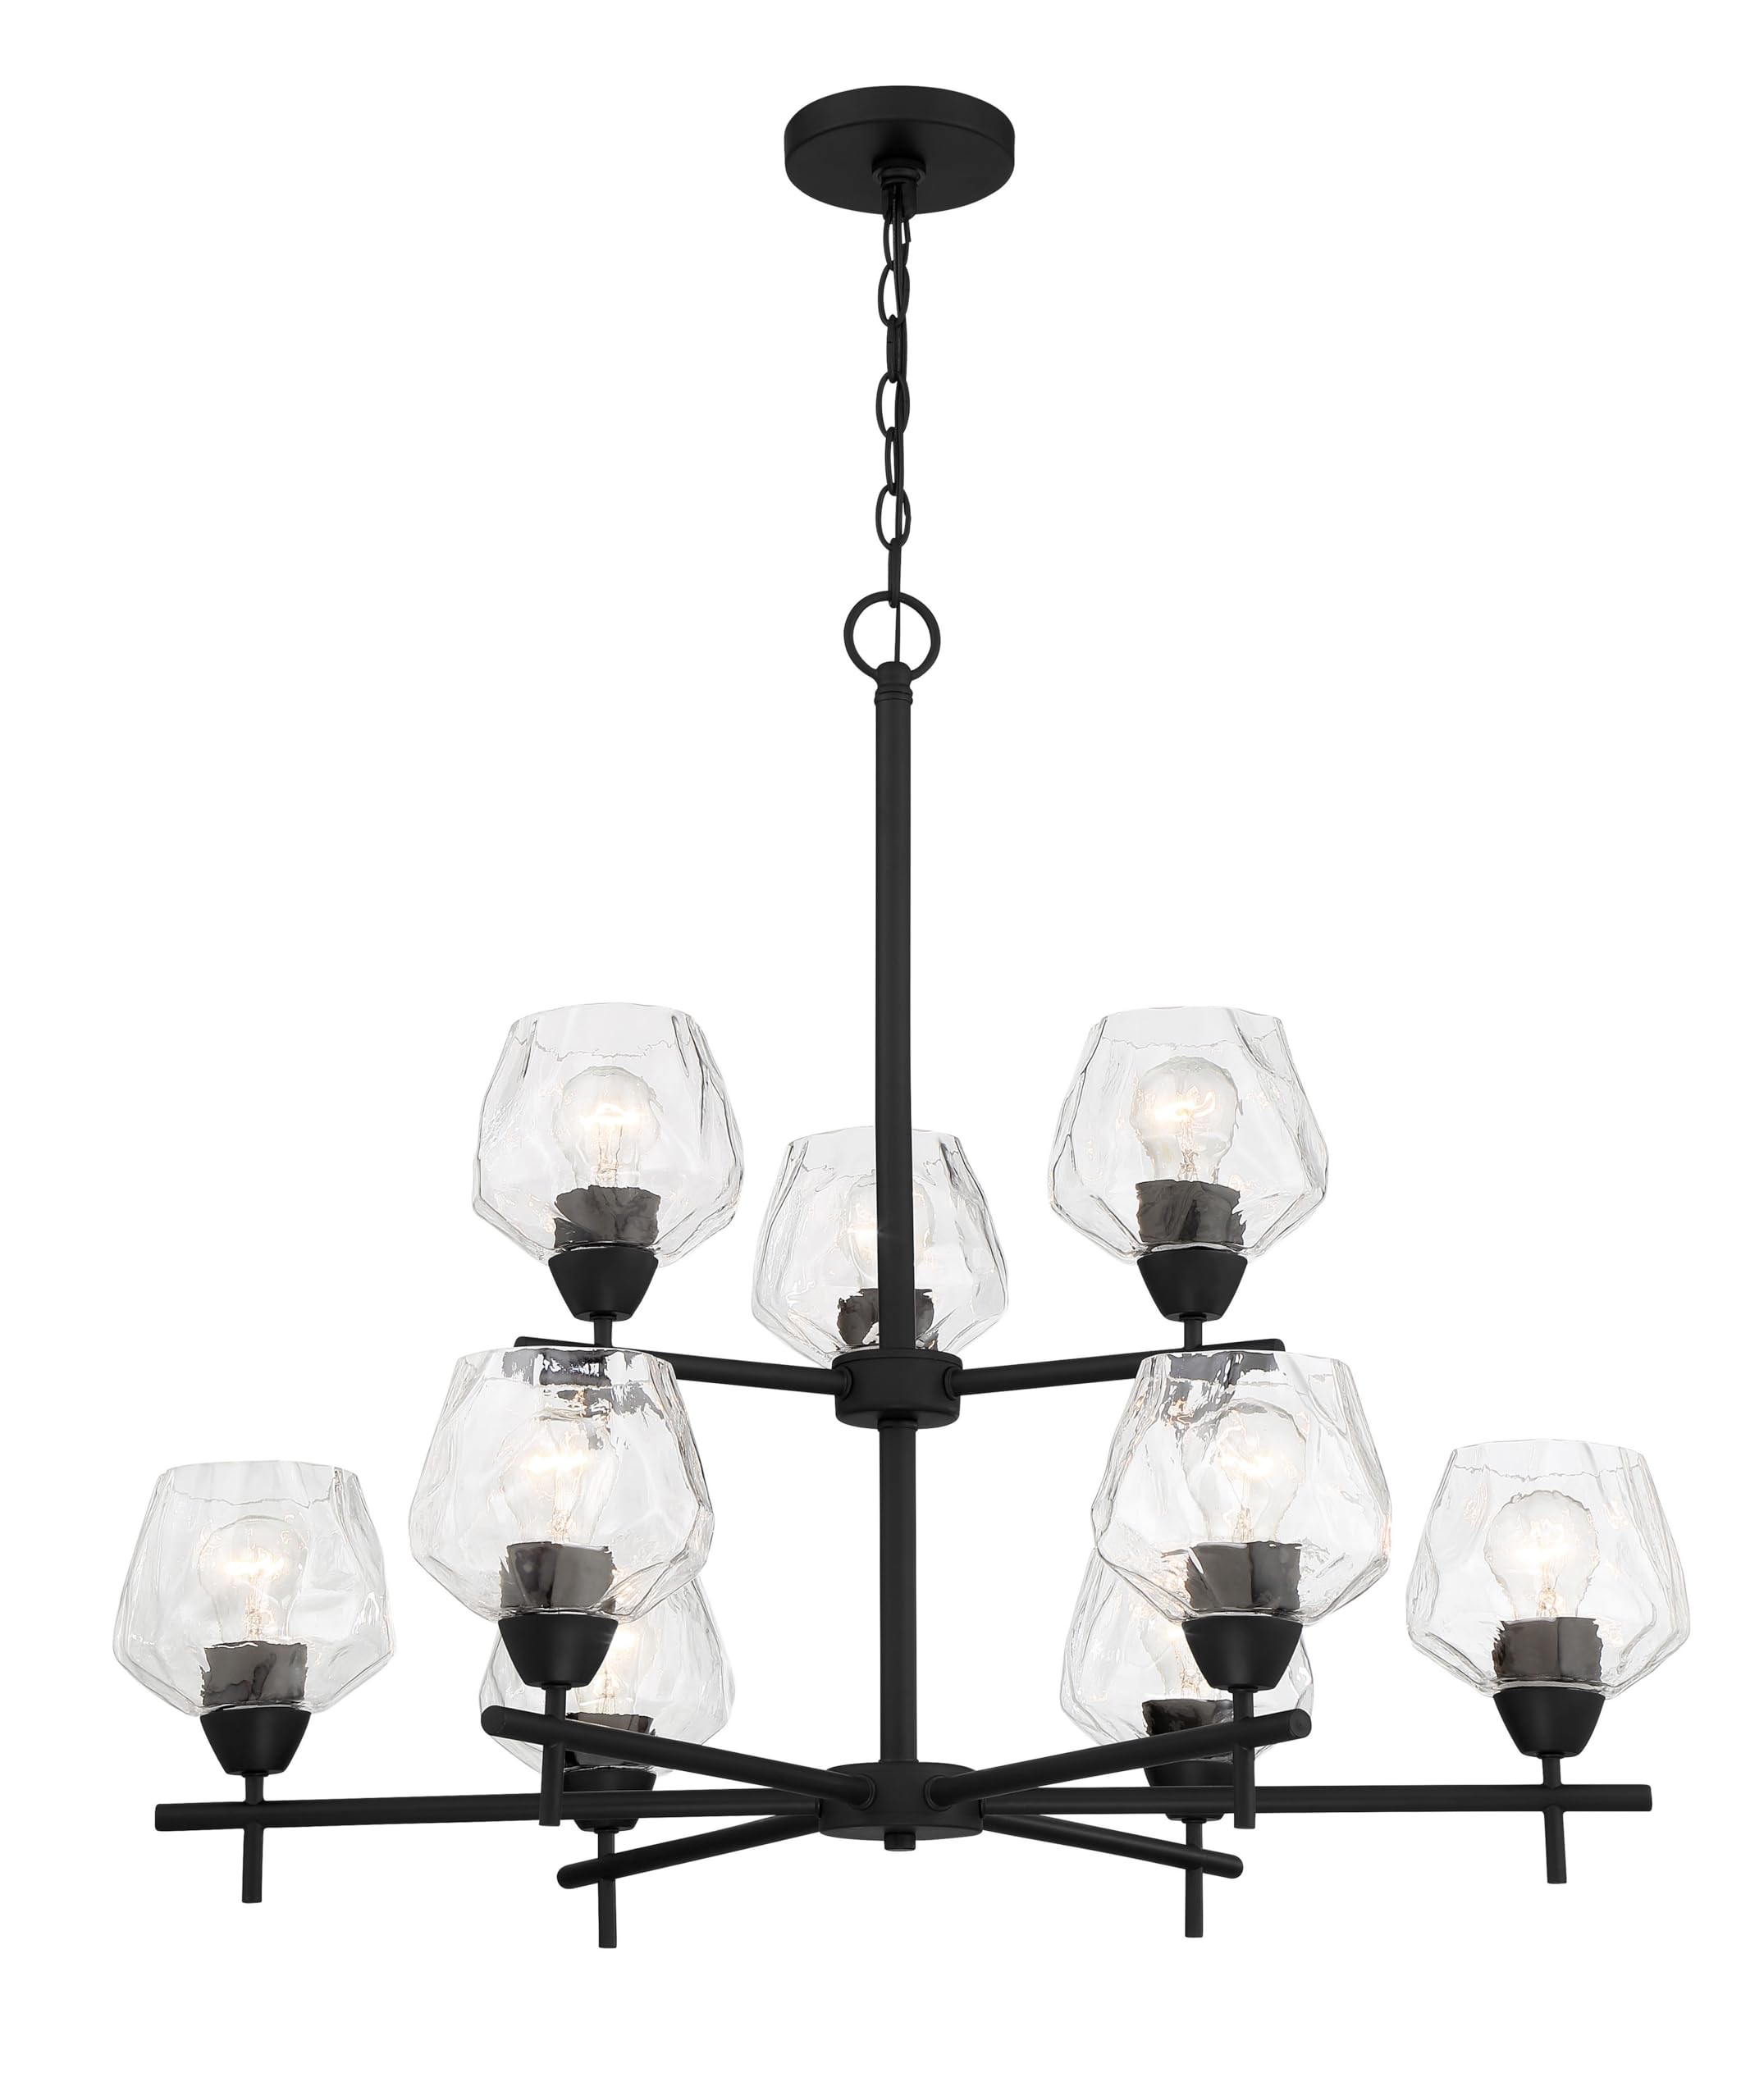
Image: Minka Lavery Camrin Chandelier, 9-Light, Coal Black. This image displays the complete chandelier with all nine lights and glass shades installed, showcasing түүний ерөнхий загвар.
7. Эрчим хүчийг сэргээх
Once installation is complete, restore power at the main circuit breaker and test the fixture.
Ашиглалтын заавар
The Minka Lavery Camrin Chandelier operates via a standard wall switch. For dimming functionality, ensure you have installed dimmable E26 bulbs and a compatible dimmer switch (sold separately). The control method is typically through a wall-mounted switch.
Засвар үйлчилгээ
Цэвэрлэгээ
To clean the fixture, ensure power is off. Wipe the metal parts with a soft, dry cloth. For the glass shades, use a mild glass cleaner and a soft cloth. Avoid abrasive cleaners or harsh chemicals that may damage the finish or glass.
Булцуу солих
Always turn off power at the circuit breaker before replacing bulbs. Allow bulbs to cool completely before touching them. Unscrew the old bulb and replace it with a new A19 medium base (E26) bulb, not exceeding 60 watts. Restore power after replacement.
Алдааг олж засварлах
| Асуудал | Боломжит шалтгаан | Шийдэл |
|---|---|---|
| Тоног төхөөрөмж асахгүй байна | No power to fixture; Loose wiring connection; Faulty bulb; Faulty wall switch | Check circuit breaker; Verify all wire connections are secure; Replace bulb; Test wall switch |
| Гэрэл анивчих | Loose bulb; Incorrect bulb type for dimmer; Loose wiring connection | Tighten bulbs; Ensure dimmable bulbs are used with a dimmer; Check wiring connections |
| Бүдгэрэлт ажиллахгүй байна | Non-dimmable bulbs installed; Incompatible dimmer switch; Faulty dimmer switch | Install dimmable bulbs; Ensure dimmer switch is compatible with LED/Halogen bulbs; Replace dimmer switch |
Үзүүлэлтүүд
| Онцлог | Дэлгэрэнгүй |
|---|---|
| Загварын дугаар | 2179-66A |
| Хэмжээ (L x W x H) | 31 инч x 31 инч x 26.88 инч |
| Зүйлийн жин | 11.9 фунт |
| Өнгө | Coal Black |
| Материал | Металл, шил |
| Гэрлийн тоо | 9 |
| Булцууны суурь | E26 (Дунд суурь) |
| Макс Ватtage Нэг чийдэн | 60 ватт |
| Нийт хамгийн их ваттtage | 540 ватт |
| Ботьtage | 120 вольт |
| Гэрлийн эх үүсвэрийн төрөл | Halogen (compatible with LED/Incandescent) |
| Багасгах боломжтой | Тийм (тохирох чийдэн болон бүдэгрүүлэгч унтраалгатай) |
| Суурилуулалтын төрөл | Хагас угаалтуур |
| Тохируулах боломжтой өлгөх өндөр | 29.88 inches (Min) to 100.38 inches (Max) |
| Баталгаажуулалт | ETL гэрчилгээтэй |
| Байршлын хэрэглээ | Damp Rated (Indoor) |
Баталгаат хугацааны мэдээлэл
This Minka Lavery product is covered by a one-year limited warranty from the date of purchase. This warranty covers defects in materials and workmanship under normal use. For specific details regarding warranty claims, please refer to the official Minka Lavery warranty policy or contact customer support.
Хэрэглэгчийн дэмжлэг
For technical assistance, missing parts, or warranty inquiries, please contact Minka Lavery customer support. Visit the official Minka Lavery webхолбоо барих мэдээлэл болон нэмэлт эх сурвалжийн сайт.
Үйлдвэрлэгч: Minka Lighting LLC.


