1. Танилцуулга
Welcome to the user manual for your Ulefone Armor X9 Rugged Phone. This guide provides essential information on setting up, operating, maintaining, and troubleshooting your device. The Ulefone Armor X9 is designed for durability and performance, featuring robust protection and advanced functionalities.
Key features of your Ulefone Armor X9 include:
- IP68/IP69K Grade 360 All Round Protection: Хүчтэй орчинд тэсвэрлэхийн тулд бүтээгдсэн.
- Android 11 үйлдлийн систем: Enjoy the latest Android experience.
- 4GB RAM + 128GB ROM: Ample memory and storage for your applications and data.
- 16MP Triple Rear Camera: Capture high-quality photos and videos.
- Massive 5580mAh Battery Capacity: Extended usage time.
- Triple Navigation System: Enhanced positioning accuracy.
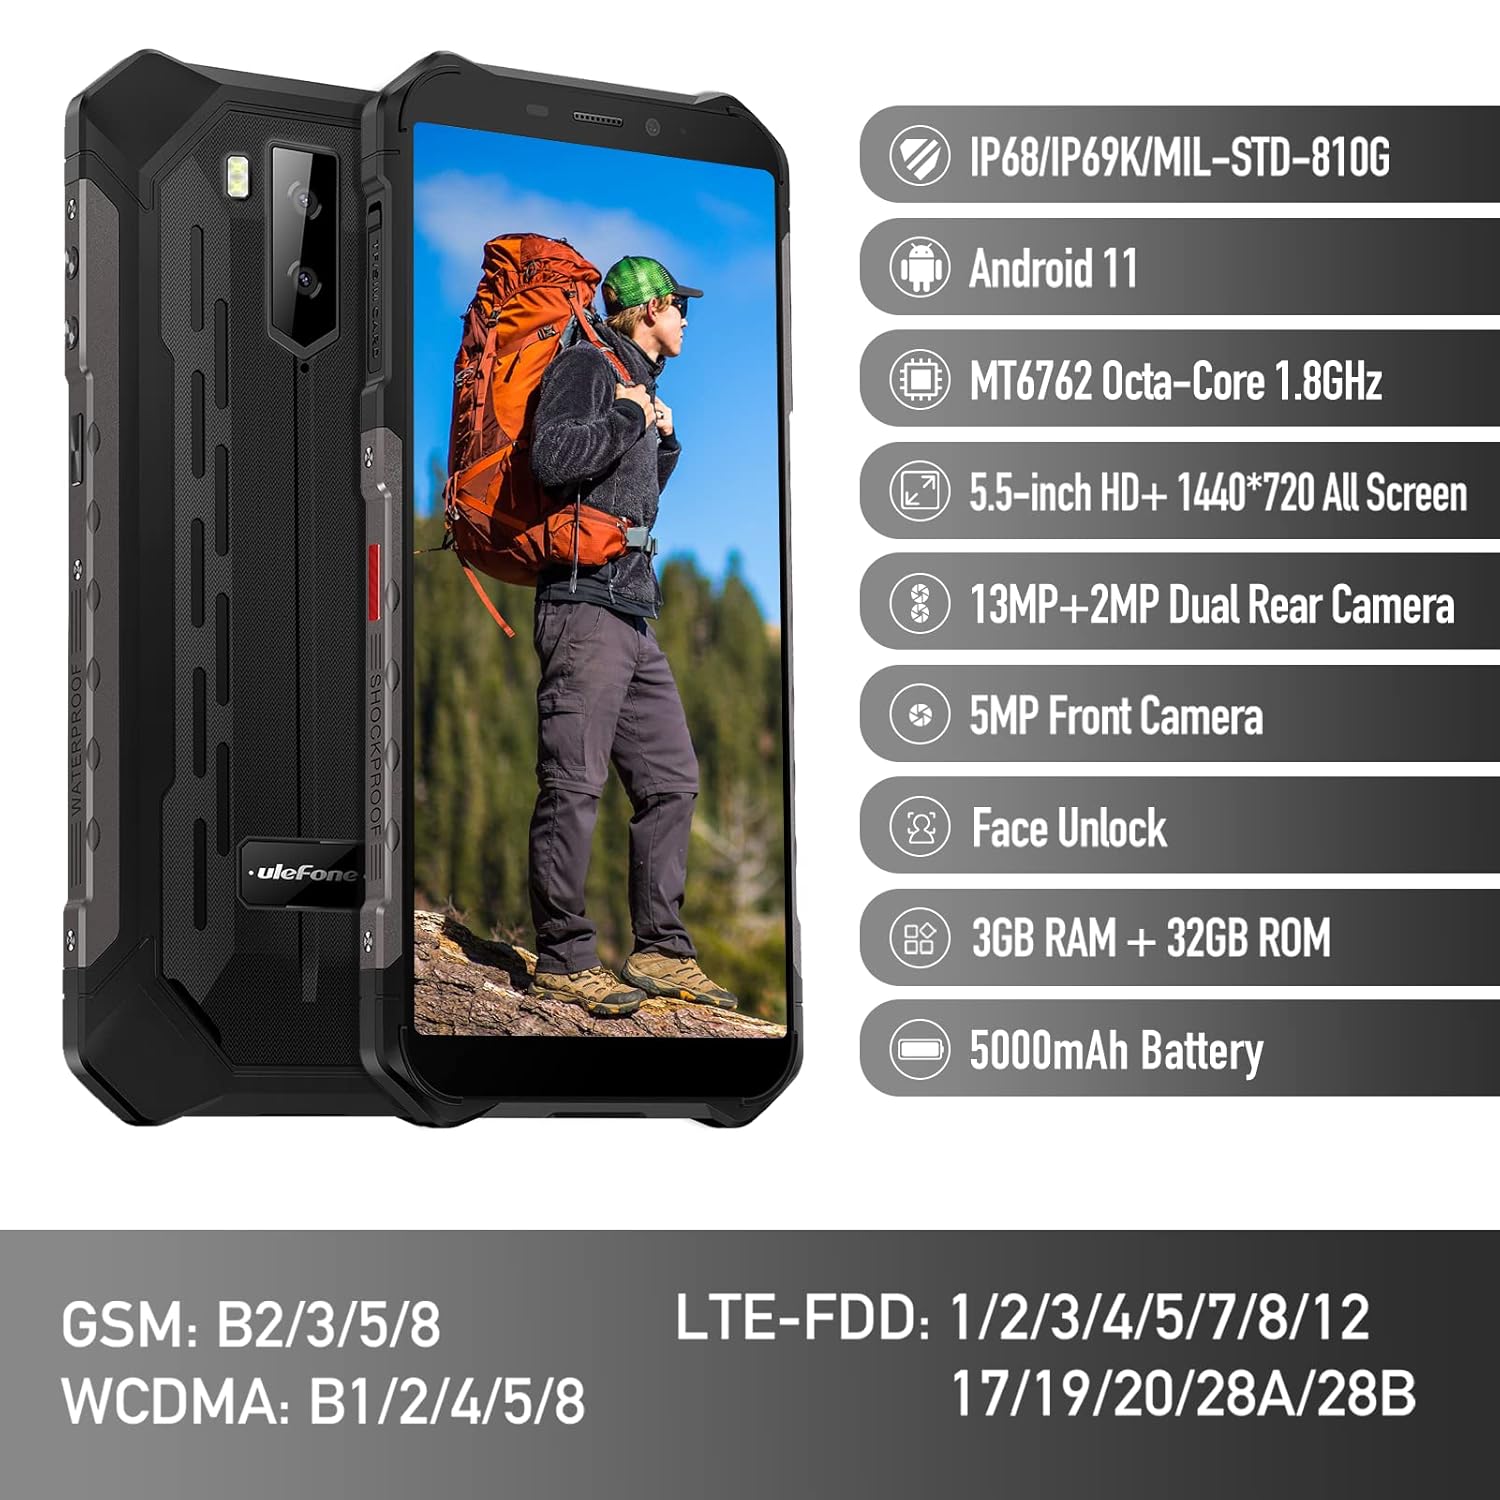
Figure 1: Ulefone Armor X9 Rugged Phone overview, highlighting its robust design and core specifications like IP68/IP69K rating, Android 11, Octa-Core processor, 5.5-inch HD+ screen, 13MP+2MP dual rear camera, 5MP front camera, Face Unlock, 3GB RAM + 32GB ROM, and 5000mAh battery.
2. Тохиргоо
2.1. SIM карт болон TF карт суурилуулах
The Ulefone Armor X9 supports dual SIM cards and a TF (microSD) card for expandable storage. Follow these steps to install them:
- Утасны хажуу талд байгаа SIM картны тавиурыг олоорой.
- Тавиурыг нээхийн тулд өгөгдсөн SIM гаргагч хэрэгслийг ашиглана уу.
- Carefully place your Nano-SIM cards into the designated slots (SIM1 and SIM2).
- If using a TF card, place it into the dedicated TF card slot. Note that some configurations may share a slot between SIM2 and the TF card.
- Gently push the tray back into the phone until it is flush with the device body. Ensure the tray is properly sealed to maintain water and dust resistance.

Figure 2: Illustration of the dual SIM and TF card tray, showing how to insert SIM1, SIM2, and a TF card into the Ulefone Armor X9.
2.2. Анхны цэнэглэлт
Before first use, it is recommended to fully charge your Ulefone Armor X9. Use the provided USB cable and power adapter.
- USB кабелийг утасныхаа цэнэглэгч порт руу холбоно уу.
- USB кабелийн нөгөө үзүүрийг тэжээлийн адаптерт холбоно.
- Цахилгаан адаптерийг ханын залгуурт холбоно уу.
- Цэнэглэх үзүүлэлт дэлгэц дээр гарч ирнэ. Батерейны дүрс дүүртэл утсаа цэнэглэхийг зөвшөөрнө үү.
2.3. Асаах/унтраах
- Асаахын тулд: Press and hold the Power button (usually on the right side) until the Ulefone logo appears.
- Унтраахын тулд: Press and hold the Power button until the power options menu appears on the screen. Select "Power off" and confirm.
- Дахин эхлүүлэхийн тулд: Цахилгааны сонголтуудын цэснээс "Дахин эхлүүлэх" гэснийг сонгоод баталгаажуулна уу.
3. Ашиглалтын заавар
3.1. Үндсэн навигаци (Андройд 11)
Your Ulefone Armor X9 runs on Android 11, offering an intuitive user interface. Common gestures and navigation include:
- Дээш шудрах: Аппликейшний шургуулганд хандах.
- Доош шудрах: Мэдэгдлийн самбар болон хурдан тохиргоог нээнэ үү.
- Товш: Нэг зүйлийг сонгох эсвэл програмыг нээнэ үү.
- Урт хэвлэл: Контекст цэс рүү нэвтрэх эсвэл дүрсийг зөөх.
- Томруулахын тулд чимхэх: Зургийг томруулж эсвэл жижигрүүлэх ба web хуудаснууд.

Figure 3: Screenshots of the Android 11 interface on the Ulefone Armor X9, showing settings menus, quick toggles, and the sound recorder application.

Figure 4: The 5.5-inch 18:9 All Screen display of the Ulefone Armor X9, showcasing its immersive viewing experience with an image of a skier.
3.2. Камерын хэрэглээ
Your phone is equipped with a 16MP Triple Rear Camera and a Front Camera. To use the camera:
- Үндсэн дэлгэц эсвэл аппликейшны шургуулганаас "Камер" аппликейшнийг нээнэ үү.
- Зураг авахын тулд Хөшигний товчийг товшино уу.
- Шаардлагатай бол зураг болон видео горимуудын хооронд шилжинэ үү.
- Tap the icon to switch between the front and rear cameras.
- Explore various camera modes and settings for optimal results.
3.3. Холболт
The Ulefone Armor X9 supports various connectivity options:
- Wi-Fi: Боломжтой сүлжээнд холбогдохын тулд Тохиргоо > Сүлжээ ба интернет > Wi-Fi руу очно уу.
- Bluetooth: Go to Settings > Connected devices > Bluetooth to pair with Bluetooth devices.
- GPS: The phone features AGPS for accurate location services. Ensure location services are enabled in Settings > Location.
- USB: Connect your phone to a computer using a USB cable for data transfer or charging.
3.4. Нүүрээр тайлах
For convenient and secure unlocking, your Ulefone Armor X9 supports Face Unlock:
- Тохиргоо > Аюулгүй байдал > Царайгаар түгжээ тайлах руу очно уу.
- Царайгаа бүртгүүлэхийн тулд дэлгэцэн дээрх зааврыг дагана уу.
- Ensure good lighting and hold the phone at eye level during registration.
- Once registered, you can unlock your phone by simply looking at the front camera.
4. Засвар үйлчилгээ
4.1. Цэвэрлэгээ ба арчилгаа
To maintain the performance and appearance of your rugged phone:
- Дэлгэц болон биеийг зөөлөн, хөвөнгүй даавуугаар арчина.
- Зөрүүд шороонд бага зэрэг damp даавуу. Хүчтэй химийн бодис, зүлгүүрийн материалаас зайлсхий.
- Ensure all port covers are securely closed to maintain water and dust resistance, especially after charging or using headphones.

Figure 5: The Ulefone Armor X9's 360° All Protection Design, showcasing its superior materials and superb durability against impacts and harsh conditions.
4.2. Water and Dust Resistance (IP68/IP69K)
The Ulefone Armor X9 is rated IP68/IP69K, meaning it is resistant to dust and water immersion. However, this resistance is not permanent and may decrease over time with normal wear. To ensure optimal protection:
- Do not intentionally submerge the phone in water for extended periods or beyond specified depths.
- Avoid exposing the phone to high-pressure water or extreme temperatures.
- Ensure all port covers are tightly sealed before exposure to water or dust.
- If the phone gets wet, dry it thoroughly before charging or opening any ports.
4.3. Зайны арчилгаа
To prolong the life of your 5580mAh Lithium Polymer battery:
- Батерейны ажиллагааг муутгаж болзошгүй тул хэт халуун эсвэл хүйтэн температураас зайлсхий.
- Use only the original charger and cable or certified compatible accessories.
- Зайг байнга бүрэн шавхаж болохгүй. Маш бага түвшинд хүрэхээс өмнө цэнэглэ.
5. Алдаа засах
If you encounter issues with your Ulefone Armor X9, try the following troubleshooting steps:
5.1. Утас асахгүй байна
- Ensure the battery is charged. Connect the phone to a charger for at least 30 minutes.
- Асаах товчийг 10-15 секундын турш дарж дахин асаана уу.
5.2. Цэнэглэхтэй холбоотой асуудлууд
- Verify that the charging cable and adapter are working correctly. Try a different charger if available.
- Цэнэглэх порт нь цэвэр, хог хаягдалгүй эсэхийг шалгаарай.
- Make sure the charging cable is fully inserted into the port. Some rugged phone ports may require a firm connection due to protective covers.
5.3. SIM/TF Card Not Detected
- Ensure the SIM/TF card is correctly inserted into the tray and the tray is fully seated.
- Утсаа дахин эхлүүлнэ үү.
- Check if the SIM card is active with your network provider.
5.4. App Crashes or Freezing
- Асуудалтай програмыг хаагаад дахин нээнэ үү.
- Аппликейшны кэш болон өгөгдлийг цэвэрлэ (Тохиргоо > Аппликейшн > [Аппликейшны нэр] > Хадгалах сан ба кэш).
- Аппликешныг хамгийн сүүлийн хувилбар болгон шинэчилсэн эсэхийг шалгаарай.
- Утсаа дахин эхлүүлнэ үү.
5.5. Үйлдвэрийн тохиргоонд дахин тохируулах
Хэрэв асуудал гарсаар байвал үйлдвэрийн тохиргоонд дахин тохируулснаар асуудлыг шийдэж болно. Анхааруулга: Энэ нь таны утсан дээрх бүх өгөгдлийг устгах болно. Үргэлжлүүлэхийн өмнө чухал өгөгдлийг нөөцлөөрэй.
- Тохиргоо > Систем > Дахин тохируулах сонголтууд руу очно уу.
- "Бүх өгөгдлийг устгах (үйлдвэрийн тохиргоо)" -г сонгоно уу.
- Шийдвэрээ баталгаажуулж, асуувал PIN/нууц үгээ оруулна уу.
6. Техникийн үзүүлэлтүүд
Below are the detailed specifications for the Ulefone Armor X9:

Figure 6: Details of the Ulefone Armor X9's Octa-Core Processor, highlighting its power-efficient yet powerful performance, along with 3GB RAM and 32GB ROM, and support for up to 256GB TF card extendable storage.
| Онцлог | Тодорхойлолт |
|---|---|
| Үйлдлийн систем | Android 11.0 |
| RAM | 3 ГБ (Note: Feature bullets mention 4GB RAM, please verify actual model) |
| Санах ойн хадгалах багтаамж | 32 ГБ (Expandable with TF card up to 256GB. Feature bullets mention 128GB ROM, please verify actual model) |
| CPU загвар | MT6762 найман цөмт 1.8 GHz (Note: Specifications list 'Snapdragon', but image indicates MT6762. Please verify actual model) |
| Бүтээгдэхүүний хэмжээс | 15.8 x 7.75 x 1.38 см |
| Зүйлийн жин | 472 гр |
| Батерей | 1 Lithium Polymer battery (5580mAh, included) |
| Утасгүй холбоо | Cellular, Bluetooth, USB, Wi-Fi |
| GPS | AGPS |
| Онцлог шинж чанарууд | Rear Camera, Face Unlock, IP68/IP69K, MIL-STD-810G |
| Дэлгэц | 5.5-inch HD+ 1440*720 All Screen |
| Арын камер | 13MP+2MP Dual Rear Camera (Note: Feature bullets mention 16MP Triple Rear Camera, please verify actual model) |
| Урд камер | 5MP урд камер |
| Өнгө | Хар |
| Үйлдвэрлэгч | Ulefone |
Note: Specifications are based on available product data and may vary slightly. Please refer to your product packaging for the most accurate information. There are discrepancies between feature bullets, specifications, and image text regarding RAM, ROM, CPU, and camera megapixels. This manual uses the most frequently cited or detailed information, with notes for clarification.
7. Баталгаат хугацаа ба дэмжлэг
7.1. Баталгаат хугацааны мэдээлэл
Your Ulefone Armor X9 is covered by a manufacturer's warranty. The specific terms and duration of the warranty may vary by region and retailer. Please refer to the warranty card included in your product packaging or contact your point of purchase for detailed information regarding warranty coverage and claims.
7.2. Хэрэглэгчийн дэмжлэг
For technical assistance, troubleshooting beyond this manual, or warranty inquiries, please contact Ulefone customer support or your authorized dealer. You can typically find contact information on the official Ulefone webсайт эсвэл таны бүтээгдэхүүний баримт бичигт.
- Visit the official Ulefone website for FAQs, software updates, and support contact details.
- Дэмжлэг үзүүлэх үйлчилгээтэй холбогдохдоо худалдан авалтын баримт болон бүтээгдэхүүний серийн дугаараа гартаа байлгаарай.


