1. Танилцуулга
This manual provides essential instructions for the safe installation, operation, and maintenance of your ELEGRP 50 Amps 125/250V NEMA 14-50R Range Oven Stove Receptacle and ELEGRP NEMA 14-30P & NEMA 14-50P 4-Prong Electric Dryer and Range Oven Stove Plugs. Please read this manual thoroughly before installation and use, and retain it for future reference.
2. Аюулгүй байдлын мэдээлэл
АНХААРУУЛГА: Risk of electric shock or fire. Improper installation or use can lead to serious injury or death. All electrical work should be performed by a qualified electrician and in accordance with all national and local electrical codes.
- Always turn off power at the circuit breaker or fuse box before installing or servicing the receptacle or plugs.
- боть байгаа эсэхийг шалгаарайtagд ба amperage ratings of your appliance match the receptacle and plug ratings.
- Цахилгаан цочролоос сэргийлэхийн тулд зөв газардуулга хийх.
- Хэрэв бүтээгдэхүүн гэмтсэн бол бүү хэрэглээрэй.
- Keep children away from electrical outlets and wiring.
3. Бүтээгдэхүүн дууссанview
The ELEGRP NEMA 14-50R Receptacle is a flush-mount power outlet designed for heavy-duty applications such as electric ranges, ovens, and EV chargers. The ELEGRP NEMA 14-30P and 14-50P plugs are industrial-grade, straight-blade plugs for electric dryers and ranges, featuring interchangeable blades for versatility.
3.1 Receptacle Features (NEMA 14-50R)
- Төрөл: NEMA 14-50R, 50 Ampс, 125/250 В
- Тохиргоо: 3 шон, 4 утас, газардуулга
- Суурилуулалт: Flush Mount, fits single and 2-gang box styles
- Барилга: Heavy gauge galvanized steel mounting strap, durable nylon housing, brass contacts
- Утасны нийцтэй байдал: Accepts #10, #8 to #4 AWG copper or aluminum wire
- Баталгаажуулалт: UL жагсаалтад орсон

Image: ELEGRP NEMA 14-50R Receptacle. This image shows the front view 50-ийн Amp, 125/250V NEMA 14-50R flush mount receptacle with its distinct blade configuration and UL listing mark.
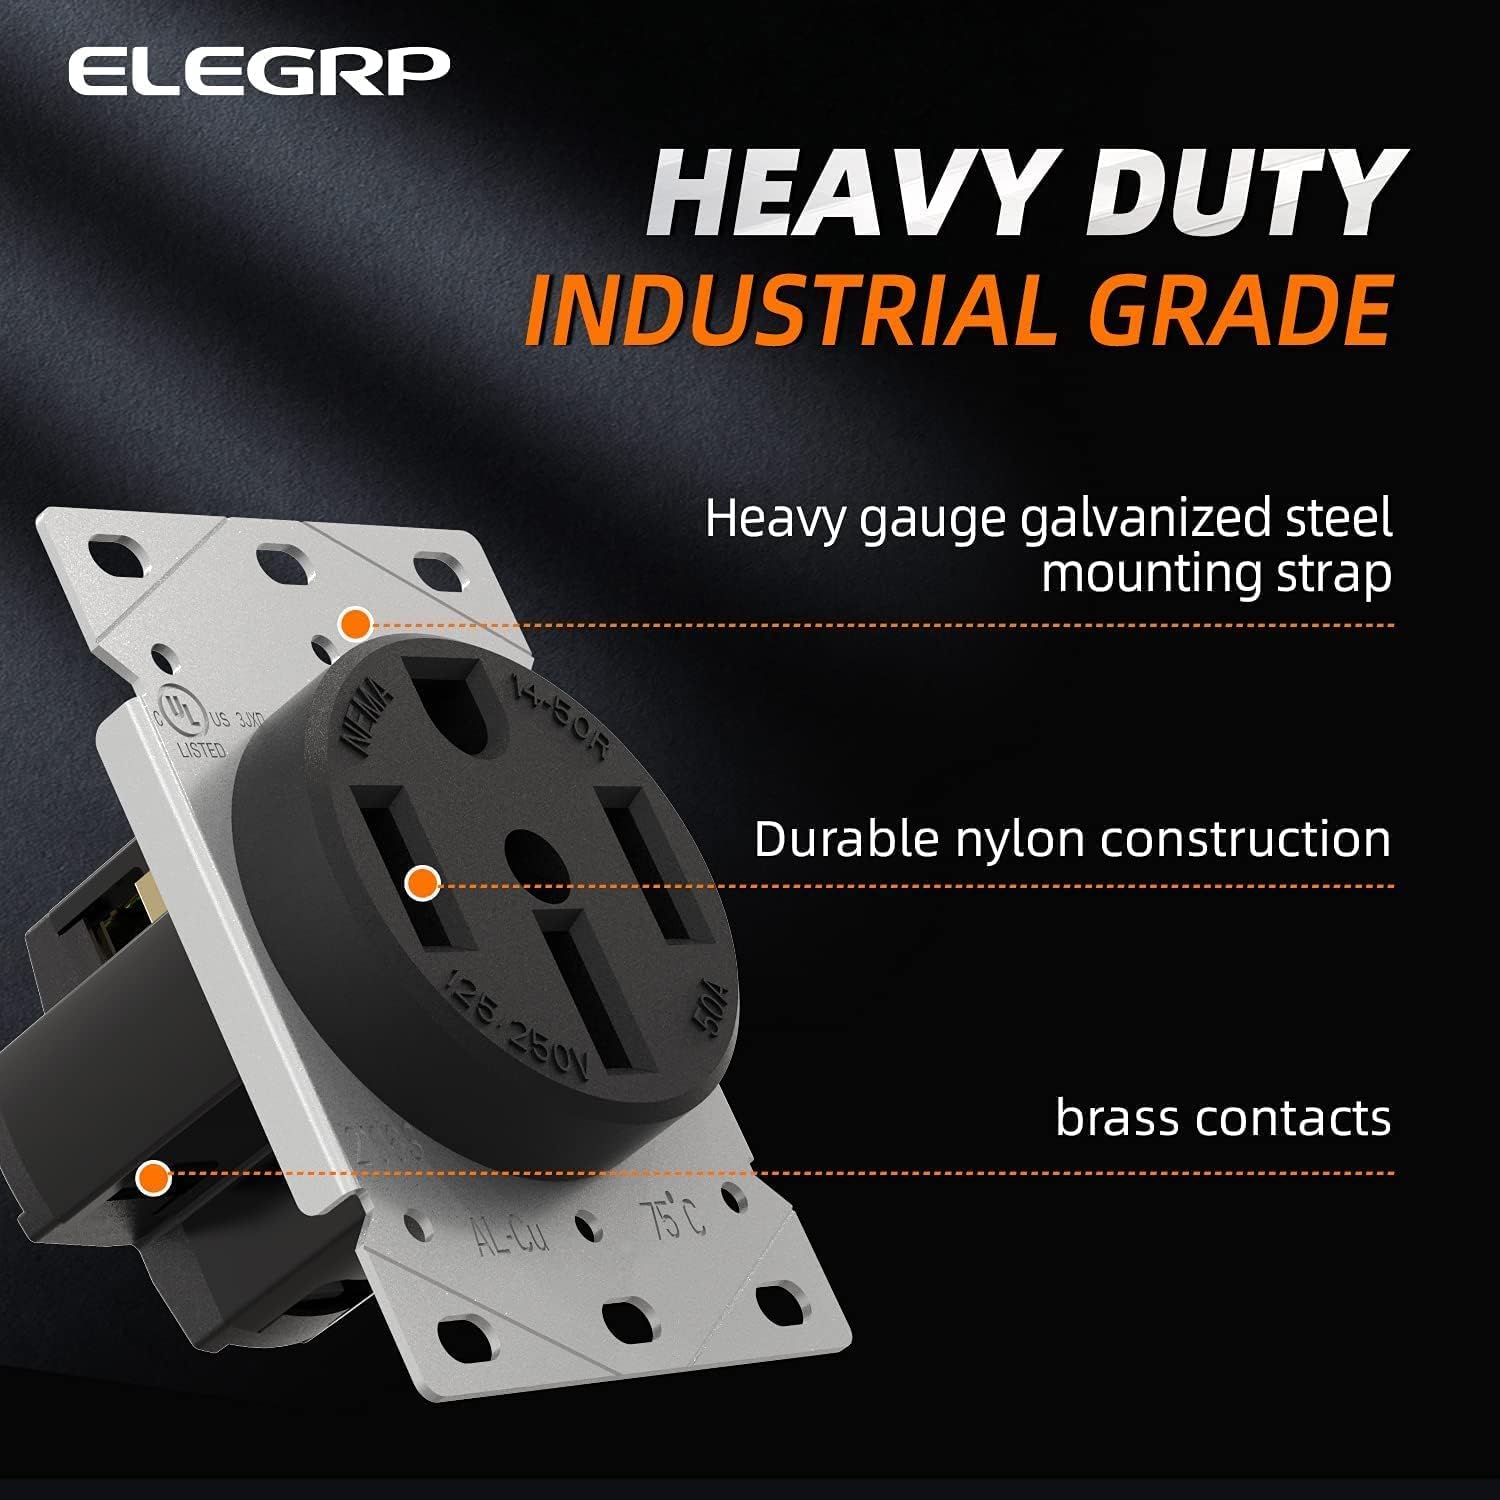
Image: ELEGRP NEMA 14-50R Receptacle Features. This image highlights the heavy-duty industrial grade construction, including the galvanized steel mounting strap, durable nylon housing, and brass contacts.
3.2 Plug Features (NEMA 14-30P & 14-50P)
- Төрөл: ОБЕГ 14-30P (30 Amps) & NEMA 14-50P (50 Amps), 125/250V
- Тохиргоо: 3 шон, 4 утас, газардуулга
- Дизайн: Straight Blade, Heavy Duty Angle Plug
- Барилга: Industrial Grade, interchangeable blade for 14-30P/14-50P conversion
- Утасны нийцтэй байдал: Accepts #10 to #6 AWG wire
- Баталгаажуулалт: UL жагсаалтад орсон

Image: ELEGRP NEMA 14-50P Plug. This image displays the 4-prong NEMA 14-50P plug with its robust construction and brass blades.

Image: ELEGRP Dual Function Plug. This image illustrates how the plug can be converted between NEMA 14-50P and 14-30P configurations by changing a blade, showing both configurations and the interchangeable blade component.
4. Техникийн үзүүлэлтүүд
| Онцлог | Тодорхойлолт |
|---|---|
| Загварын дугаар | ELEGRP-50A-125V |
| Савны төрөл | ОБЕГ 14-50Р |
| Залгуурын төрөл | NEMA 14-30P, NEMA 14-50P (interchangeable) |
| Ботьtage Үнэлгээ | 125/250 В |
| AmpҮнэлгээг устгах | Receptacle: 50 Amps; Plugs: 30 Amps (14-30P), 50 Amps (14-50P) |
| Утасны тохиргоо | 3 шон, 4 утас, газардуулга |
| Материал | Nylon housing, Brass contacts, Galvanized steel strap |
| Wire Gauge (Receptacle) | #10, #8 to #4 AWG (Copper or Aluminum) |
| Wire Gauge (Plugs) | #10-оос #6 AWG хүртэл |
| Гэрчилгээ | UL жагсаалтад орсон |
5. Суурилуулах заавар
ЧУХАЛ: Ensure power is OFF at the main circuit breaker before beginning any installation. If you are unsure about any steps, consult a qualified electrician.
5.1 NEMA 14-50R Receptacle Installation
- Prepare the Electrical Box: Ensure you have a suitable electrical box (single or 2-gang style) installed in the wall.
- Тууз утаснууд: Carefully strip approximately 3/4 inch of insulation from the ends of the electrical wires (Black, Red, White, Green/Bare).
- Холбох утас: Refer to the wiring diagram below. Connect the wires to the corresponding terminals on the receptacle.
- Green Screw (Ground): Connect the Green or Bare copper wire.
- Brass Screw 'X' (Hot): Connect the Red wire.
- Brass Screw 'Y' (Hot): Connect the Black wire.
- Silver Screw (Neutral): Connect the White wire.
- Хамгаалалтын утас: Tighten all terminal screws firmly to ensure good electrical contact. Tug gently on each wire to confirm it is secure.
- Холбох сав: Carefully push the wired receptacle into the electrical box. Secure it to the box using the mounting screws provided.
- Ханын хавтанг суурилуулах: Attach the appropriate wall plate (with a 2.15" diameter center hole) over the receptacle.
- Эрчим хүчийг сэргээх: Once installation is complete and verified, turn the power back on at the circuit breaker.

Image: NEMA 14-50R Receptacle Wiring Diagram. This diagram clearly labels the terminal identification markings for the NEMA 14-50R receptacle, showing where to connect the Green (Ground), Red (Hot X), Black (Hot Y), and White (Neutral) wires. It also indicates that terminals accept #10 to #4 AWG wire.
5.2 NEMA 14-30P / 14-50P Plug Wiring
- Select Blade Configuration: Determine if you need a 14-30P (30 Amp) or 14-50P (50 Amp) plug. The ELEGRP plug features an interchangeable blade. Ensure the correct blade is installed for your application.
- Disassemble Plug: Unscrew and remove the outer casing of the plug to expose the terminal screws.
- Тууз утаснууд: Strip approximately 3/4 inch of insulation from the ends of the appliance cord wires (Black, Red, White, Green/Bare).
- Холбох утас: Refer to the wiring diagram below. Connect the wires to the corresponding terminals.
- Green Screw (Ground): Connect the Green or Bare copper wire.
- Brass Screw (Hot): Connect the Black wire.
- Brass Screw (Hot): Connect the Red wire.
- Silver Screw (Neutral): Connect the White wire.
- Хамгаалалтын утас: Tighten all terminal screws firmly. Ensure no stray wire strands are present that could cause a short circuit.
- Reassemble Plug: Carefully reassemble the plug casing, ensuring all wires are neatly tucked inside and not pinched.

Image: NEMA 14-50P Plug Wiring Diagram. This diagram shows the internal wiring of the NEMA 14-50P plug, indicating the connection points for Green (Ground), Black (Hot), Red (Hot), and White (Neutral) wires. It specifies acceptable wire gauge from #10 to #6 AWG.
6. Ашиглалтын заавар
Once the ELEGRP NEMA 14-50R receptacle is correctly installed and the appliance cord is wired with the appropriate ELEGRP NEMA 14-30P or 14-50P plug, operation is straightforward.
- Эрчим хүчийг баталгаажуулах: Ensure the circuit breaker for the receptacle is in the ON position.
- Төхөөрөмжийг холбох: Align the prongs of the appliance plug with the slots of the wall receptacle. Insert the plug firmly and completely into the receptacle.
- Operate Appliance: Turn on your appliance (e.g., electric range, dryer, EV charger) according to its manufacturer's instructions.
- Disconnect Appliance: To disconnect, grasp the plug body firmly and pull it straight out from the receptacle. Do not pull by the cord.

Image: Appliance Plugged into Receptacle. This image shows a NEMA 14-50P plug connected to a wall-mounted receptacle, illustrating a typical installation for a heavy-duty appliance like a dryer or range.
7. Засвар үйлчилгээ
The ELEGRP receptacle and plugs are designed for durability and require minimal maintenance.
- Тогтмол үзлэг: Periodically inspect the receptacle and plugs for any signs of wear, damage, discoloration, or loose connections.
- Цэвэрлэгээ: Ensure power is OFF before cleaning. Wipe the exterior surfaces with a dry, clean cloth. Do not use liquid cleaners or solvents.
- Холболтуудыг чангалах: If you suspect loose wiring, turn off power at the breaker and re-tighten terminal screws.
- Солих: If any part of the receptacle or plug is damaged, replace it immediately with an equivalent UL Listed product.
8. Алдаа засах
Хэрэв танд асуудал тулгарвал дараах нийтлэг алдааг олж засварлах алхмуудыг анхаарч үзээрэй.
| Асуудал | Боломжит шалтгаан | Шийдэл |
|---|---|---|
| Төхөөрөмжид цахилгаан байхгүй | Circuit breaker tripped; Loose wiring; Faulty appliance cord/plug | Check and reset circuit breaker. Turn off power and inspect wiring connections at both the receptacle and plug. Test appliance with another known working outlet if possible. |
| Plug feels loose in receptacle | Worn receptacle contacts; Incorrect plug type | Ensure the correct NEMA plug type (14-30P or 14-50P) is used. If contacts are worn, replace the receptacle. |
| Хэт халалт эсвэл шатаж буй үнэр | Overload; Loose connections; Damaged wiring/components | Immediately turn off power at the circuit breaker. Do not use. Inspect for damage or loose connections. Consult a qualified electrician. |
9. Баталгаат хугацаа ба дэмжлэг
ELEGRP products are manufactured to high-quality standards. For warranty information or technical support, please visit the official ELEGRP webсайт эсвэл харилцагчийн үйлчилгээтэй холбогдоно уу. Баталгаат зарга авахын тулд худалдан авалтын баримтаа хадгална уу.
ELEGRP Official Webсайт: Visit the ELEGRP Store on Amazon


