1. Танилцуулга
Thank you for choosing the Conentool 21V Cordless Drill Driver Set. This manual provides essential information for the safe and effective use of your new tool. Please read all instructions carefully before operation to ensure proper handling, maximize performance, and prevent injury. Keep this manual for future reference.
2. Аюулгүй ажиллагааны заавар
Гал түймэр, цахилгаанд цохиулах, гэмтэх эрсдэлийг бууруулахын тулд цахилгаан хэрэгсэл ашиглахдаа аюулгүй байдлын үндсэн арга хэмжээг үргэлж дагаж мөрдөөрэй.
Цахилгаан хэрэгслийн аюулгүй байдлын ерөнхий сэрэмжлүүлэг
- Ажлын талбайн аюулгүй байдал: Ажлын байраа цэвэр, гэрэлтүүлэг сайтай байлга. Эмх замбараагүй эсвэл харанхуй газар осол аваар гарахыг өдөөдөг. Шатамхай шингэн, хий, тоос зэрэг тэсрэх аюултай орчинд цахилгаан хэрэгслийг бүү ажиллуул.
- Цахилгааны аюулгүй байдал: Хоолой, радиатор, зуух, хөргөгч гэх мэт газардуулгатай эсвэл газардуулгатай гадаргуутай биед хүрэхээс зайлсхий. Цахилгаан хэрэгслийг бороо эсвэл нойтон нөхцөлд бүү гарга.
- Хувийн аюулгүй байдал: Always wear eye protection. Use appropriate safety equipment such as dust masks, non-skid safety shoes, hard hats, or hearing protection when necessary. Dress properly; avoid loose clothing or jewelry.
- Хэрэгслийн хэрэглээ ба арчилгаа: Цахилгаан хэрэгслийг хүчээр бүү хий. Хэрэглээнд тохирох цахилгаан хэрэгслийг ашигла. Ямар нэгэн тохируулга хийх, дагалдах хэрэгслийг солих, цахилгаан хэрэгслийг хадгалахын өмнө залгуурыг тэжээлийн эх үүсвэрээс салгаж, батарейг салга.
- Батерейны хэрэглээ ба арчилгаа: Зөвхөн үйлдвэрлэгчийн заасан цэнэглэгчээр цэнэглэнэ үү. Батерейг бусад цахилгаан хэрэгсэлтэй хамт бүү ашиглаарай.
3. Багцын агуулга
Your Conentool 21V Cordless Drill Driver Set includes the following items:
- 1х утасгүй өрөм
- 1х үүрэх хайрцаг
- 2x 1500mAh Lithium-Ion Batteries
- 1х цэнэглэгч
- 9x Socket Wrenches ( 4-12mm)
- 12x Screwdriver Bits
- Conventional Drill Bits
- Tile Drill Bit
- Long Screwdriver Bit
- 1x Flexible Drill Shaft

Image: Complete Conentool 21V Cordless Drill Driver Set with all accessories laid out.
Зураг: Ойролцоогоор view of the various accessories included in the set, such as the drill, batteries, charger, and different types of bits and wrenches.
4. Бүтээгдэхүүн дууссанview
The Conentool 21V Cordless Drill Driver is a versatile and powerful tool designed for various drilling and screwing tasks. It features a robust motor, ergonomic design, and multiple adjustable settings for optimal performance.
Гол онцлогууд:
- 45N.m Max Torque: хангадаг ampшаардлагатай програмуудад зориулсан хүч.
- 18+1 Torque Adjustment: Allows precise control for different materials and tasks, from delicate screwing to heavy-duty drilling.
- Хоёр хурдны тохиргоо: Offers flexibility with a low speed (0-400rpm) for high torque applications and a high speed (0-1500rpm) for faster drilling.
- Хос 1500 мА батерей: Ensures extended operation time with quick charging.
- Компакт, хөнгөн дизайн: Minimizes user fatigue during prolonged use.
- Баригдсан LED гэрэл: Гэрэл багатай нөхцөлд харагдах байдлыг сайжруулах үүднээс ажлын талбайг гэрэлтүүлдэг.
- 3/8" (10mm) Self-Locking Chuck: Enables quick and easy bit changes.
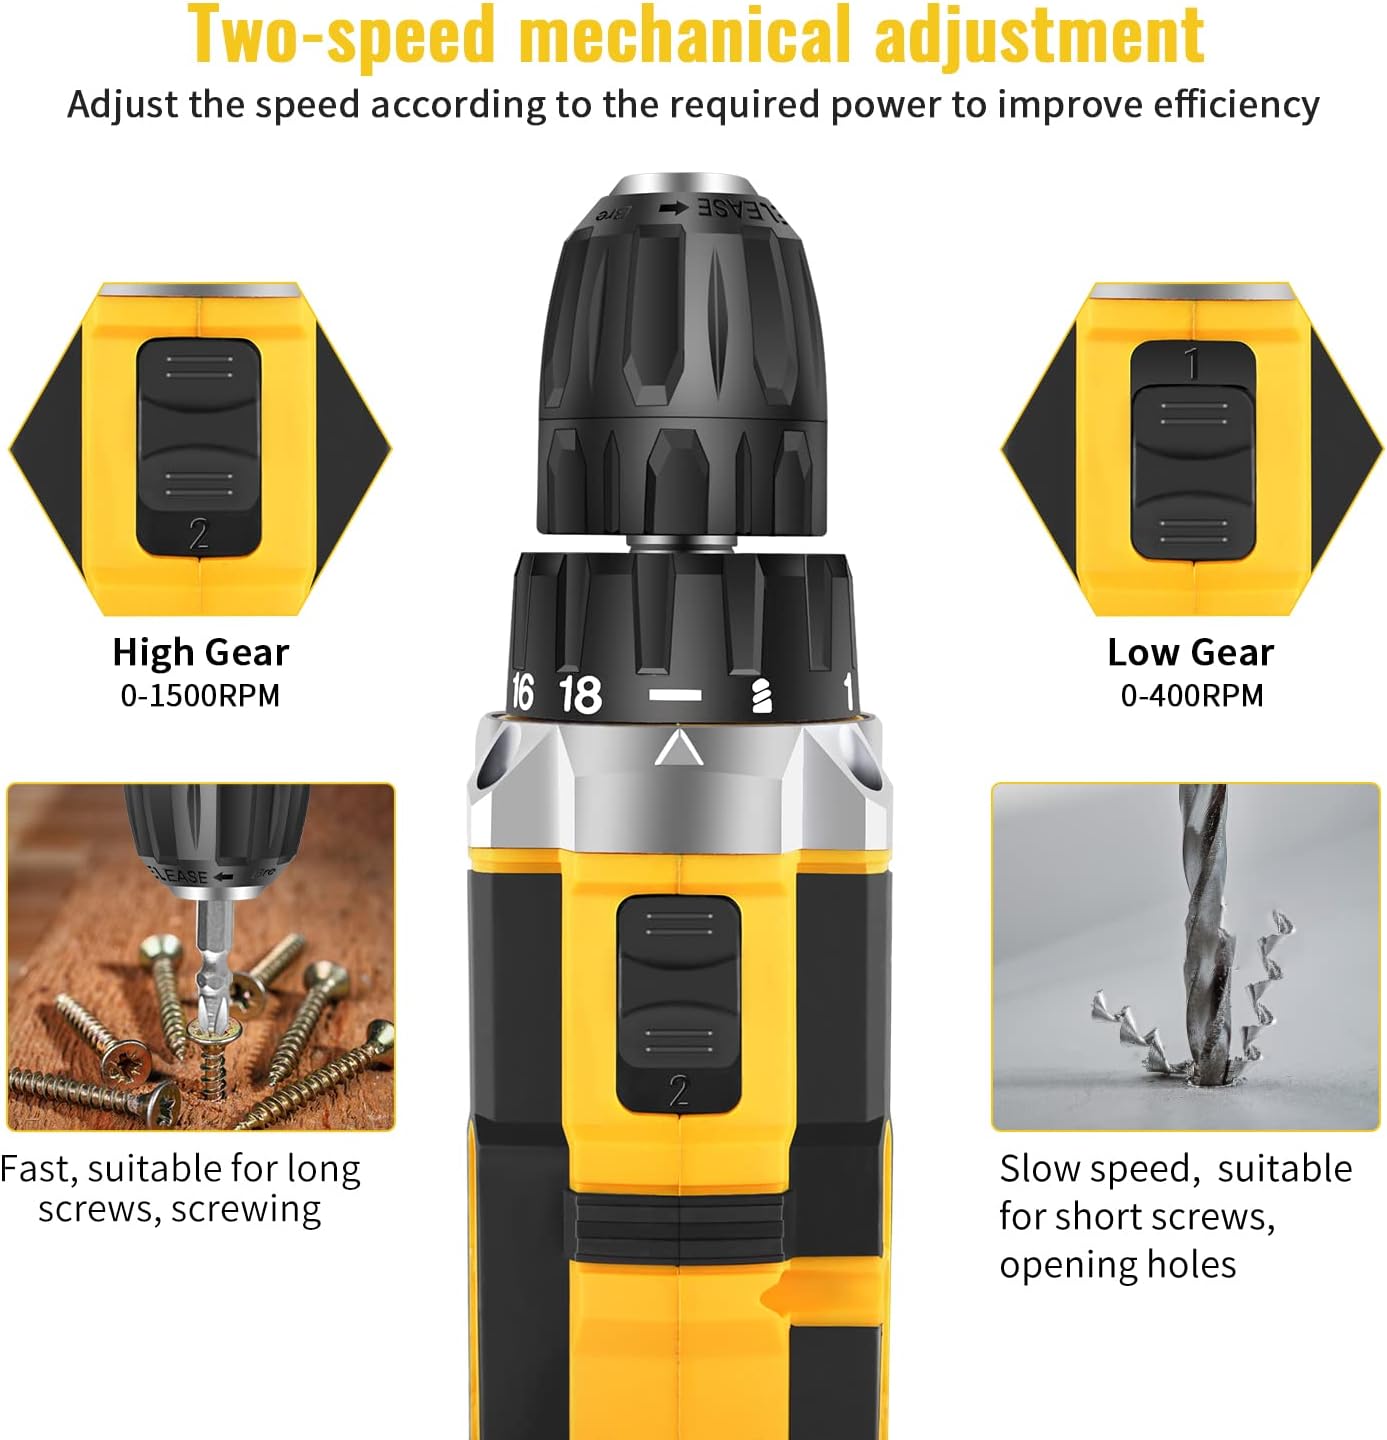
Image: Detailed diagram pointing out various features of the drill, including torque settings, speed selector, ventilation, LED light, and grip.

Image: Visual representation of the drill's internal motor, highlighting its 45N.m maximum torque and efficient heat dissipation.

Image: The drill depicted as lightweight and compact, designed to reduce user fatigue.

Image: Illustration of the drill's motor cooling system, demonstrating effective heat dissipation.

Image: Close-up of the integrated LED light, designed to illuminate the work area.
5. Тохиргоо
5.1 Зайг цэнэглэх
The drill comes with two 1500mAh lithium-ion batteries. Before first use, fully charge both batteries. A fast charger is included, and a full charge typically takes about 1 hour.
- Цэнэглэгчийг ердийн цахилгаан залгуурт холбоно уу.
- Зайны багцыг цэнэглэгч дээр товших хүртэл шургуулна уу.
- The charger indicator light will show the charging status (refer to charger manual for specific light indications).
- Бүрэн цэнэглэгдсэний дараа зайг цэнэглэгчээс салга.
5.2 Зайг суулгах/салгах
- Суулгахын тулд: Батерейг өрөмдлөгийн бариулын суурьтай зэрэгцүүлж, байранд нь найдвартай тогтох хүртэл шургуулна.
- Устгахын тулд: Press the battery release button located on the front of the battery pack and slide the battery out of the drill handle.

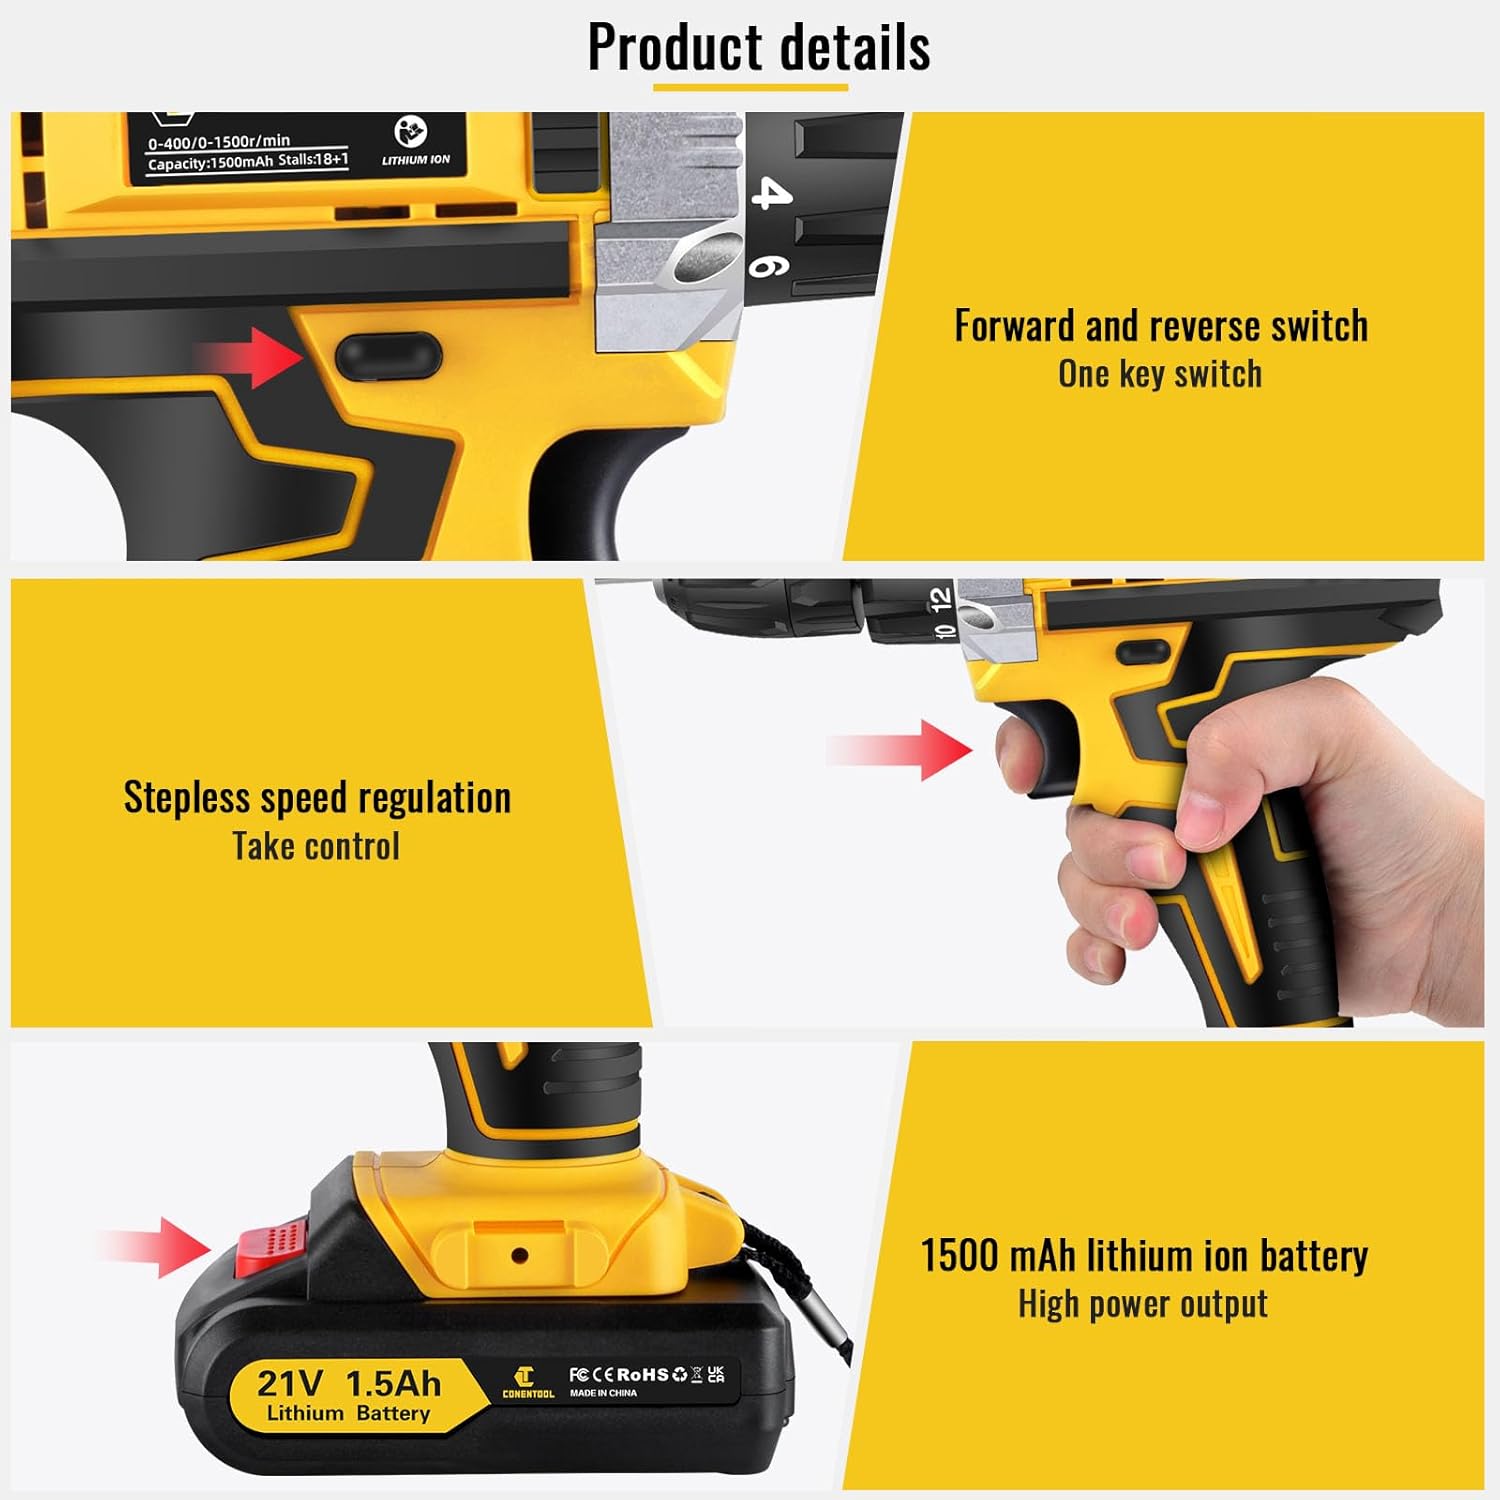
Image: Details on battery installation and removal, along with trigger and switch controls.
5.3 Installing Drill Bits/Screwdriver Bits
The drill features a 3/8" (10mm) self-locking chuck for quick and easy bit changes.
- Эрүүг нээхийн тулд тэнхлэгийг цагийн зүүний эсрэг эргүүлнэ.
- Хүссэн өрмийн хошуу эсвэл халивын хошууг патрон руу хийж, бат бөх суурилуулсан эсэхийг шалгаарай.
- Rotate the chuck clockwise to tighten the jaws securely around the bit. Ensure the bit is centered and tight before operation.

Image: Close-up of the drill chuck, showing how to insert and secure bits.
6. Ашиглалтын заавар
6.1 Асаах/унтраах болон хувьсах хурдны триггер
The drill is activated by pressing the variable speed trigger. The speed of rotation increases as you press the trigger further.
- To start the drill, press the trigger.
- To increase speed, press the trigger further.
- Өрөмдлөгийг зогсоохын тулд гохыг суллана уу.

Image: Illustration of the variable speed trigger and the forward/reverse button.
6.2 Two-Speed Mechanical Adjustment
The drill has two mechanical speed settings, selected via a switch on top of the drill housing.
- Gear 1 (Low Speed: 0-400rpm): Provides higher torque, ideal for driving screws or drilling into harder materials.
- Gear 2 (High Speed: 0-1500rpm): Provides lower torque but faster rotation, suitable for drilling into softer materials or for quick tasks.

Image: Diagram showing the two-speed selector switch and its corresponding RPM ranges.
6.3 Torque Adjustment (18+1 Settings)
The torque collar allows you to adjust the amount of rotational force the drill applies. This prevents over-tightening screws or damaging materials.
- Rotate the torque collar to select the desired setting from 1 to 18. Lower numbers are for smaller screws and softer materials, higher numbers for larger screws and harder materials.
- The drill icon setting is for drilling applications, providing maximum torque.

Image: The torque adjustment ring with settings for different materials.
6.4 Урагш/Урвуу шилжүүлэгч
The forward/reverse switch is located above the trigger and controls the direction of rotation.
- Урагш эргүүлэхийн тулд (боолтыг өрөмдөж, чангалахын тулд) унтраалгыг зүүн тийш түлхэнэ үү.
- Push the switch to the right for reverse rotation (for loosening screws or removing bits).
- Шилжүүлэгч төв байрлалд байх үед гох түгжигддэг бөгөөд энэ нь санамсаргүй асахаас сэргийлдэг.
6.5 LED гэрлийг ашиглах
Нэгдсэн LED гэрэл нь гохыг дарах үед автоматаар асч, бүдэг гэрэлтэй ажлын хэсэгт харагдах байдлыг хангана.

Image: The LED light in action, illuminating the work surface, and the onboard bit holder.
7. Засвар үйлчилгээ
Тогтмол засвар үйлчилгээ нь таны өрөмдлөгийн урт наслалт, оновчтой ажиллагааг баталгаажуулдаг.
- Цэвэрлэгээ: Агааржуулалтын нүхийг цэвэр, цэвэр байлгаарай. Зөөлөн, чийгтэй агааржуулагч ашиглана уу.amp багажийг арчих даавуу. Химийн хүчтэй бодис, зүлгүүрийн цэвэрлэгч хэрэглэж болохгүй.
- Батерейны арчилгаа: Store batteries in a cool, dry place away from direct sunlight. Do not store fully discharged batteries for extended periods. Recharge them periodically if not in use.
- Хадгалах: Store the drill and all accessories in the provided carry case in a dry, secure location, out of reach of children.
8. Алдаа засах
If you encounter issues with your Conentool drill, refer to the following common problems and solutions:
| Асуудал | Боломжит шалтгаан | Шийдэл |
|---|---|---|
| Өрөмдлөг эхлэхгүй байна | Battery not charged; Battery not properly inserted; Forward/Reverse switch in center (locked) position. | Charge battery; Re-insert battery securely; Move switch to forward or reverse position. |
| Ашиглалтын явцад эрчим хүчний алдагдал | Battery low; Overload. | Recharge battery; Reduce pressure on the drill or use a lower speed/higher torque setting. |
| Bit wobbles or falls out | Chuck not tightened sufficiently; Bit shank damaged. | Re-tighten chuck firmly; Replace damaged bit. |
| Хэт халалт | Prolonged heavy use; Blocked ventilation. | Allow tool to cool down; Clear ventilation openings. |
If the problem persists after attempting these solutions, please contact Conentool customer support.
9. Техникийн үзүүлэлтүүд
| Онцлог | Тодорхойлолт |
|---|---|
| Загварын дугаар | P000125 |
| Ботьtage | 21 В |
| Зайны төрөл | Лити ион |
| Зайны багтаамж | 1500mAh (1.5Ah) |
| Max torque | 45 Нм |
| Моментийн тохиргоо | 18+1 |
| Ачаалалгүй хурд (бага) | 0-400 RPM |
| Ачаалалгүй хурд (өндөр) | 0-1500 RPM |
| Чакны хэмжээ | 3/8" (10мм) |
| Эрчим хүчний эх үүсвэр | Батерейгаар ажилладаг |
| Материал | Металл |
| Зүйлийн жин | 2.5 кг |
| Бүтээгдэхүүний хэмжээс | 30.5 x 27 x 10.5 см |
10. Баталгаат хугацаа ба дэмжлэг
Conentool is committed to providing high-quality tools. For any product-related inquiries, technical assistance, or warranty claims, please contact Conentool customer support. Refer to your purchase documentation for specific warranty terms and contact information.
You can also visit the official Conentool store on Amazon for more information and support: Conentool Store


