1. Танилцуулга
Thank you for choosing the Xigmatek Lux M Micro-ATX Mini Tower PC Case. This manual provides detailed instructions for the installation, operation, and maintenance of your new PC chassis. Please read this manual carefully before beginning the assembly process to ensure proper installation and to maximize the performance and longevity of your system.
The Lux M case is designed to offer a robust and aesthetically pleasing housing for your computer components, featuring a tempered glass side panel, a metallic front panel with a unique cut-out pattern, and pre-installed fixed RGB fans for optimal cooling and visual appeal. It supports Micro-ATX and Mini-ITX motherboards and is compatible with various cooling solutions, including water cooling.
2. Аюулгүй байдлын мэдээлэл
Суурилуулалт болон ашиглалтын явцад дараах аюулгүй байдлын урьдчилан сэргийлэх арга хэмжээг дагаж мөрдөнө үү.
- Always disconnect the power supply from the wall outlet before installing or removing any components to prevent electric shock.
- Handle all components with care. Avoid touching circuit boards directly; hold them by their edges.
- Мэдрэмтгий электрон эд ангиудтай харьцахдаа электростатик цэнэг алдалтаас (ESD) болж гэмтэхээс сэргийлж, статик бус бугуйвч зүүгээрэй.
- Keep the case and components away from liquids, excessive heat, and direct sunlight.
- Ensure proper ventilation around the PC case to prevent overheating.
- Жижиг эд анги, боолтыг хүүхдүүдийн гар хүрэхгүй газар хадгална уу.
3. Багцын агуулга
Бүх бараа савлагаандаа байгаа эсэхийг шалгана уу. Хэрэв ямар нэгэн бараа алга болсон эсвэл гэмтсэн бол худалдагчтайгаа холбогдоно уу.
- Xigmatek Lux M Micro-ATX Mini Tower PC Case
- Accessory box (containing screws, standoffs, cable ties, etc.)
- Хэрэглэгчийн гарын авлага (энэ баримт бичиг)
4. Бүтээгдэхүүн дууссанview
Familiarize yourself with the various parts of your Xigmatek Lux M PC case.
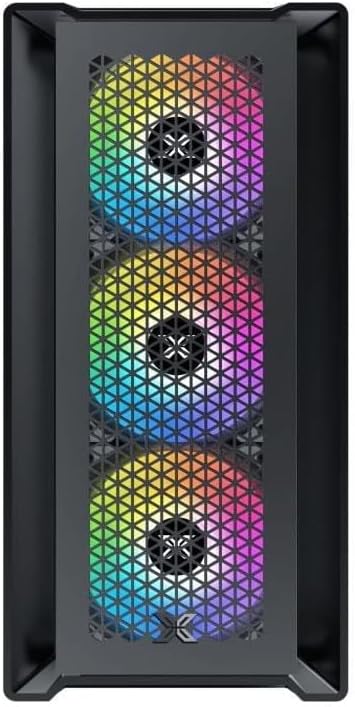
Зураг 4.1: Урд View. This image displays the front of the Xigmatek Lux M case, highlighting the metallic mesh panel with a triangular design and the three pre-installed 120mm fixed RGB fans.

Figure 4.2: Angled Top-Front View. This perspective shows the tempered glass side panel, offering a clear view of the interior, and the top panel with its I/O ports (USB, audio) and power button.
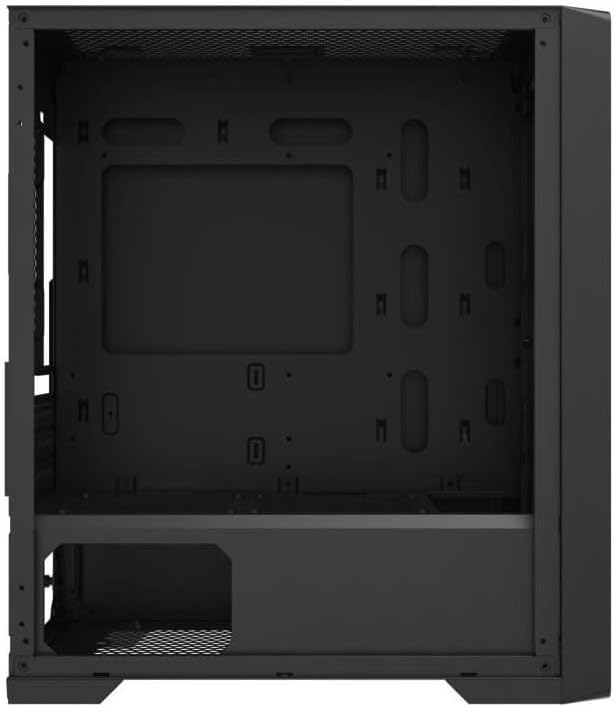
Зураг 4.3: Дотоод зохион байгуулалт. The internal structure of the case, featuring the motherboard mounting tray, cutouts for cable management, and the power supply shroud at the bottom.
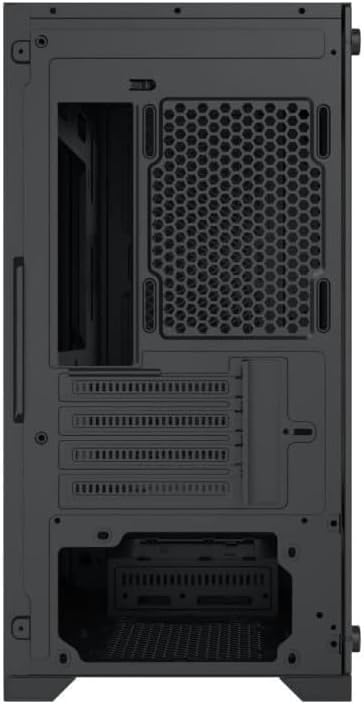
Зураг 4.4: Ар талд View. This image illustrates the rear of the case, including the expansion slots for graphics cards and other add-in cards, the rear fan mounting area, and the power supply mounting bracket.
5. Тохиргоо ба суурилуулалт
Follow these steps to install your computer components into the Xigmatek Lux M case.
5.1. Кейс бэлтгэх
- Хайрцгийг хавтгай, тогтвортой гадаргуу дээр байрлуул.
- Remove the tempered glass side panel by unscrewing the thumb screws and carefully lifting it off. Set it aside on a soft, non-abrasive surface.
- Remove the opposite steel side panel by unscrewing the thumb screws and sliding it backward.
5.2. Эх хавтанг суурилуулах
The Lux M supports Micro-ATX and Mini-ITX motherboards.
- Эх хавтан дээрээ урьдчилан суулгаагүй бол I/O бамбайг гэрний арын нүхэнд суулгана уу.
- Align the motherboard with the pre-installed standoffs. Ensure all screw holes on the motherboard match the standoffs.
- Secure the motherboard using the provided motherboard screws. Do not overtighten.
5.3. Цахилгаан хангамжийн нэгж (PSU) суурилуулах
The PSU mounts at the rear bottom of the case.
- Slide the PSU into its designated compartment from the rear of the case.
- Align the PSU's screw holes with the holes on the case's rear panel.
- Secure the PSU with the provided screws.
5.4. Storage Drive Installation (2.5"/3.5" Drives)
The case supports 2x 2.5"/3.5" storage drives.
- Locate the drive cage beneath the PSU shroud or dedicated 2.5" mounting points behind the motherboard tray.
- For 3.5" HDDs, slide the drive into a drive tray (if applicable) and secure it with screws.
- For 2.5" SSDs, secure them directly to the mounting points using the provided screws.
5.5. График карт (VGA) болон өргөтгөлийн картын суурилуулалт
Уг гэр нь 320 мм хүртэл урттай график картуудыг дэмждэг.
- Шаардлагатай өргөтгөлийн үүрний тагийг хайрцагны арын хэсгээс ав.
- Insert your graphics card or other expansion card into the appropriate PCIe slot on your motherboard.
- Secure the card to the case using the expansion slot screws.
5.6. Cooling System Installation (Optional)
The Lux M comes with 4x 120mm X24F fixed RGB fans. It supports additional cooling options.
- CPU хөргөгч: Max height of 160mm. Install your CPU cooler according to its manufacturer's instructions.
- Радиаторын дэмжлэг: The case supports radiators of 360mm, 240mm, or 120mm. Refer to your radiator's manual for installation. Common mounting locations include the front and top panels.
5.7. Кабелийн менежмент
Кабелийг цэгцлэхийн тулд эх хавтангийн тавиурын ард байрлах кабелийн чиглүүлэлтийн таслуур болон холбох цэгүүдийг ашиглаарай. Энэ нь агаарын урсгал болон гоо зүйн байдлыг сайжруулна.
5.8. Эцсийн чуулган
- Once all components are installed and cables are managed, reattach the steel side panel and secure it with thumb screws.
- Carefully reattach the tempered glass side panel and secure it with thumb screws.
6. Ашиглалтын заавар
After completing the installation, connect your peripherals (monitor, keyboard, mouse) and power cable to the PC. Press the power button located on the top panel of the case to start your system.
The pre-installed X24F RGB fans feature fixed RGB lighting, which will illuminate automatically upon system power-on. No additional software or controller is required for their basic operation.
Ensure that the case's ventilation is not obstructed to maintain optimal airflow and cooling performance.
7. Засвар үйлчилгээ
Тогтмол засвар үйлчилгээ нь таны компьютерын эд ангиудын урт наслалт, оновчтой ажиллагааг хангахад тусална.
- Тоос цэвэрлэх: Тоосны шүүлтүүр (байгаа бол) болон хайрцагны дотор талыг шахсан агаар эсвэл зөөлөн сойз ашиглан үе үе цэвэрлэж байгаарай. Тоос хуримтлагдах нь агаарын урсгалыг саатуулж, хэт халахад хүргэдэг.
- Гадна цэвэрлэгээ: Гадна талын гадаргууг зөөлөн арчиж, damp cloth. Avoid harsh chemicals that may damage the finish or tempered glass.
- Шилэн шил: Clean the tempered glass panel with a glass cleaner and a microfiber cloth to avoid scratches and streaks.
8. Алдаа засах
If you encounter issues during or after installation, consider the following common troubleshooting steps:
- Эрчим хүчгүй:
- Цахилгааны кабелийг цахилгаан тэжээлийн хэсэг болон ханын залгуурт найдвартай холбосон эсэхийг шалгаарай.
- Check that the PSU switch is in the 'ON' position.
- Verify that the front panel power switch cable is correctly connected to the motherboard's front panel header.
- Fans Not Spinning / RGB Not Lighting:
- Ensure all fan power cables are securely connected to the motherboard or a fan controller.
- For RGB, confirm that any necessary RGB headers are connected to the motherboard (though the included fans are fixed RGB and should light up with power).
- Дэлгэцийн гаралт байхгүй:
- Verify that your monitor cable is connected to the graphics card (if installed) and not the motherboard's integrated graphics port.
- График картыг PCIe үүрэнд дахин суулгана уу.
- Хэт халалт:
- Ensure all case fans are spinning and oriented correctly for optimal airflow (intake/exhaust).
- Тоосны шүүлтүүр болон дотор эд ангиудыг цэвэрлэ.
- Verify that the CPU cooler is properly seated and making good contact with the CPU.
For more complex issues, consult your component manuals or seek assistance from Xigmatek support or a qualified technician.
9. Техникийн үзүүлэлтүүд
| Онцлог | Тодорхойлолт |
|---|---|
| Брэнд | Xigmatek |
| Загварын нэр | Lux M |
| Загварын дугаар | EN48540 |
| Кейсийн төрөл | Мини цамхаг |
| Эх хавтангийн нийцтэй байдал | Micro-ATX, Mini-ITX |
| Материал | Tempered Glass (side panel), Metal (front panel) |
| Өнгө | Хар |
| Урьдчилан суулгасан фенүүд | 4 x 120mm X24F Fixed RGB Fans |
| Радиаторын дэмжлэг | 360мм, 240мм, 120мм |
| CPU хөргөгчийн хамгийн их өндөр | 160 мм |
| Хамгийн их VGA урт | 320 мм |
| PSU-ийн хамгийн их урт | 165 мм |
| Хадгалах булан | 2x 2.5"/3.5" |
| Онцлог шинж чанарууд | RGB Lighting, Triangular Mesh Front Design |
10. Баталгаат хугацаа ба дэмжлэг
Xigmatek products are manufactured to the highest quality standards. For warranty information and technical support, please refer to the warranty card included with your product or visit the official Xigmatek webсайт. Баталгаат заргад зориулж худалдан авалтаа нотлох баримтаа үлдээнэ үү.
For further assistance, you may contact Xigmatek customer support through their official channels.


