1. Танилцуулга
This manual provides detailed instructions for the setup, operation, and maintenance of your XTUGA U-260 Dual Channel UHF Wireless Microphone System. Please read this manual thoroughly before using the product to ensure proper functionality and to maximize its lifespan. Retain this manual for future reference.
2. Бүтээгдэхүүн дууссанview
The XTUGA U-260 is a professional-grade dual UHF wireless microphone system designed for various applications including church events, karaoke, weddings, and other live events. It features a robust design, adjustable frequencies, and convenient auto-scan and IR pairing functions.
2.1. Оруулсан бүрэлдэхүүн хэсгүүд
- U-260 UHF Wireless Receiver (1 unit)
- UHF Wireless Handheld Microphones (2 units)
- Antennas (2 units)
- Цахилгаан адаптер (1 нэгж)
- Хэрэглэгчийн гарын авлага (1 ширхэг)
- Аудио кабель (1 ширхэг)
- Anti-skid Rings (2 units)
- Power Plugs (2 units)
- Power Cables (2 units)

Figure 2.1: All components included with the XTUGA U-260 Wireless Microphone System, including the receiver, two microphones, antennas, power adapter, cables, and anti-skid rings.
2.2. Үндсэн шинж чанарууд
- Dual UHF Channels: Two independent channels with 100 selectable frequencies each (Channel 1: 540.1 - 564.85 MHz; Channel 2: 568.1 - 592.85 MHz).
- Auto Scan Function: Automatically searches for the least interference channel.
- IR Synchronization: Seamlessly pairs the receiver and microphones.
- Давтамжийн түгжээ: Prevents accidental frequency changes.
- Long Range Operation: Up to 492ft (150 meters) operating distance.
- Удаан эдэлгээтэй барилга: Microphones feature sturdy metal construction.
- Дээд зэргийн дууны чанар: High-quality dynamic cartridge designed to limit feedback and interference.
- Rechargeable Microphones: Built-in lithium batteries provide up to 8 hours of use on a 3-hour charge via USB-C.
- Dashboard-Inspired Display: Receiver features a unique display for AF and RF signal indication.

Figure 2.2: The receiver's display screen, featuring a dashboard-inspired design for clear signal indication.
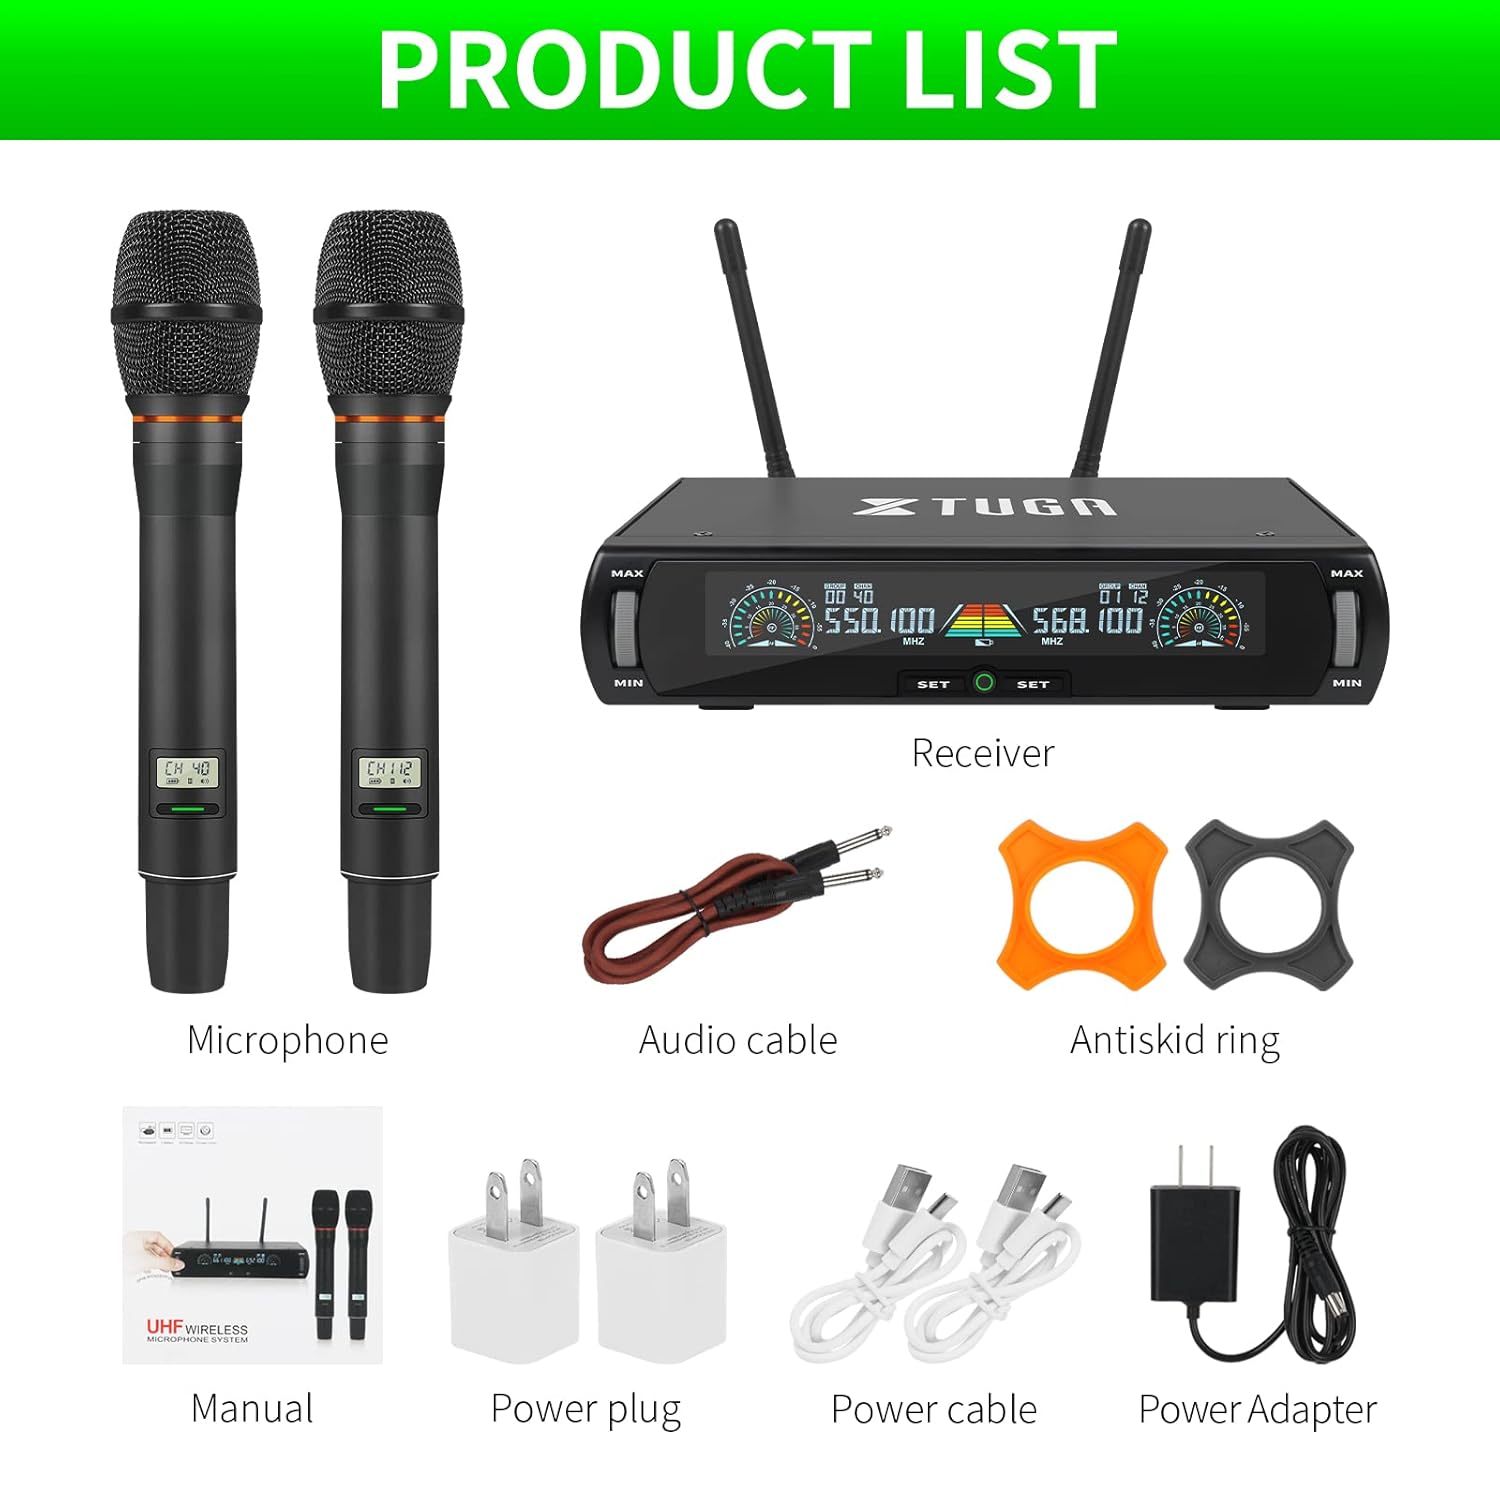
Figure 2.3: Illustration of the microphone's cardioid pickup pattern, designed to reduce noise and capture sound realistically.
2.3. Бүрэлдэхүүн хэсгүүдийг тодорхойлох

Зураг 2.4: Нарийвчилсан view of the receiver and microphone components.
- Дууны хяналт
- Function settings button
- Switch (Power/Mode)
- Дэлгэцийг харуулах
- Power socket (DC 12V)
- Антенны үүр
- XLR гаралт
- Audio output (6.35mm/1/4 inch)
- Steel meshed head (Microphone)
- Display screen (Microphone)
- Switch (Microphone Power)
- Type-C charging port (Microphone)
3. Тохируулах заавар
- Бүрэлдэхүүн хэсгүүдийг задлах: Сав баглаа боодолоос бүх зүйлийг болгоомжтой авч хая.
- Антен холбох: Screw the two antennas into the antenna jacks on the rear of the receiver. Ensure they are securely tightened.
- Эрчим хүчний холболт: Connect the power adapter to the receiver's power socket (DC 12V) and plug it into a suitable power outlet.
- Аудио гаралт:
- For balanced output, connect XLR cables from the receiver's XLR outputs to your mixer or ampнастан.
- For unbalanced output, use the provided 6.35mm (1/4 inch) audio cable to connect the receiver's audio output to your mixer or ampнастан.
- Хүлээн авагчийг асаах: Press the power switch on the receiver. The display screen should illuminate.
- Charge Microphones: Before first use, ensure both microphones are fully charged using the provided USB-C cables and power plugs. The microphone display will show charging status.
- Асаалттай микрофонууд: Press and hold the power switch on each microphone until its display illuminates.

Figure 3.1: The XTUGA U-260 system ready for operation, showing the receiver with antennas and two handheld microphones.
4. Ашиглалтын заавар
4.1. Frequency Selection and IR Pairing
The system features an auto-scan function to find clear frequencies and IR synchronization for easy pairing.

Figure 4.1: Diagram illustrating the IR pairing process between the microphone and receiver.
- Initiate Auto Scan: On the receiver, press the "SET" button three times quickly for the desired microphone channel (left or right). The receiver will scan for the clearest available frequency.
- Select Frequency (Optional): If you wish to manually select a frequency after the scan, rotate the volume knob corresponding to the microphone channel you are adjusting.
- IR Pairing: Once a frequency is displayed on the receiver, hold the front of the microphone (where its display is located) close to the IR sensor on the receiver. The IR sensor is located on the bottom left side of the receiver's screen.
- Хослолтыг баталгаажуулах: While holding the microphone near the IR sensor, press the "SET" button on the receiver once for the corresponding microphone channel. A small indicator light on the receiver should flash, and the microphone's display will update to show the new frequency, confirming successful pairing. This process may require a couple of attempts to ensure proper alignment and timing.
4.2. Frequency Lock Function
To prevent accidental changes to the selected frequency, use the frequency lock function.

Figure 4.2: Visual representation of the frequency lock function, showing a padlock icon.
- Түгжих: Press and hold the "SET" button on the receiver for the desired microphone channel until a lock icon appears on the display.
- Түгжээг тайлахын тулд: Press and hold the "SET" button again until the lock icon disappears.
4.3. Дууны түвшний хяналт
Each microphone channel has an independent volume control knob on the receiver. Rotate the "MIN/MAX" knobs to adjust the output volume for each microphone.
4.4. Microphone Charging
The handheld microphones are equipped with built-in rechargeable lithium batteries.

Figure 4.3: Illustration of microphone battery life (8 hours work) and charging time (3 hours) via USB-C.
- Connect a USB-C cable to the charging port at the bottom of the microphone.
- Connect the other end of the USB-C cable to a power adapter or a USB power source.
- A dim red light on the microphone's display bar indicates charging. The light will turn off or change color when fully charged.
- A full charge typically takes approximately 3 hours and provides up to 8 hours of continuous use.
5. Засвар үйлчилгээ
- Цэвэрлэгээ: Use a soft, dry cloth to clean the receiver and microphones. Do not use liquid cleaners or solvents.
- Хадгалах: Ашиглаагүй үед системийг сэрүүн, хуурай газар, нарны шууд тусгал болон хэт өндөр температураас хол хадгална уу.
- Батерейны арчилгаа: For optimal battery life, avoid fully discharging the microphones frequently. Recharge them regularly, especially if storing for extended periods.
- Кабелийн менежмент: Ensure all cables are connected securely and are not strained or kinked.
6. Алдаа засах
| Асуудал | Боломжит шалтгаан | Шийдэл |
|---|---|---|
| Дууны гаралт байхгүй. |
|
|
| Interference or static noise. |
|
|
| Микрофон хослохгүй байна. |
|
|
| Microphone battery drains quickly. |
|
|
7. Техникийн үзүүлэлтүүд
| Онцлог | Дэлгэрэнгүй |
|---|---|
| Загвар | U-260 |
| Брэнд | XTUGA |
| Микрофоны хэлбэр хүчин зүйл | Микрофоны систем (Гар) |
| Холболтын технологи | UHF утасгүй, XLR |
| Сувгийн тоо | 2 (2x100 selectable frequencies) |
| Frequency Range (Channel 1) | 540.1 - 564.85 МГц |
| Frequency Range (Channel 2) | 568.1 - 592.85 МГц |
| Үйл ажиллагааны хүрээ | 492 фут (150 метр) хүртэл |
| Туйлын загвар | Нэг чиглэлтэй (Кардиоид пикап) |
| Эсэргүүцэл | 600 Ом |
| Дуу шуугианы харьцаа | 120 дБ |
| Микрофоны тэжээлийн эх үүсвэр | Цэнэглэдэг литийн батерей |
| Microphone Battery Life | 8 цаг хүртэл |
| Microphone Charging Time | Ойролцоогоор 3 цаг (USB-C-ээр) |
| Хүлээн авагчийн тэжээлийн эх үүсвэр | DC 12V цахилгаан хувиргагч |
| Материал | Metal (Microphones) |
| Оруулсан бүрэлдэхүүн хэсгүүд | Receiver, 2 Handheld Microphones, 2 Antennas, Power Adapter, User Manual, Audio Cable, Anti-skid Rings, Power Plugs, Power Cables |
| Зүйлийн жин | 2 кг |
8. Баталгаат хугацаа ба дэмжлэг
XTUGA provides a one-year free warranty period for products with authentic brand logos. For any questions, technical assistance, or warranty claims, please contact XTUGA customer support through your purchase platform or the official XTUGA webсайт.
Баталгаат баталгааг баталгаажуулахын тулд худалдан авалтаа баталгаажуулна уу.


