Pretul KIT-8P Hole Saw Set Instruction Manual
Загвар: 29100
1. Бүтээгдэхүүн дууссанview
The Pretul KIT-8P is a comprehensive set of hole saws designed for efficient and precise cutting in various materials. This kit includes 6 carbon steel hole saws of different sizes and 2 mandrels, providing versatility for your projects.
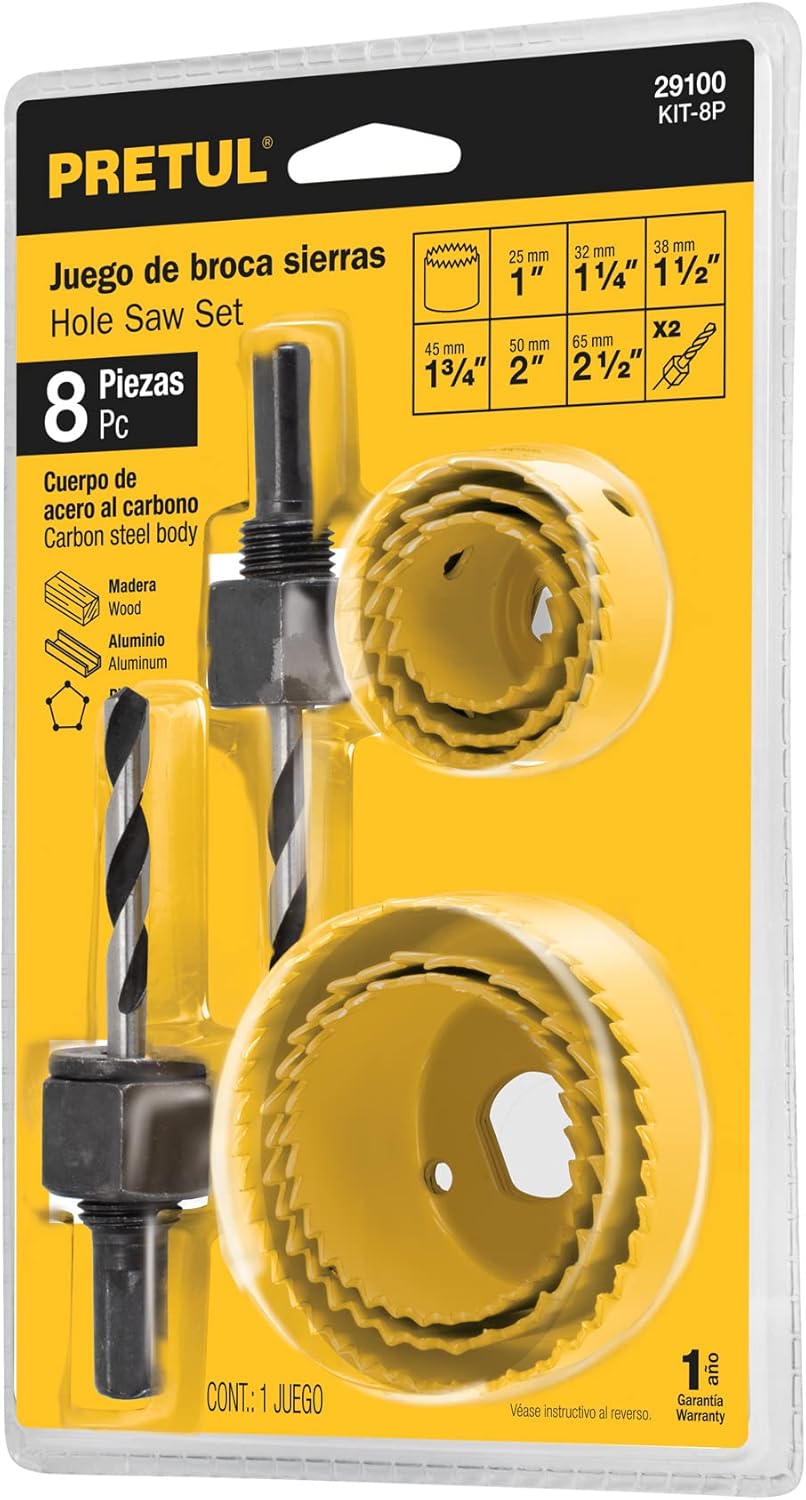
Image 1.1: Pretul KIT-8P Hole Saw Set, complete package.
Гол онцлогууд:
- Carbon Steel Body: Ensures durability and effective cutting performance.
- Олон талын хэрэглээ: Suitable for cutting holes in aluminum, wood, and plastic.
- Олон хэмжээ: Includes a range of common hole saw diameters for various tasks.
2. Аюулгүй байдлын мэдээлэл
Always prioritize safety when using power tools and accessories. Failure to follow these safety guidelines may result in serious injury or damage to the product.
- Хувийн хамгаалах хэрэгсэл (PPE) өмсөх: Always wear safety glasses or goggles to protect your eyes from flying debris. Consider gloves and hearing protection as needed.
- Аюулгүй ажлын хэсэг: Зүсэж буй материалаа нягт clampашиглалтын явцад хөдөлгөөнөөс урьдчилан сэргийлэхийн тулд бэхэлсэн эсвэл бэхэлсэн.
- Зөв хурдыг ашиглах: Refer to your drill's manual for recommended speeds for different materials. Using an incorrect speed can cause overheating, premature wear, or material damage.
- Хэрэглэхийн өмнө шалгах: Before each use, check the hole saws and mandrel for any signs of damage, cracks, or excessive wear. Do not use damaged tools.
- Гараа цэвэр байлгах: Never touch the rotating hole saw or the workpiece near the cutting area while the drill is operating.
- Цахилгааныг салгах: Always disconnect the drill from the power source before changing hole saws, making adjustments, or performing maintenance.
- Зөв агааржуулалт: Work in a well-ventilated area, especially when cutting materials that may produce dust or fumes.
- Аюулгүй хадгалах: Store hole saws and mandrels in a dry, secure place, out of reach of children.
3. Багцын агуулга
The Pretul KIT-8P Hole Saw Set includes the following components:

Зураг 3.1: Нарийвчилсан view of KIT-8P contents and sizes.
- 6 Carbon Steel Hole Saws:
- 1 инч (25 мм)
- 1 1/4 инч (32 мм)
- 1 1/2 инч (38 мм)
- 1 3/4 инч (45 мм)
- 2 инч (50 мм)
- 2 1/2 инч (65 мм)
- 2 Mandrels:
- 3/8 инч
- 5/16 инч
4. Тохиргоо ба угсралт
Follow these steps to properly assemble the hole saw with the mandrel and attach it to your drill.

Image 4.1: Hole Saw Assembly Diagram.
- Select the Correct Hole Saw: Choose the hole saw size appropriate for your cutting needs.
- Attach Hole Saw to Mandrel: Thread the selected hole saw onto the mandrel. Ensure it is securely tightened. The pilot drill on the mandrel should extend beyond the teeth of the hole saw.
- Insert Mandrel into Drill Chuck: Open the chuck of your power drill. Insert the straight shank of the mandrel into the chuck, ensuring it is centered and fully seated.
- Tighten Drill Chuck: Securely tighten the drill chuck around the mandrel shank. Most drills require a chuck key or hand-tightening until the mandrel is firmly gripped and will not slip during operation.
- Ассемблейг баталгаажуулах: Gently tug on the assembled hole saw to ensure it is securely attached to the drill and the hole saw is tight on the mandrel.
5. Ашиглалтын заавар
Once the hole saw is assembled and attached to your drill, follow these steps for effective and safe operation:
- Ажлын хэсгийг бэлтгэх: Mark the center of the desired hole on your material. Secure the workpiece firmly to a stable surface using clamps эсвэл огтлох үед хөдөлгөөн хийхээс сэргийлэхийн тулд саваа.
- Position the Pilot Drill: Place the tip of the pilot drill directly on the marked center of your hole.
- Өрөмдлөг эхлүүлэх: Begin drilling at a slow speed to allow the pilot drill to create a guide hole. Once the pilot drill has penetrated the material, gradually increase the drill speed.
- Тогтвортой даралт хийх: Apply consistent, moderate pressure to the drill. Avoid excessive force, which can cause the hole saw to bind, overheat, or damage the material.
- Хяналтыг хадгалах: Keep a firm grip on the drill and maintain control throughout the cutting process. Be prepared for potential kickback, especially when the hole saw breaks through the material.
- Хог хаягдлыг цэвэрлэх: Periodically withdraw the hole saw from the cut to clear chips and debris, especially when cutting thicker materials. This helps prevent overheating and improves cutting efficiency.
- Тайралтыг гүйцээгээрэй: Continue drilling until the hole saw has fully penetrated the material.
- Remove Core: Once the cut is complete, carefully remove the drill. The cut material core will typically be inside the hole saw. Use a screwdriver or similar tool to push out the core from the side slots of the hole saw.
Санал болгож буй материал:
- Хөнгөн цагаан
- Мод
- Хуванцар
6. Засвар үйлчилгээ
Proper maintenance will extend the life of your Pretul KIT-8P Hole Saw Set and ensure optimal performance.
- Цэвэрлэгээ: After each use, clean the hole saws and mandrel to remove any accumulated dust, chips, or residue. Use a brush or compressed air. Avoid using harsh chemicals that could damage the finish.
- Тосолгоо (заавал биш): For prolonged cutting or harder materials, applying a suitable cutting lubricant can reduce friction and heat, extending the life of the hole saw.
- Шалгалт: Regularly inspect the teeth of the hole saws for dullness, damage, or missing teeth. Inspect the mandrel for bends or damage to the pilot drill. Replace worn or damaged components.
- Хадгалах: Store the hole saw set in its original packaging or a suitable tool case to protect it from moisture, dust, and physical damage. Keep it in a dry environment to prevent rust.
7. Алдаа засах
Here are some common issues you might encounter and their potential solutions:
| Асуудал | Боломжит шалтгаан | Шийдэл |
|---|---|---|
| Hole saw binds or stalls | Too much pressure; dull teeth; material too hard; chips not clearing. | Reduce pressure; replace hole saw; ensure material is suitable; clear chips frequently. |
| Poor cut quality or rough edges | Dull teeth; incorrect speed; unstable workpiece. | Replace hole saw; adjust drill speed; secure workpiece firmly. |
| Hole saw overheats | Excessive speed; insufficient chip clearance; no lubricant. | Reduce speed; clear chips more often; apply cutting lubricant. |
| Mandrel slips in drill chuck | Chuck not tightened enough; dirty shank. | Ensure chuck is fully tightened; clean mandrel shank before inserting. |
8. Техникийн үзүүлэлтүүд
| Загварын дугаар | 29100 |
| Брэнд | Претул |
| Материал | Нүүрстөрөгчийн ган |
| Хэсгийн тоо | 8 (6 Hole Saws, 2 Mandrels) |
| Hole Saw Sizes | 1", 1 1/4", 1 1/2", 1 3/4", 2", 2 1/2" |
| Mandrel Sizes | 3/8", 5/16" |
| Дуусга | Бүрээсгүй |
| Бариулын төрөл | Шулуун |
| Tool Cutting Type | Спираль |
| Багцын хэмжээ | 20.3 x 12.9 x 3.3 см |
| Багцын жин | 350 гр |
| Үйлдвэрлэгч | Трупер SA de CV |
9. Баталгаат хугацаа ба дэмжлэг
The Pretul KIT-8P Hole Saw Set comes with a 1 жилийн баталгаат хугацаа худалдан авсан өдрөөс эхлэн үйлдвэрлэлийн согогийг хамарна. Баталгаат заргад зориулж худалдан авалтаа нотлох баримтаа үлдээнэ үү.
For technical support, warranty inquiries, or replacement parts, please contact Pretul customer service. Refer to the product packaging or the official Pretul webхамгийн сүүлийн үеийн холбоо барих мэдээллийг авах сайт.
Pretul is a brand of Grupo Truper.


