1. Аюулгүй байдлын чухал мэдээлэл
Please read and understand all instructions before beginning installation. Failure to do so may result in electric shock, fire, or other injuries that could be fatal or cause property damage.
- АНХААРУУЛГА: To avoid electric shock, ensure power is turned off at the circuit breaker or fuse box before installation.
- Бүх цахилгааны холболтууд нь орон нутгийн хууль тогтоомж, дүрэм журам эсвэл Үндэсний цахилгаан код (NEC) -ийн дагуу байх ёстой.
- Хэрэв та суулгах процессын талаар эргэлзэж байвал мэргэшсэн цахилгаанчинтай зөвлөлд.
- Энэхүү бэхэлгээ нь дотор ашиглахад зориулагдсанamp байршил.
- Төхөөрөмж эсвэл түүний бүрэлдэхүүн хэсгүүдийг өөрчлөхийг бүү оролд.
2. Багцын агуулга
Verify that all parts are included before proceeding with installation.
- LED Chips (Integrated)
- Installation Kits (Mounting hardware)
- Зааварчилгаа (энэ баримт бичиг)
3. Бүтээгдэхүүний техникийн үзүүлэлтүүд
| Онцлог | Тодорхойлолт |
|---|---|
| Брэнд | Хамиля |
| Загвар | CL |
| Хэмжээ | 12"L x 12"W x 3.3"H |
| Материал | Anti-rust Metal, LED |
| Ватtage | 18 ватт |
| Ботьtage | 120 вольт (AC) |
| Гэрлийн эх үүсвэрийн төрөл | LED (Нэгдсэн) |
| Өнгөний температур | 3000 Келвин |
| Гэрэлтүүлэг | 2200 люмен |
| Багасгах боломжтой | Тийм (Ихэнх dimmers-тэй тохирно) |
| Суурилуулалтын төрөл | Шатах уул |
| Дотор/гадаа ашиглах | Дотор (Дamp Байршлын үнэлгээ) |
| Гэрчилгээ | ETL Listed (for electrical components) |
4. Суулгах заавар (Тохируулга)
Эхлэхээсээ өмнө: Ensure the power is OFF at the circuit breaker. Use a voltage tester to confirm the power is off before touching any wires.
- Prepare the Mounting Plate:
The fixture includes a mounting plate. Attach this plate to your junction box using the provided screws. Ensure it is securely fastened.
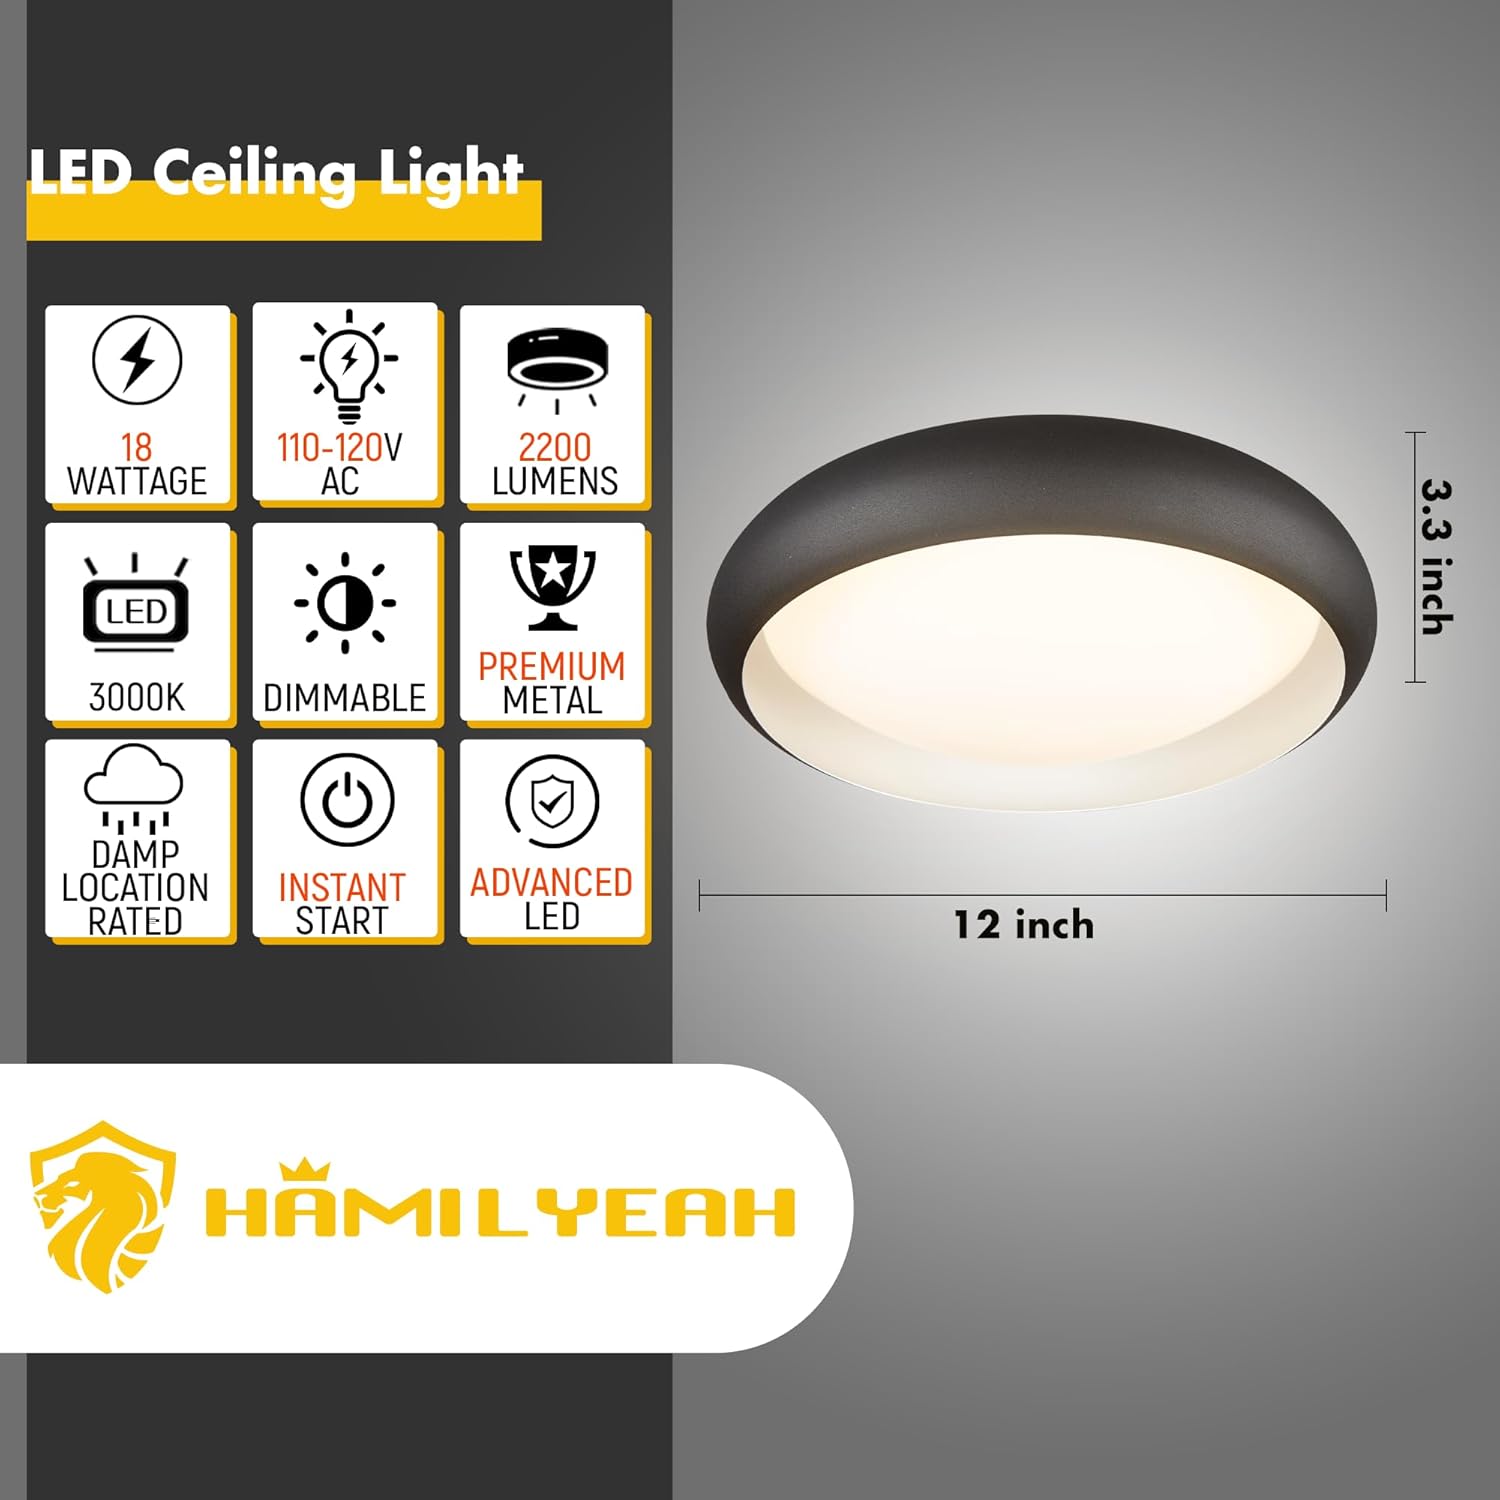
Image 1: Product dimensions and key specifications. This image illustrates the physical size and electrical characteristics of the light fixture.
- Цахилгааны холболтууд:
Connect the fixture's wires to the corresponding wires from your junction box. Typically, this involves:
- Бэхэлгээнээс гарч буй хар утсыг уулзвар хайрцагнаас гарч буй хар (халуун) утсанд холбоно уу.
- Бэхэлгээний цагаан утсыг уулзвар хайрцагнаас цагаан (төвийг сахисан) утас руу холбоно.
- Connect the green or bare copper (ground) wire from the fixture to the ground wire from the junction box.
Secure connections with wire nuts. Ensure all wires are tucked neatly into the junction box.
- Тоног төхөөрөмжийг суурилуулах:
Align the fixture with the mounting plate and secure it firmly. This usually involves tightening screws that pass through the fixture into the mounting plate.

Image 2: The Hamilyeah flush mount LED ceiling light installed and illuminated. This shows the light's appearance when operational.
- Эрчим хүчийг сэргээх:
Once the fixture is securely installed and all connections are made, restore power at the circuit breaker. Test the light fixture.
Note on older junction boxes: Some older homes may have smaller junction boxes where the LED plate might obstruct mounting holes. In such cases, it may be necessary to carefully disassemble the LED plate from the mounting bracket to access the holes, then reassemble after securing the bracket. If you encounter difficulties, consult a professional electrician.
5. Ашиглалтын заавар
This Hamilyeah LED ceiling light is designed for simple operation.
- Асаах/унтраах: Гэрлийг гэрэлтүүлэгт холбогдсон стандарт ханын унтраалга ашиглан удирдана уу.
- Чийрэгжүүлэх функц: This fixture is dimmable. If connected to a compatible dimmer switch (sold separately), you can adjust the light intensity to your preference.
Video 1: Hamilyeah Flush Mount LED Ceiling Light Modern. This video demonstrates the light fixture in various room settings, showcasing its aesthetic and functionality.
6. Засвар үйлчилгээ
To maintain the appearance and performance of your Hamilyeah LED ceiling light, follow these simple guidelines:
- Цэвэрлэгээ: Цэвэрлэхийн өмнө цахилгааныг унтраасан эсэхийг шалгаарай. Бэхэлгээг зөөлөн, хуурай эсвэл бага зэрэг арчина damp даавуу. Зүлгүүрийн цэвэрлэгч эсвэл уусгагч хэрэглэж болохгүй, учир нь эдгээр нь өнгөлгөө болон цахилгаан эд ангиудыг гэмтээж болзошгүй.
- LED урт наслалт: The integrated LED chips are designed for long life and do not require replacement.
7. Алдаа засах
Хэрэв та гэрэлтүүлгийн төхөөрөмжтэй холбоотой асуудал гарвал дараах нийтлэг асуудал, шийдлүүдийг үзнэ үү.
| Асуудал | Боломжит шалтгаан | Шийдэл |
|---|---|---|
| Гэрэл асдаггүй. | Бэхэлгээнд хүч байхгүй. Сул утас холболт. Ханын унтраалга буруу байна. | Хэлхээ таслагч/гал хамгаалагчийг шалгана уу. Цахилгаан асаалттай байгаа эсэхийг шалгана уу. Бүх холболтууд найдвартай байгаа эсэхийг шалгаарай (цахилгаан унтраалттай үед). Ханын унтраалгыг өөр төхөөрөмжөөр шалгах эсвэл солино уу. |
| Гэрэл гэнэт анивчих эсвэл бүдгэрч байна. | Тохиромжгүй бүдгэрүүлэгч унтраалга. Сул утас холболт. | Ensure dimmer switch is LED-compatible. Replace if necessary. Утасны холболтыг шалгана уу (цахилгаан унтраалттай үед). |
| Гэрэл нь хүлээгдэж буй шиг тод биш юм. | Диммерийн тохиргоо хэт бага байна. Буруу суурилуулалт. | Бүдэгрүүлэгчийг хамгийн их гэрэлтэлтэд тохируулна уу. Review installation steps to ensure proper wiring. |
8. Баталгаат хугацаа ба дэмжлэг
Баталгаат хугацаа: Hamilyeah provides a 1-year hassle-free warranty for this product. This warranty covers defects in materials and workmanship under normal use.
Хэрэглэгчийн дэмжлэг: If you have any questions, require assistance, or need to claim warranty service, please contact Hamilyeah customer support. You can typically reach us through your purchase platform by navigating to "Your Orders," finding your order in the list, selecting "Problem with Order," and choosing the relevant topic.
For more information, visit the official Hamilyeah store: Hamilyeah Store


