1. Бүтээгдэхүүн дууссанview
The Gemini GMU-M200 is a dual-person handheld UHF wireless microphone system designed for various audio applications. It features two handheld microphones and a compact plug-in receiver, providing wireless audio transmission up to 164 feet (50 meters). This system is suitable for performances, karaoke, weddings, conferences, meetings, and lectures.
Each microphone is equipped with a dynamic mic capsule and a cardioid pickup pattern, which helps to focus on the speaker's voice and minimize background noise and feedback. The dual-channel receiver connects to audio equipment via a standard 1/4" TS plug. Both microphones and the receiver are powered by rechargeable lithium batteries, with convenient USB charging capability.
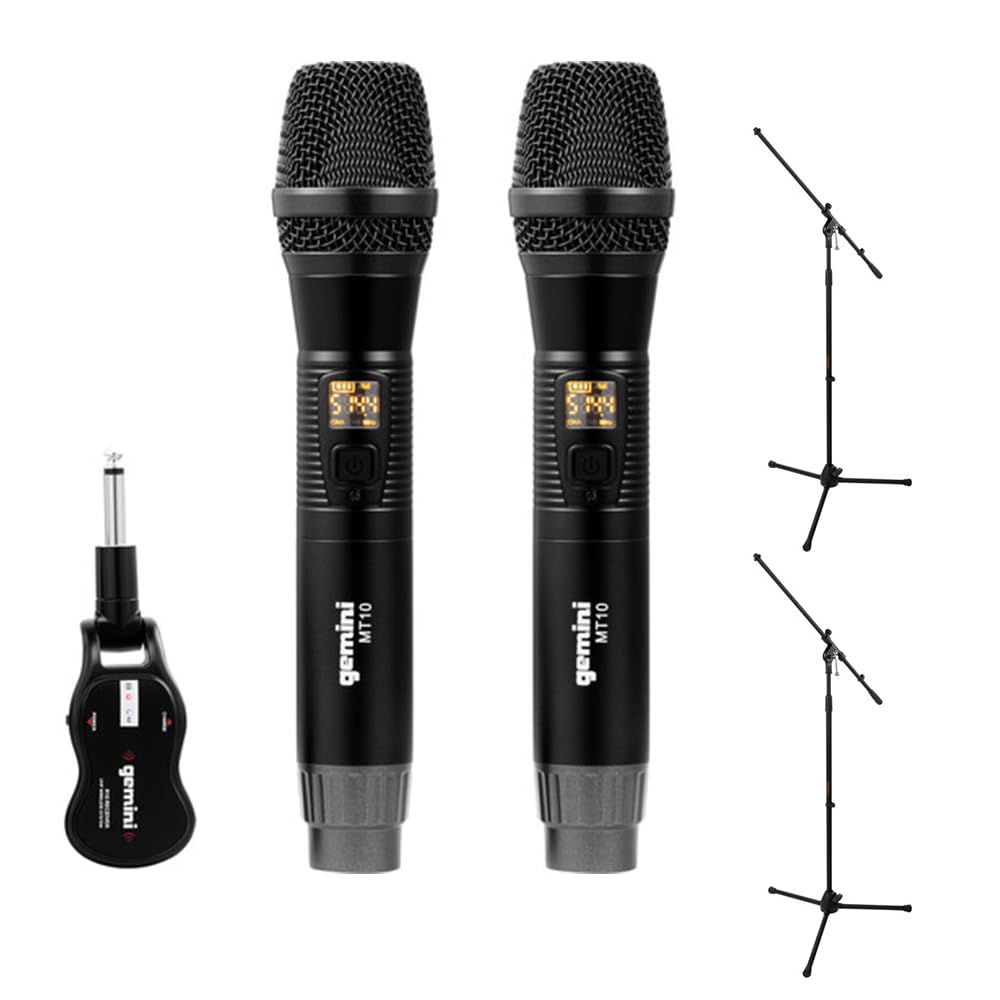
Image 1.1: Gemini GMU-M200 Wireless Microphone System components, including two handheld microphones and a plug-in receiver.
2. Хайрцагт юу байна
Verify that all components are present before setup.
- 2x Handheld Wireless Microphones (Gemini MT10)
- 1x Plug-in Wireless Receiver (Gemini R10)
- 2x Rechargeable 18650 1200mAh Lithium Batteries (pre-installed in microphones)
- 1х микро-USB цэнэглэгч кабель
- 2x Auray MS-5230F Tripod Microphone Stands with Fixed Boom (Note: These are included as part of the bundle.)
- Хэрэглэгчийн гарын авлага (энэ баримт бичиг)

Image 2.1: Included Micro-USB charging cable.

Image 2.2: Two Auray MS-5230F Tripod Microphone Stands included in the bundle.
3. Тохируулах заавар
3.1. Microphone Battery Installation and Charging
- Unscrew the bottom cap of each handheld microphone.
- Ensure the 18650 1200mAh rechargeable lithium battery is correctly inserted according to polarity markings. The batteries are typically pre-installed.
- To charge the microphones, connect the micro-USB charging cable to the DC-5V port located at the bottom of each microphone. Connect the other end to a USB power source (e.g., computer USB port, USB wall adapter).
- The LED display on the microphone will indicate charging status. A full charge provides several hours of use.

Image 3.1: Handheld microphone with the battery compartment open, showing the rechargeable 18650 battery.

Зураг 3.2: Ойролцоогоор view of the micro-USB charging port (DC-5V) at the base of the microphone.
3.2. Receiver Charging and Connection
- The plug-in receiver also contains a rechargeable lithium battery. Charge it using the provided micro-USB cable and a USB power source.
- Once charged, plug the receiver's 1/4" TS connector directly into the microphone input of your audio device (e.g., PA speaker, amplifier, mixer, karaoke machine).
- Ensure the audio device's input volume is set to a low level before powering on the receiver.
4. Ашиглалтын заавар
4.1. Powering On and Automatic Pairing
- Press and hold the power button on each handheld microphone to turn them on. The LED display will illuminate.
- Press and hold the power button on the plug-in receiver to turn it on.
- The microphones and receiver will automatically pair. A successful connection is indicated by a stable signal indicator on the microphone's LED display.
4.2. Дууны хэмжээг тохируулах
- Volume can be controlled directly from the handheld microphones. Refer to the microphone's controls for volume adjustment buttons.
- Additionally, adjust the input volume on your connected audio device (PA speaker, amplifier, mixer) to achieve the desired sound level.
4.3. Давтамжийн өөрчлөлт
If you experience interference or signal dropouts, you can change the operating frequency:
- On the handheld microphone, locate the "SET" button.
- Press the "SET" button to cycle through available UHF frequencies. The LED display will show the current frequency.
- The receiver will automatically sync to the new frequency selected on the microphone.
- Select a frequency that provides clear, interference-free audio. The system operates within the 512-541.7 MHz range in the United States.

Image 4.1: Two Gemini MT10 handheld microphones, showing their LED displays and control buttons.
5. Засвар үйлчилгээ
5.1. Цэвэрлэгээ
- Микрофон болон хүлээн авагчийг зөөлөн, хуурай даавуугаар арчина.
- Зүлгүүрийн цэвэрлэгч, уусгагч, химийн хатуу бодис хэрэглэж болохгүй.
- Avoid moisture contact with electronic components.
5.2. Зайны арчилгаа
- Recharge batteries regularly, even if the system is not in frequent use, to maintain battery health.
- If storing the system for an extended period, charge the batteries to approximately 50% before storage.
- Replace batteries if their performance significantly degrades. Use only approved 18650 rechargeable lithium batteries for the microphones.
6. Алдаа засах
- Дуугүй:
- Ensure microphones and receiver are powered on.
- Check battery levels on both microphones and receiver. Recharge if necessary.
- Verify the receiver is securely plugged into the audio device's input.
- Increase the volume on the microphones and the connected audio device.
- Confirm that the microphones and receiver are paired (stable signal indicator).
- Interference/Static:
- Press the "SET" button on the microphone to change to a different operating frequency.
- Ensure there are no other wireless devices operating on similar frequencies nearby.
- Reduce the distance between the microphones and the receiver.
- Avoid physical obstructions between the transmitter and receiver.
- Богино утасгүй холболтын хүрээ:
- Ensure line of sight between microphones and receiver for optimal performance.
- Хүлээн авагчийг хөндлөнгийн нөлөөлөл үүсгэж болзошгүй том металл объект эсвэл бусад электрон төхөөрөмжийн ойролцоо байрлуулахаас зайлсхий.
- Check battery levels. Low batteries can affect range.
7. Техникийн үзүүлэлтүүд
| Онцлог | Тодорхойлолт |
|---|---|
| Загварын нэр | GEGMUM200 |
| Микрофоны хэлбэр хүчин зүйл | Микрофоны систем (Гар) |
| Холболтын технологи | UHF утасгүй |
| Давтамжийн хүрээ (АНУ) | 512 - 541.7 МГц |
| Сувгийн тоо | 2 (Хос суваг) |
| Утасгүй сүлжээ | 164 фут (50 метр) дээш |
| Эрчим хүчний эх үүсвэр | Battery Powered (Rechargeable Lithium) |
| Microphone Battery Type | 18650 1200mAh (User-replaceable) |
| Цэнэглэх порт | Micro-USB (DC-5V) |
| Хүлээн авагчийн холбогчийн төрөл | 1/4" TS Plug |
| Туйлын загвар | Нэг чиглэлтэй (кардиоид) |
| Материал | Металл |
| Өнгө | Хар |
| Зүйлийн жин | 2 фунт (систем) |
| Тохиромжтой төхөөрөмжүүд | Ampөргөгч, караоке машин, чанга яригч |
8. Баталгаат хугацаа ба дэмжлэг
For warranty information or technical support, please refer to the official Gemini webсайт эсвэл харилцагчийн үйлчилгээний хэлтэстэй холбогдоно уу. Худалдан авалтын баримтаа аливаа баталгаат нэхэмжлэлийг худалдан авсан баримт болгон хадгална уу.
Gemini Official Webсайт: www.geminisound.com (Жич: Энэ бол орлуулагч юм URL, please verify the actual support webсайт.)


