Бүтээгдэхүүн дууссанview
The Artillery Sidewinder X3 Plus is a high-performance 3D printer designed for both hobbyists and professionals, offering a large build volume and advanced features for efficient and precise 3D printing.

Зураг 1: Урд view of the Artillery Sidewinder X3 Plus 3D Printer, showcasing its robust frame and integrated control panel.
Гол онцлогууд
- Large Build Size: 300mm × 300mm × 400mm (11.8in × 11.8in × 15.7in) for greater creative freedom.
- Хэт чимээгүй өндөр хурдтай хэвлэх: Achieves speeds up to 300 mm/s with 0.1 mm precision.
- Upgraded 300°C High-Temperature Nozzle: Supports various filaments including PLA, TPU, PETG, ABS, and Nylon, with automatic nozzle cleaning.
- 49 цэгийн автомат ор тэгшлэх: Ensures quick and accurate leveling of the build platform.
- Dual-Gear Direct Extruder: Provides powerful extrusion and smoother filament feeding for improved print quality.
- Анкет хэвлэх функц: Detects filament runout/breakage or power loss and resumes printing after recovery.
- Хос Z тэнхлэг ба Хос Мотор: Ensures stability and higher printing accuracy through coordinated movement.

Зураг 2: Illustration demonstrating the large print volume of the Sidewinder X3 Plus, capable of accommodating substantial models.
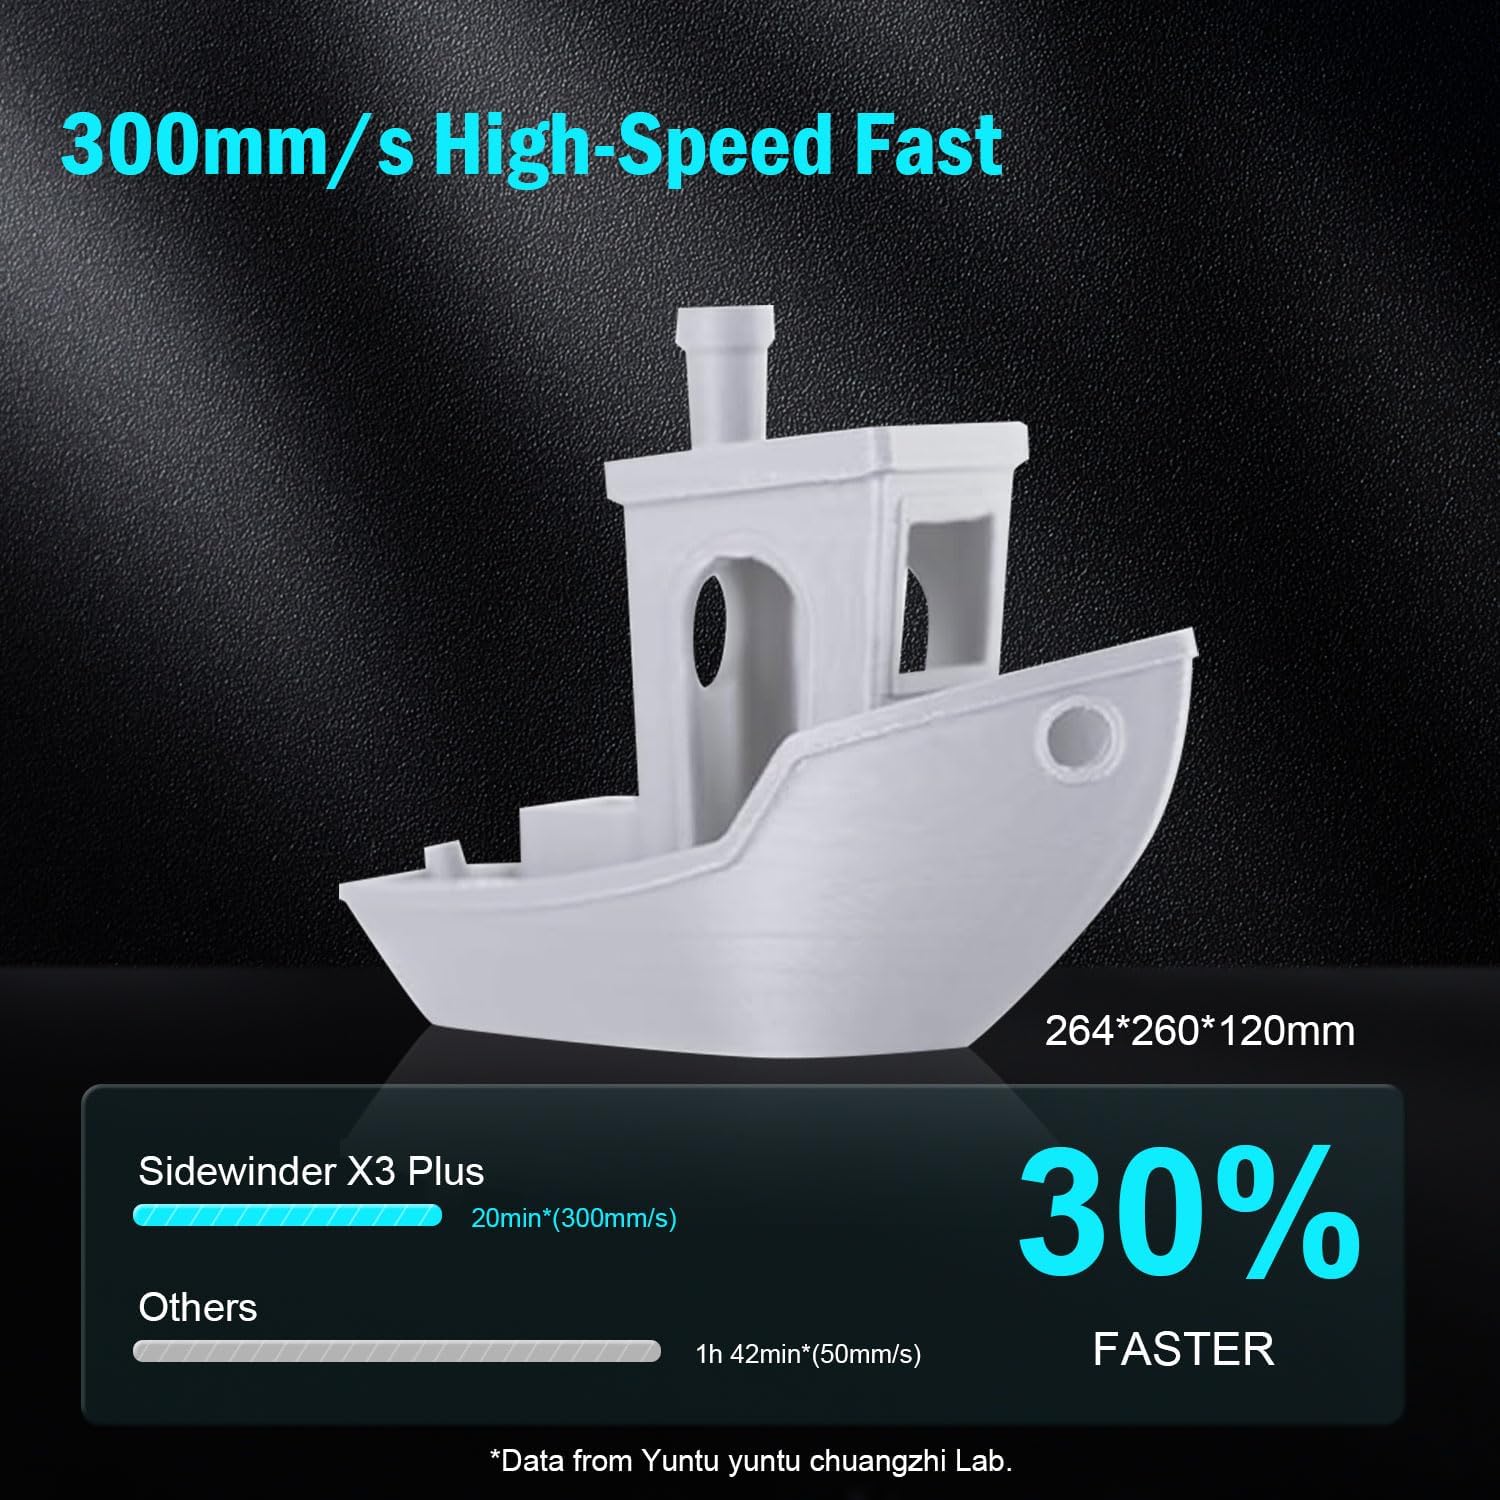
Зураг 3: Visual representation of the Sidewinder X3 Plus's high-speed printing capability, showing a printed boat model.

Зураг 4: Ойролцоогоор view of the all-metal hotend and automatic cleaning nozzle, highlighting its high-temperature capabilities.

Зураг 5: Diagram illustrating the 49-point smart auto-leveling system on the print bed, simplifying the leveling process.
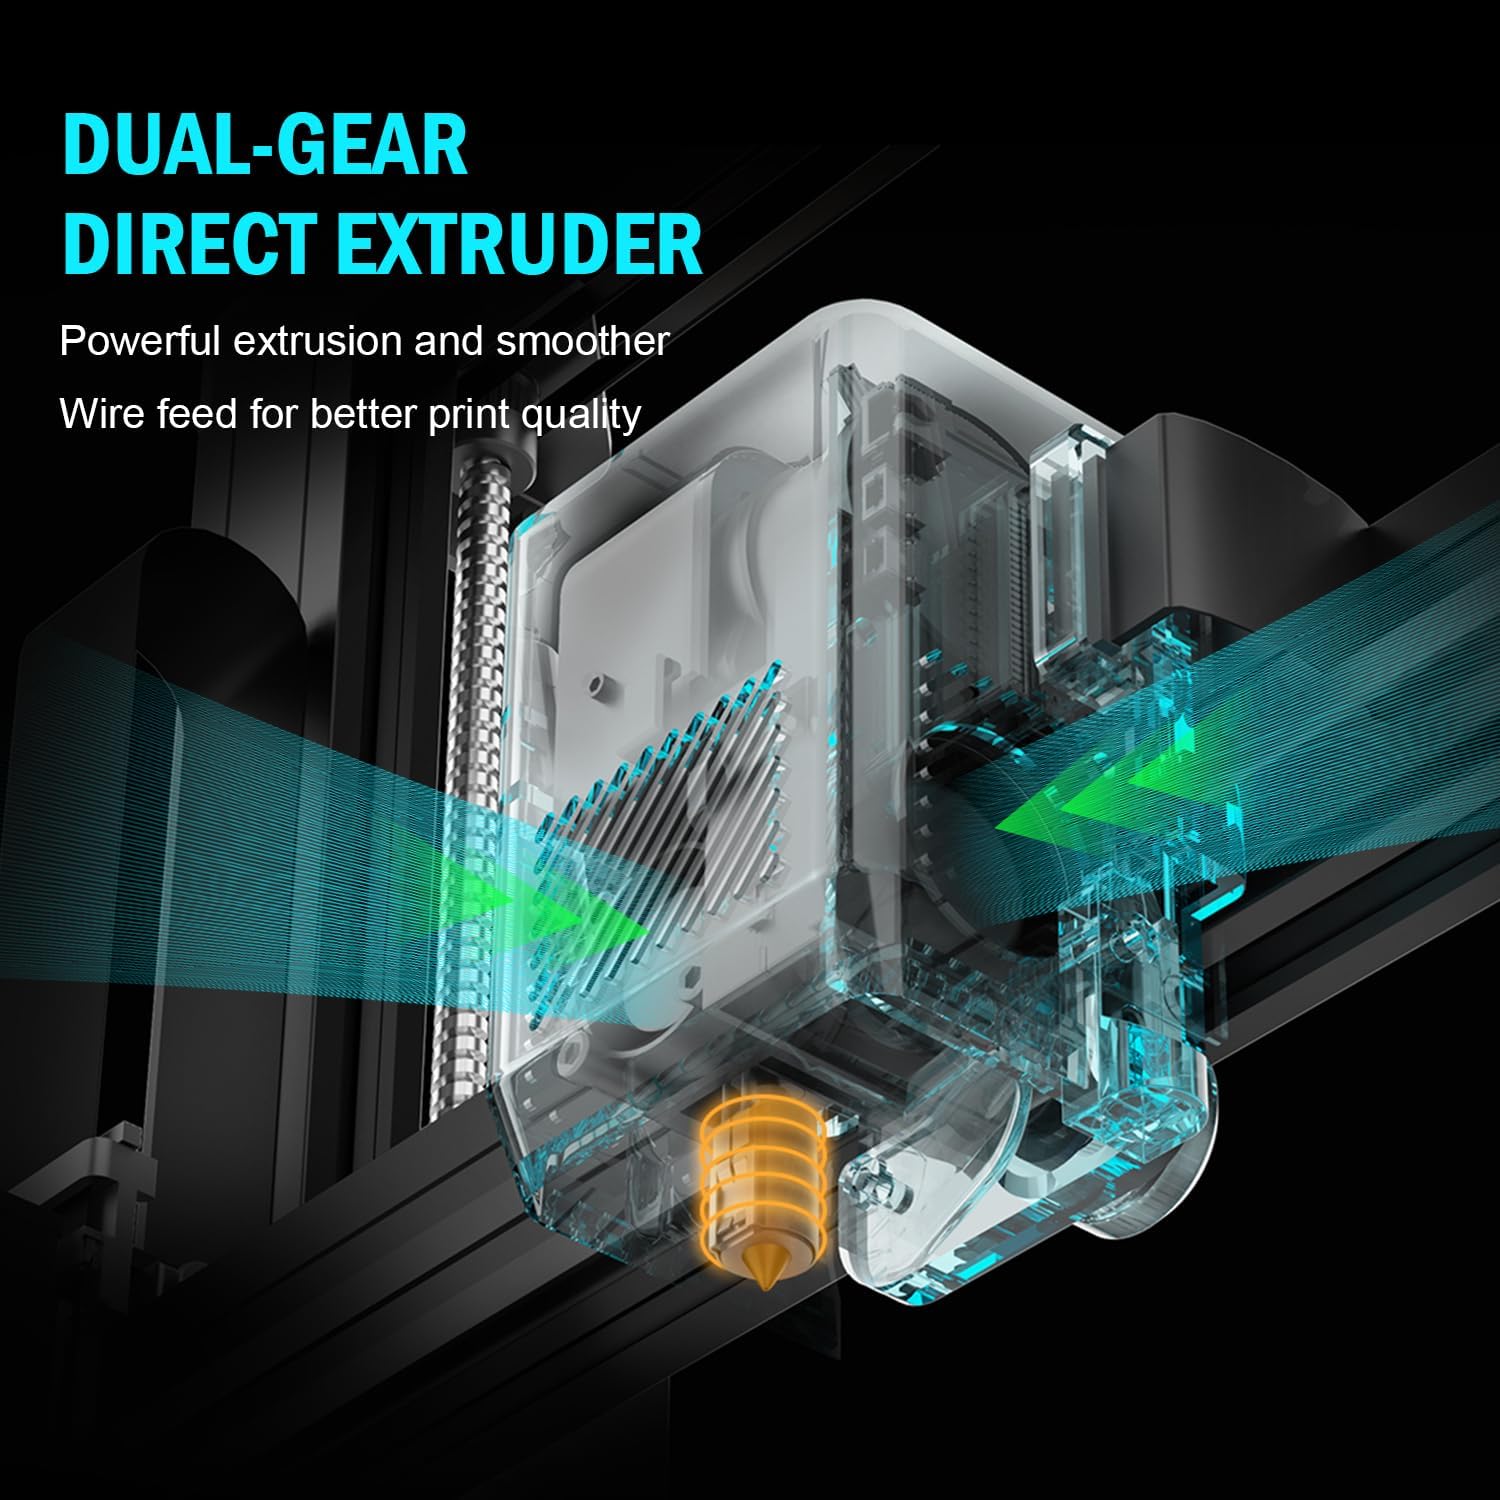
Зураг 6: Дотоод view of the dual-gear direct extruder, showing the gears that ensure consistent filament flow.

Зураг 7: Depiction of the dual Z-axes and dual motors system, highlighting their role in enhancing print stability and precision.
Тохируулах гарын авлага
The Artillery Sidewinder X3 Plus is designed for quick assembly. Follow these general steps for initial setup:
- Савлах: Сав баглаа боодолоос бүх бүрэлдэхүүн хэсгүүдийг болгоомжтой арилгана. Баглаа боодлын жагсаалтад орсон бүх эд анги байгаа эсэхийг шалгаарай.
- Суурийн угсралт: Place the printer base on a stable, level surface.
- Гантри суурилуулах: Attach the gantry (Z-axis frame) to the base. Ensure all screws are securely fastened.
- Утасны холболтууд: Connect all necessary cables, including power, motor, and sensor cables, according to the labels.
- Утас эзэмшигч: Mount the filament holder.
- Анхны асаалт: Цахилгааны утсыг холбож, принтерээ асаана уу.
- Автомат тэгшлэх: Perform the 49-point auto bed leveling procedure as prompted by the printer's interface. This is crucial for successful first prints.

Зураг 8: Visual guide showing the four main steps for assembling the Artillery Sidewinder X3 Plus, indicating a straightforward setup process.
Ашиглалтын заавар
Filament ачаалж байна
- Ensure the hotend is preheated to the appropriate temperature for your filament type (e.g., 200°C for PLA).
- Утасыг экструдерын оролтын нүхэнд оруулна.
- Push the filament until it is gripped by the extruder gears and begins to feed through the hotend.
- Confirm filament is extruding smoothly from the nozzle.
Хэвлэж эхэлж байна
- Зүсэх програм хангамж (жишээ нь, Cura, PrusaSlicer) ашиглан 3D загвараа бэлтгэж, G-код болгон хадгална уу file to a USB drive or SD card.
- Insert the USB drive/SD card into the printer's designated slot.
- Navigate the printer's touchscreen interface to select the desired G-code file.
- Confirm print settings and initiate the print. The printer will automatically preheat and begin printing.

Зураг 9: Image showing the 4.3-inch touchscreen interface of the Sidewinder X3 Plus, demonstrating user interaction for print control.
Removing a Print
- Allow the print bed to cool down completely after the print finishes.
- Gently flex the PEI magnetic print platform to detach the printed object. Avoid using excessive force or sharp tools to prevent damage to the print surface.
Засвар үйлчилгээ
Regular maintenance ensures optimal performance and longevity of your Artillery Sidewinder X3 Plus.
- Хэвлэх орыг цэвэрлэ: After each print, clean the print surface with isopropyl alcohol to remove any residue and ensure good adhesion for future prints.
- Цорго цэвэрлэх: The printer features an automatic cleaning nozzle. However, inspect the nozzle periodically for clogs or wear. If necessary, perform a cold pull or replace the nozzle.
- Lubricate Z-axis Lead Screws: Apply a small amount of lithium grease or similar lubricant to the Z-axis lead screws every few weeks, depending on usage, to ensure smooth vertical movement.
- Бүс болон дамар шалгах: Periodically inspect the X and Y axis belts for proper tension and wear. Ensure pulleys are clean and move freely.
- Програм хангамжийн шинэчлэлтүүд: Албан ёсны Артиллерийг шалгана уу webТаны хэвлэгч хамгийн сүүлийн үеийн функцууд болон алдааны засваруудтай эсэхийг шалгахын тулд боломжтой програм хангамжийн шинэчлэлтүүдийг үзэх сайт.
Нийтлэг асуудлуудыг олж засварлах
| Асуудал | Боломжит шалтгаан | Шийдэл |
|---|---|---|
| Шилэн утас гадагшлахгүй байна | Бөглөрсөн цорго, орооцолдсон утас, буруу температур. | Clean the nozzle, check filament path, verify hotend temperature. |
| Орны наалдац муу | Тэгш бус ор, бохир хэвлэмэл гадаргуу, буруу температуртай ор. | Автоматаар тэгшлэх, хэвлэх давхаргыг изопропилийн спиртээр цэвэрлэж, давхаргын температурыг тохируулна. |
| Давхаргыг шилжүүлэх | Loose belts, motor issues, print speed too high. | Check and tighten X/Y axis belts, inspect motor connections, reduce print speed. |
| Printer is excessively loud | Loose components, fan noise, worn bearings. | Inspect for loose screws, check fan operation, lubricate moving parts. |
| "Thermal runaway detected" error | Faulty thermistor, loose wiring to hotend/bed, heater cartridge issue. | Immediately power off the printer. Check all wiring connections to the hotend and heated bed. Contact support if issue persists. |
| "Error: home Y failed" or similar homing errors | Obstructed endstop switch, loose motor cable, faulty sensor. | Check for obstructions, ensure all motor and endstop cables are securely connected. Restart printer. |
Техникийн үзүүлэлтүүд
| Онцлог | Дэлгэрэнгүй |
|---|---|
| Бүтээгдэхүүний хэмжээс | 20 x 19.4 x 25.6 инч (508 x 493 x 650 мм) |
| Зүйлийн жин | 36.6 фунт (16.6 кг) |
| Бүтээлийн хэмжээ | 300 x 300 x 400 мм (11.8 x 11.8 x 15.7 инч) |
| Хэвлэх хурд | 300 мм/с хүртэл |
| Цоргоны температур | Хамгийн их температур 300 ° C |
| Ор тэгшлэх | 49 цэгийн авто ор тэгшлэх |
| Экструдерын төрөл | Хос араатай шууд экструдер |
| Дэмжигдсэн утаснууд | PLA, TPU, PETG, ABS, Nylon |
| Холболт | USB, SD карт |
| Материал | Металл |
| Өнгө | Хар |
Баталгаат болон дэмжлэг
For warranty information and technical support, please refer to the official Artillery webсайт эсвэл харилцагчийн үйлчилгээтэй шууд холбогдоно уу. Худалдан авалтын баримтаа баталгаат нэхэмжлэлд зориулж худалдан авалтын баталгаа болгон хадгална уу.
Үйлдвэрлэгч: Их буу
Албан ёсны Webсайт: www.artillery3d.com (Жич: Энэ бол орлуулагч юм URL, please refer to the actual manufacturer's webдэмжлэг үзүүлэх сайт.)


