Танилцуулга
This manual provides detailed instructions for the assembly, operation, and maintenance of your Vetroo AL800 Mid Tower ATX PC Computer Case. Please read this manual thoroughly before beginning installation to ensure proper setup and optimal performance.

Figure 1: Vetroo AL800 Mid Tower ATX PC Computer Case (Black)
Аюулгүй байдлын мэдээлэл
- Аливаа эд ангиудыг суулгах эсвэл салгахаасаа өмнө цахилгаан тэжээлийг ханын залгуураас үргэлж салга.
- Handle components with care to avoid damage from electrostatic discharge. Consider using an anti-static wrist strap.
- Keep the case and components away from liquids and excessive humidity.
- Хэт халалтаас урьдчилан сэргийлэхийн тулд зохих агааржуулалтыг хангах.
- Do not attempt to modify the case or its components, as this may void your warranty and pose safety risks.
Багцын агуулга
Бүх зүйл багцад байгаа эсэхийг шалгана уу:
- Vetroo AL800 Mid Tower ATX PC Computer Case
- Дагалдах хэрэгслийн хайрцаг (эрэг, тулгуур, кабель зангиа)
- Pre-installed 1x 120mm PWM/ARGB Fan (rear)
- Хэрэглэгчийн гарын авлага (энэ баримт бичиг)
Гол онцлогууд
- ARGB LED Strip: Integrated LED lighting and ARGB case fans can be synchronized with compatible motherboards via a 5V 3-pin interface.
- Door Opening Design: Features a 4mm thick tempered glass side panel with a convenient door-opening mechanism for easy access to internal components.
- High Performance Airflow: A mesh front panel and strategically placed dust filters ensure optimal airflow and system cooling.
- Өргөн нийцтэй байдал: Supports ATX, M-ATX, and ITX motherboards. Accommodates GPUs up to 340mm in length and CPU coolers up to 165mm in height.
- Шингэн хөргөлтийн дэмжлэг: Front panel supports up to a 360mm liquid cooling radiator.
- Фэнүүдийн дэмжлэг: Supports up to 8 x 120mm fans.
- Энгийн кабелийн удирдлага: Includes two soft silicone cord grommets for organized cable routing.
- Powerful I/O Panel: Features 1x USB 3.2 Type-C port, 2x USB 3.0 ports, and a combined microphone/headphone jack.
Тохиргоо ба суурилуулалт
1. Ерөнхий бэлтгэл
- Хайрцгийг хавтгай, тогтвортой гадаргуу дээр байрлуул.
- Open the tempered glass side panel by gently pulling it open. It is hinged for easy access.
- Remove the tempered glass panel if necessary for easier installation by lifting it off its hinges once open.

Figure 2: Tempered Glass Door Opening Design
2. Эх хавтанг суурилуулах
- Оролт/гаралтын бамбайг (боломжтой бол) хайрцагны арын нүхэнд суулгана.
- Align your ATX, M-ATX, or ITX motherboard with the pre-installed standoffs.
- Дагалдах хэрэгслийн хайрцагнаас өгсөн боолтыг ашиглан эх хавтанг бэхлэнэ үү.
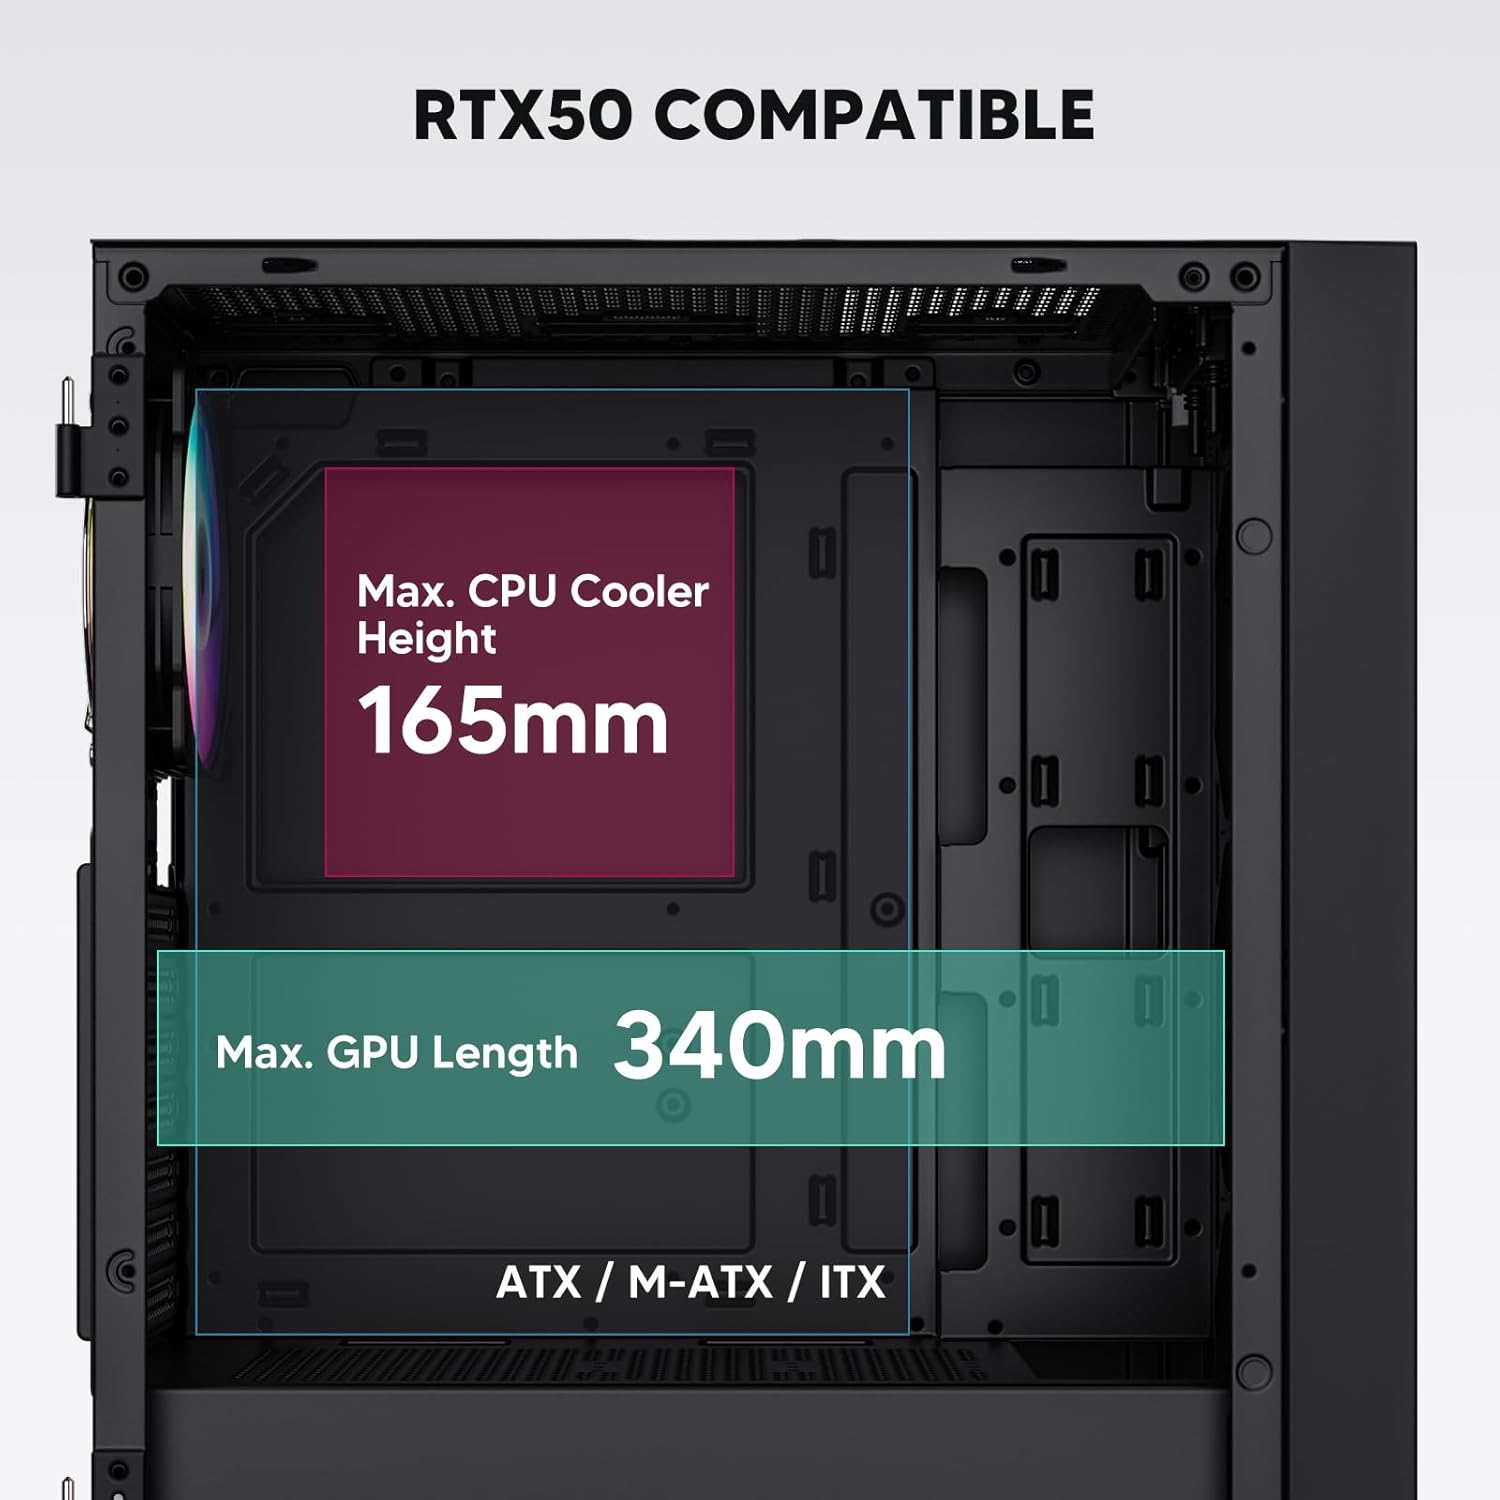
Figure 3: Motherboard and Component Clearance (Max CPU Cooler Height 165mm, Max GPU Length 340mm)
3. Storage Device Installation (HDD/SSD)
- Locate the dedicated mounting points for SSDs and HDDs.
- Install 2.5" SSDs onto the SSD trays or mounting brackets.
- Install 3.5" HDDs into the drive cage located at the bottom of the case.
- Secure all drives with the appropriate screws.

Figure 4: Internal Layout with Drive Bay Locations (SSD, HDD, Power Supply)
4. Цахилгаан хангамжийн суурилуулалт
- Mount your power supply unit (PSU) in the dedicated compartment at the bottom rear of the case.
- Ensure the PSU fan faces downwards (if the case has a bottom vent) or upwards, depending on your cooling preference.
- Secure the PSU with screws from the rear of the case. The case supports PSUs up to 200mm in length.
5. Өргөтгөлийн карт (GPU) суурилуулах
- Шаардлагатай PCI-E үүрний тагийг хайрцагны ар талаас салга.
- Insert your graphics card or other expansion cards into the motherboard's PCI-E slots.
- Secure the cards with screws. The case supports GPUs up to 340mm in length.
6. Cooling System Installation (Fans/Radiators)
- The case comes with one pre-installed 120mm PWM/ARGB fan at the rear.
- Additional fans (120mm or 140mm) can be installed at the front, top, and bottom.
- Liquid cooling radiators up to 360mm can be installed at the front, and up to 240mm at the top.
- Refer to the diagram for supported fan and radiator configurations.

Figure 5: Fan and Liquid Radiator Support Diagram
7. Урд талын самбарын холболтууд
- Connect the front panel cables (Power, Reset, USB 3.0, USB Type-C, HD Audio) to the corresponding headers on your motherboard.
- Consult your motherboard manual for the exact pin layout of these headers.
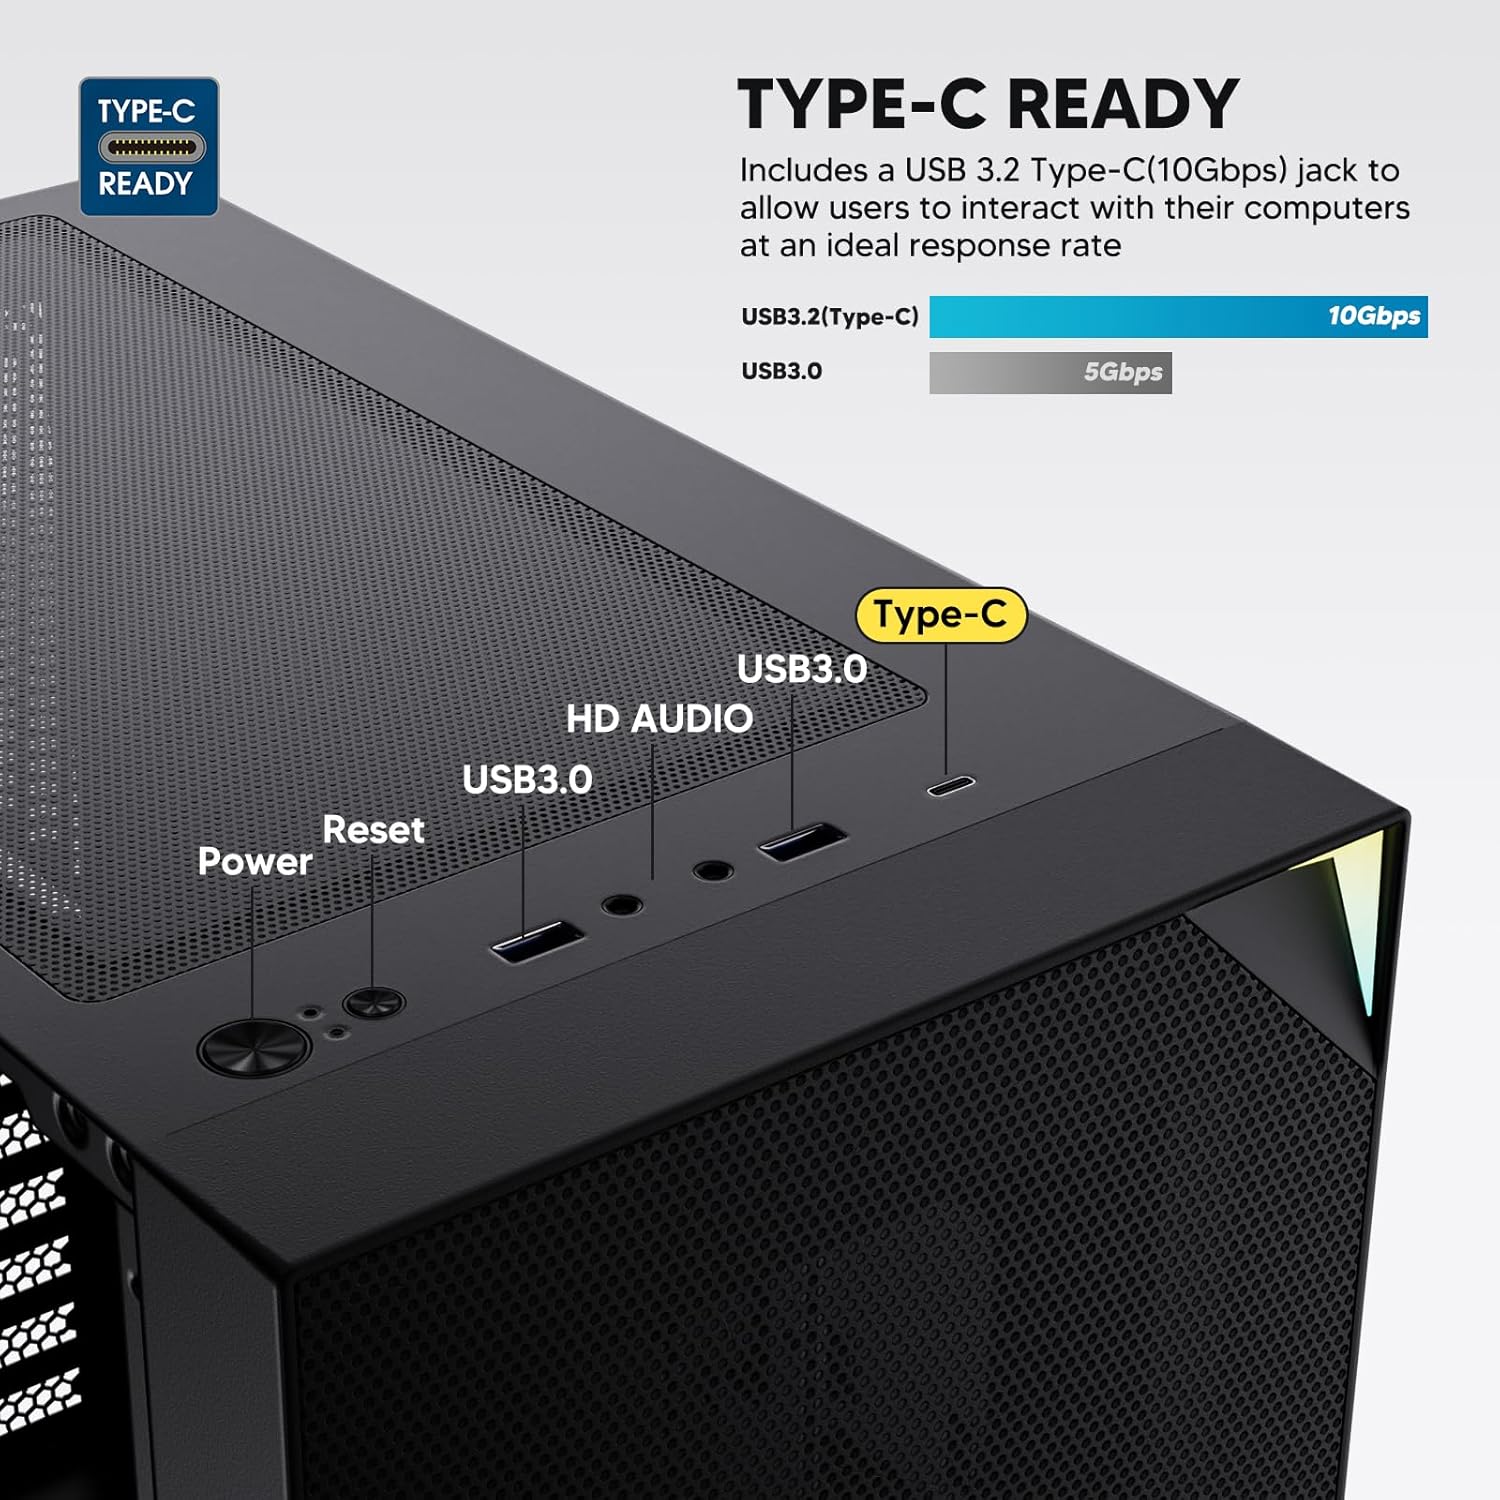
Figure 6: Top I/O Panel Connections
8. ARGB and PWM Connections
- The pre-installed fan and ARGB LED strip require connection to your motherboard.
- Connect the 4-pin PWM connector from the fan to a compatible fan header on your motherboard for speed control.
- Connect the 3-pin ARGB connector from the fan and LED strip to a 5V 3-pin ARGB header on your motherboard for lighting synchronization. 12V RGB толгой руу бүү холбогдоорой, учир нь энэ нь LED-ийг гэмтээж болзошгүй.
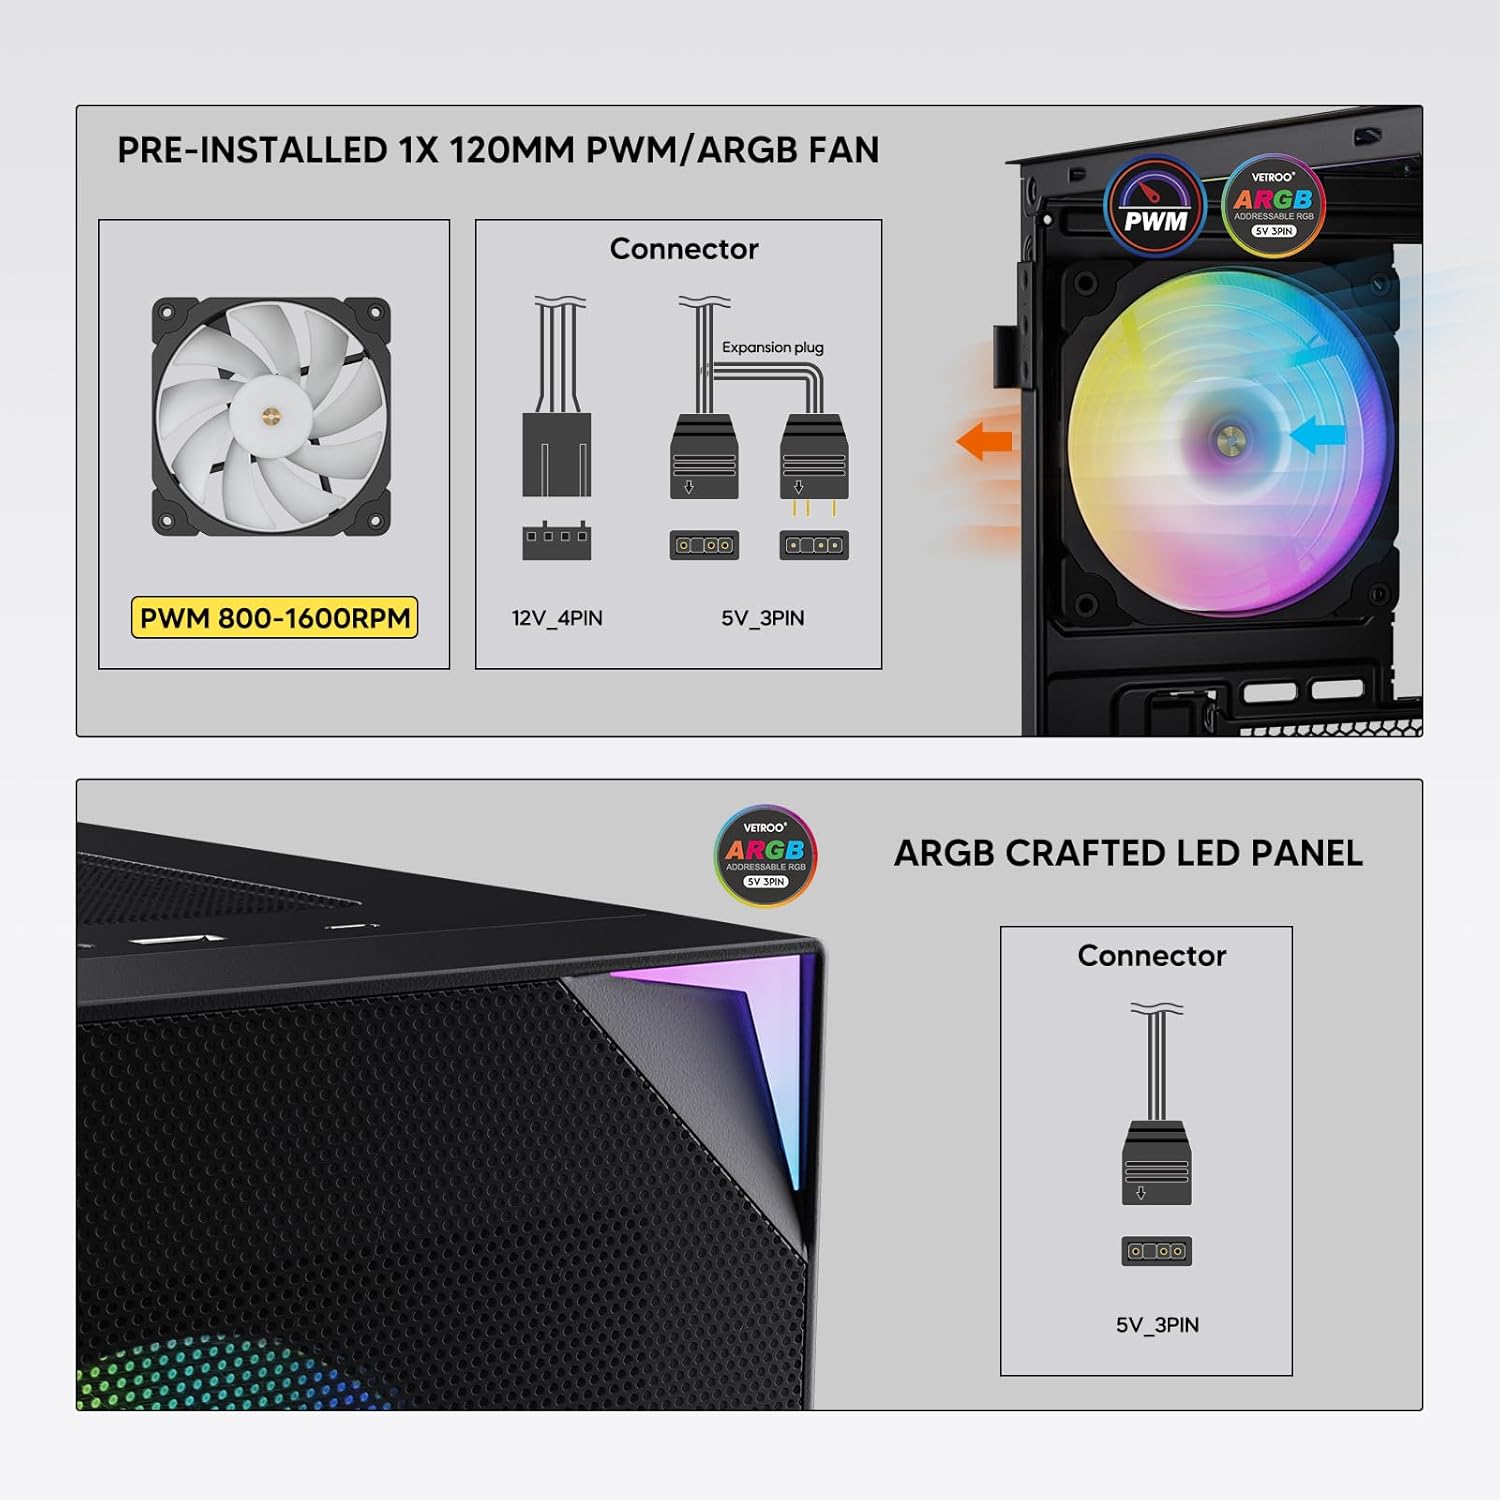
Figure 7: PWM and ARGB Connector Details
9. Кабелийн менежмент
- Кабелиудыг цэгцлэхийн тулд эх хавтангийн тавиурын ард байрлах кабелийн чиглүүлэлтийн таслуур болон холбох цэгүүдийг ашиглана уу.
- The soft silicone grommets help protect cables and provide a clean look.
- Proper cable management improves airflow and aesthetics.
Үйл ажиллагаа
1. Анхдагч асаалт
- After all components are securely installed and cables connected, close the tempered glass side panel.
- Дэлгэц, гар, хулгана болон цахилгааны кабелиа компьютерт холбоно уу.
- Цахилгаан тэжээлийн самбар дээрх цахилгаан унтраалгыг 'ON' байрлалд эргүүлнэ үү.
- Press the power button on the top I/O panel of the case to start your system.
2. ARGB гэрэлтүүлгийн удирдлага
- If connected to a compatible motherboard's 5V 3-pin ARGB header, the lighting of the pre-installed fan and LED strip can be controlled via your motherboard's RGB software (e.g., ASUS Aura Sync, MSI Mystic Light Sync, Gigabyte RGB Fusion, ASRock Polychrome Sync).
- Refer to your motherboard's manual for specific instructions on using its ARGB control software.
3. Airflow Management
- The mesh front panel is designed for optimal air intake.
- Ensure that intake fans (typically front and bottom) and exhaust fans (typically rear and top) are configured to create positive or neutral air pressure for efficient cooling and dust prevention.

Figure 8: Airflow Diagram with Dust Filters
Засвар үйлчилгээ
1. Тоосны шүүлтүүр цэвэрлэх
- The case is equipped with dust filters on the top and bottom panels.
- Regularly check and clean these filters to maintain optimal airflow and prevent dust buildup inside the system.
- Gently remove the magnetic dust filters and clean them with compressed air or by rinsing with water (ensure they are completely dry before re-installation).
2. Tempered Glass Panel Care
- Clean the tempered glass panel with a soft, lint-free cloth and a non-abrasive glass cleaner.
- Avoid harsh chemicals or abrasive materials that could scratch or damage the glass.
Алдааг олж засварлах
- Систем асахгүй байна:
- Цахилгааны кабелийг цахилгаан тэжээлийн хэсэг болон ханын залгуурт найдвартай холбосон эсэхийг шалгаарай.
- PSU унтраалга 'ON' байрлалд байгаа эсэхийг шалгана уу.
- Check that the front panel power button cable is correctly connected to the motherboard header.
- Confirm all power cables (24-pin ATX, CPU, GPU) are properly seated in the motherboard and components.
- Фенүүд эргэхгүй байна / ARGB асахгүй байна:
- Check that the fan's PWM connector is securely plugged into a motherboard fan header.
- Verify the ARGB 3-pin connector is correctly attached to a 5V 3-pin ARGB header on the motherboard (not 12V RGB).
- Эх хавтангийнхаа ARGB програм хангамжийг зөв суулгаж, тохируулсан эсэхийг шалгаарай.
- USB портууд ажиллахгүй байна:
- Confirm the USB 3.0 and USB Type-C front panel cables are correctly connected to their respective motherboard headers.
- Check your motherboard manual for correct header locations.
- For other component-specific issues, refer to the instruction manuals for your motherboard, CPU, GPU, and other installed hardware.
Үзүүлэлтүүд
| Брэнд | Ветроо |
| Загварын нэр | AL800 |
| Загварын дугаар | VT-CASE-AL800-BK (FBA) |
| Кейсийн төрөл | Дунд цамхаг |
| Эх хавтангийн нийцтэй байдал | ATX, M-ATX, ITX |
| Өнгө | Хар |
| Материал | Металл, хатуу шил |
| Зүйлийн жин | 12.37 фунт (ойролцоогоор 5.61 кг) |
| Бүтээгдэхүүний хэмжээ (LxWxH) | 18.4 x 8.6 x 17.9 инч (ойролцоогоор 46.7 x 21.8 x 45.5 см) |
| GPU-ийн хамгийн их урт | 340 мм |
| CPU хөргөгчийн хамгийн их өндөр | 165 мм |
| PSU-ийн хамгийн их урт | 200 мм |
| Урд I / O портууд | 1x USB 3.2 Type-C, 2x USB 3.0, HD Audio (Mic/Headphone), Power, Reset |
| Фэнүүдийн дэмжлэг | Front: 3x 120mm or 2x 140mm; Top: 2x 120mm or 2x 140mm; Rear: 1x 120mm; Bottom: 2x 120mm |
| Радиаторын дэмжлэг | Front: 120/140/240/280/360mm; Top: 120/140/240mm; Rear: 120mm |
| Урьдчилан суулгасан фенүүд | 1x 120mm PWM/ARGB (Rear) |
Баталгаат болон дэмжлэг
For warranty information, technical support, or to inquire about replacement parts, please visit the official Vetroo webсайт эсвэл харилцагчийн үйлчилгээтэй шууд холбогдоно уу. Баталгаат нэхэмжлэл гаргахын тулд худалдан авалтаа нотлох баримтаа хадгалаарай.
Official Vetroo Store: Vetroo Amazon Store
Холбогдох баримт бичиг - AL800
 |
Vetroo AL800 PC Case хэрэглэгчийн гарын авлага Vetroo AL800 компьютерийн гэрт зориулсан хэрэглэгчийн гарын авлага нь эх хавтан, цахилгаан хангамж, сэнс, шингэн радиатор, HDD, SSD, график карт зэрэг бүрэлдэхүүн хэсгүүдийг суурилуулах алхмуудыг нарийвчлан харуулсан болно. Оролт/гаралтын самбарын холболтын гарын авлага болон дагалдах хэрэгслийн жагсаалтыг багтаасан болно. |
 |
Vetroo AL800 бүрэн цамхаг тоглоомын кейс зааварчилгаа Vetroo AL800 Full Tower тоглоомын компьютерийн гэрт зориулсан иж бүрэн зааварчилгаа. Цахилгаан хангамж, эх хавтан, санах ойн хөтчүүд (SSD/HDD), график картыг хэрхэн суулгах, сэнс болон радиаторыг дэмжих сонголтуудыг ойлгох талаар суралц. Дагалдах хэрэгслийн жагсаалт, алхам алхмаар дэлгэрэнгүй зааварчилгааг багтаасан болно. |
 |
Vetroo MESH-7C AL SERIES PC Case хэрэглэгчийн гарын авлага Vetroo MESH-7C AL SERIES PC-ийн хэрэглэгчийн дэлгэрэнгүй гарын авлага нь техникийн үзүүлэлтүүд, хэмжээсүүд, дагалдах хэрэгсэл, таны компьютерийг бүтээхэд зориулсан техник хангамжийг суурилуулах алхмуудыг багтаасан болно. |
 |
Vetroo M05 M-ATX PC Case зааварчилгаа Vetroo M05 M-ATX компьютерийн гэрийг угсрах дэлгэрэнгүй зааварчилгаа, эд анги суурилуулах, дагалдах хэрэгслийн ашиглалт, оролт гаралтын самбарын холболтыг багтаасан. |
 |
Vetroo AL900 ATX PC Case хэрэглэгчийн гарын авлага Vetroo AL900 ATX PC тоглоомын хайрцагны хэрэглэгчийн гарын авлага, угсралт, тэжээлийн хангамж гэх мэт бүрэлдэхүүн хэсгүүдийн суурилуулалт, оролт / гаралтын самбарын холболтыг нарийвчлан тусгасан болно. |
 |
Vetroo U6 CPU хөргөгч хэрэглэгчийн гарын авлага, суулгах гарын авлага Intel LGA 1700/1200/115X болон AMD AM5/AM4/AM3(+)/AM2(+)/FM2(+)/FM1 залгууруудтай нийцтэй байдлыг багтаасан Vetroo U6 CPU хөргөгчийн хэрэглэгчийн дэлгэрэнгүй гарын авлага, суулгах гарын авлага. Хэсгийн жагсаалт, алхам алхмаар угсрах зааврыг багтаасан болно. |