1. Танилцуулга
The Vivolink USB-C 4K KVM Extender (Model W126974534) is designed to extend USB-C signals, including 4K video, USB data (for keyboard, mouse, and other peripherals), and control signals, over long distances using HDBaseT 3.0 technology. This system consists of a Transmitter (TX) unit and a Receiver (RX) unit, connected by a single Cat6a/7 Ethernet cable. It enables users to operate a computer or other USB-C source device from a remote location with a display, keyboard, and mouse, maintaining high-quality 4K resolution.
2. Аюулгүй байдлын мэдээлэл
- Төхөөрөмжийг ажиллуулахын өмнө бүх зааврыг анхааралтай уншина уу.
- Do not expose this unit to rain, moisture, or excessive humidity.
- Хэт халалтаас урьдчилан сэргийлэхийн тулд зохих агааржуулалтыг хангах. Агааржуулалтын нүхийг хааж болохгүй.
- Зөвхөн төхөөрөмжтэй хамт ирсэн цахилгаан адаптеруудыг ашиглаарай.
- Do not attempt to open or modify the unit. Refer all servicing to qualified personnel.
- Төхөөрөмжийг хүчтэй цахилгаан соронзон орноос хол байлга.
- Аянга цахилгаантай шуургатай үед эсвэл удаан хугацаагаар ашиглаагүй үед цахилгааныг салга.
3. Багцын агуулга
Сав баглаа боодлын агуулгыг сайтар шалгана уу. Хэрэв ямар нэгэн зүйл алга болсон эсвэл гэмтсэн бол дилертэйгээ яаралтай холбоо барина уу.
- 1x Vivolink USB-C 4K KVM Extender Transmitter (TX) Unit
- 1x Vivolink USB-C 4K KVM Extender Receiver (RX) Unit
- 2x Цахилгаан адаптер (DC 12V)
- 1x USB-C-аас USB-C кабель
- 1x хэрэглэгчийн гарын авлага
- Mounting accessories (if included)
4. Бүтээгдэхүүн дууссанview
The Vivolink USB-C 4K KVM Extender leverages HDBaseT 3.0 technology to provide uncompressed 4K video, audio, USB 2.0, and control signals over a single Cat6a/7 cable up to 100 meters. This solution is ideal for applications requiring remote access to a USB-C enabled computer, such as control rooms, medical imaging, digital signage, and educational facilities.
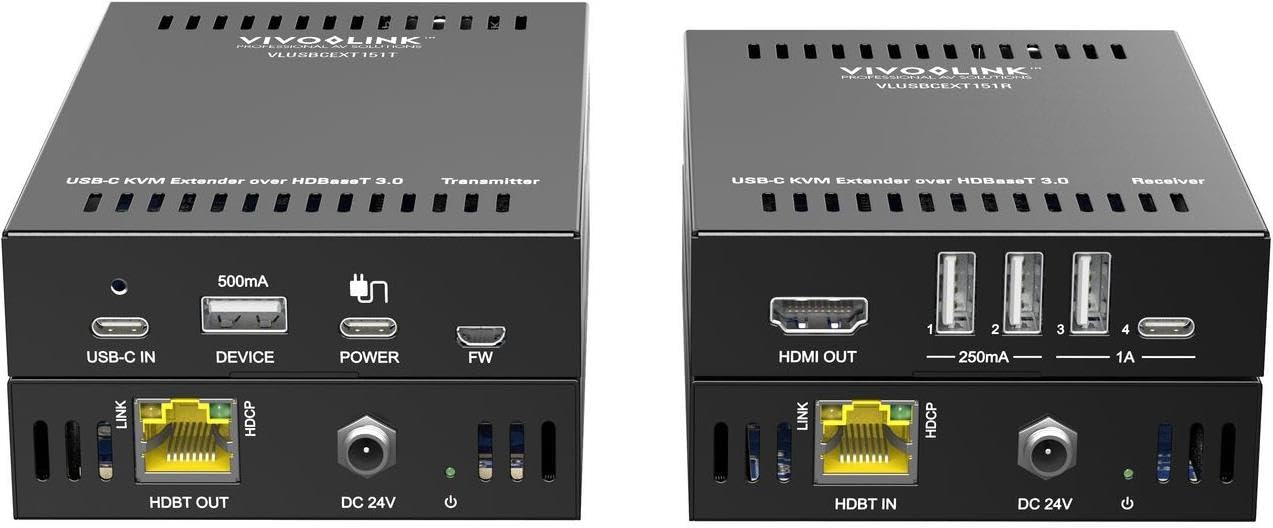
Зураг 1: Vivolink USB-C 4K KVM Extender units. This image displays the compact design of both the transmitter and receiver units, highlighting their various ports for connectivity.
The Transmitter unit connects to your USB-C source device (e.g., laptop, PC), while the Receiver unit connects to your display, keyboard, mouse, and other USB peripherals at the remote location. The HDBaseT 3.0 link ensures reliable and high-bandwidth transmission.
5. Тохируулах заавар
Follow these steps to set up your Vivolink USB-C 4K KVM Extender:
- Унтраах төхөөрөмжүүд: Ensure all devices, including your source computer, display, and the KVM extender units, are powered off before making any connections.
- Эх үүсвэрийг дамжуулагчтай холбох: Connect your USB-C source device (e.g., PC, laptop) to the USB-C input port on the Transmitter (TX) unit using the provided USB-C cable.
- Дэлгэцийг хүлээн авагчтай холбох: Connect your display (monitor) to the HDMI output port on the Receiver (RX) unit using an HDMI cable.
- Connect Peripherals to Receiver: Connect your USB keyboard, mouse, and any other USB peripherals to the USB ports on the Receiver (RX) unit.
- Connect TX and RX Units: Connect the HDBaseT OUT port on the Transmitter (TX) unit to the HDBaseT IN port on the Receiver (RX) unit using a single, high-quality Cat6a or Cat7 Ethernet cable. Ensure the cable length does not exceed 100 meters for optimal performance.
- Эрчим хүч хэрэглэх: Connect the provided 12V DC power adapters to both the Transmitter (TX) and Receiver (RX) units, then plug them into power outlets.
- Асаах төхөөрөмжүүд: Power on your display, then your source computer. The extender units will typically power on automatically when connected to power.
- Холболтыг баталгаажуулах: Check for signal on your remote display and test the functionality of your keyboard and mouse.
6. Ашиглалтын заавар
Once the Vivolink USB-C 4K KVM Extender is set up correctly, operation is straightforward:
- Automatic Signal Detection: The extender units are designed to automatically detect and transmit the video, audio, and USB signals from your source device to the remote display and peripherals.
- Шийдвэр: The system supports resolutions up to 4K (3840x2160) at 60Hz, depending on the capabilities of your source and display devices.
- USB функц: All connected USB devices (keyboard, mouse, USB drives, etc.) should function as if directly connected to the source computer.
- Хүчний дугуй: If you encounter any issues, try power cycling both the Transmitter and Receiver units, as well as your source computer and display.
7. Засвар үйлчилгээ
To ensure the longevity and optimal performance of your Vivolink USB-C 4K KVM Extender, follow these maintenance guidelines:
- Цэвэрлэгээ: Төхөөрөмжийн гадна талыг зөөлөн, хуурай даавуугаар цэвэрлэ. Шингэн эсвэл аэрозоль цэвэрлэгч бүү хэрэглэ.
- Агааржуулалт: Ensure that the ventilation openings on both units are not obstructed to prevent overheating.
- Кабелийн менежмент: Keep cables neatly organized and avoid sharp bends or excessive tension on connectors.
- Байгаль орчин: Store and operate the device in a cool, dry environment, away from direct sunlight, heat sources, and extreme temperatures.
8. Алдаа засах
If you experience issues with your KVM extender, refer to the following troubleshooting steps:
| Асуудал | Боломжит шийдэл |
|---|---|
| No video on remote display |
|
| Гар/хулгана хариу өгөхгүй байна |
|
| Intermittent signal or flickering video |
|
9. Техникийн үзүүлэлтүүд
- Брэнд: Виволинк
- Загвар: W126974534 (VLUSBCEXT150)
- Технологи: HDBaseT 3.0
- Видеоны нягтрал: 60Гц-т 4K (3840x2160) хүртэл
- Оруулах: USB-C (on TX unit)
- Гаралт: HDMI (on RX unit)
- USB: USB 2.0 (on RX unit for peripherals)
- Өргөтгөх зай: Up to 100 meters (328 feet) over Cat6a/7 cable
- Эрчим хүчний хангамж: DC 12V (via included power adapters)
- Үйлдвэрлэгч: Виволинк
- ASIN: B0CPWLBPGF
10. Баталгаат хугацаа ба дэмжлэг
Vivolink products are designed for reliability and performance. For information regarding warranty coverage, technical support, or service, please refer to the warranty card included with your product or visit the official Vivolink website. Please have your product model number (W126974534) and purchase details ready when contacting support.
Онлайн нөөцүүд: For the latest drivers, firmware updates, and additional support documentation, please visit the Vivolink support page.


