1. Танилцуулга
This manual provides detailed instructions for the installation, operation, and maintenance of your Stinger Audio MT-1000.1M 1-Channel Monoblock Marine Audio Subwoofer Amplifier. Please read this manual thoroughly before attempting installation or operation to ensure proper use and to prevent damage to the unit or your audio system. Keep this manual for future reference.
2. Бүтээгдэхүүн дууссанview
The Stinger Audio MT-1000.1M is a high-efficiency Class-D monoblock amplifier designed for marine environments. It delivers 1000 Watts RMS of power, optimized for subwoofer applications. Its robust, water-resistant design ensures reliable performance in challenging conditions.
Гол онцлогууд:
- Digital Class-D Monoblock Ampамь нас: High efficiency and compact form factor.
- Компакт, бат бөх дизайн: Built for lasting reliability.
- Robust Unregulated Power Supplies: Designed for superior performance and efficiency.
- Advanced HEXFET Power MOSFET: Features reduced on-resistance, faster switching speeds, and enhanced reliability.
- Direct Insert Power and Speaker Terminals: Decreased resistance for higher power transfer and efficiency.
- Усны хамгаалалттай дизайн: -ийг хамгаалдаг amplifier against weather elements for uninterrupted performance.
- Bass Boost Q: Adjustable bass boost from 0dB to 12dB at a selected frequency.
- Remote Bass Knob Included: Flush-mount design for effortless bass level adjustment.

3. Аюулгүй байдлын мэдээлэл
Дараах аюулгүй байдлын урьдчилан сэргийлэх арга хэмжээг үргэлж дагаж мөрдөөрэй.
- Disconnect the vehicle's negative battery terminal before any installation.
- Тээврийн хэрэгслийн явах эд ангид зөв газардуулга хийсэн эсэхийг шалгаарай.
- Цахилгаан, газардуулга болон чанга яригчийн холболтод тохирох хэмжигч утсыг ашиглана уу.
- -ийг суулгана уу amplifier in a well-ventilated area, away from direct heat sources.
- суурилуулахаас зайлсхий amplifier in locations where it may be submerged in water, despite its water-resistant rating.
- Хэрэв та суулгах процессын аль нэг хэсэгт эргэлзэж байвал мэргэжлийн суулгагчтай зөвлөлд.
4. Хайрцагт юу байна
Суулгацыг эхлүүлэхийн өмнө бүх зүйл байгаа эсэхийг шалгана уу:
- 1000 ваттын моноблок Amplifier (MT-1000.1M)
- Remote Level Control (Bass Knob)
- Суурилуулах тоног төхөөрөмж
- Зааварчилгааны гарын авлага
5. Бүрэлдэхүүн хэсгүүдийг тодорхойлох
-тай танилцана уу amplifier's controls and connections.

5.1 Control Panel (Input Side)

- POWER/PRT/CLIP Indicators: LEDs indicating power status, protection mode, and signal clipping.
- АЛСЫН ПОРТ: RJ11 connection for the included remote bass level control.
- ОРОЛТ (RCA): Audio input from your head unit or source.
- BRIDGE IN/OUT (RCA): For linking multiple ampамьдрагчид.
- GAIN хяналт: Adjusts the input sensitivity to match the output of your source unit.
- LPF (Low-Pass Filter) Control: Adjusts the upper frequency limit for the subwoofer. Range: 40Hz - 180Hz.
- SUBSONIC Filter: Removes ultra-low frequencies below the audible range to protect the subwoofer. Range: OFF - 50Hz.
- FREQ (Bass Boost Frequency) Control: Selects the center frequency for the bass boost. Range: 30Hz - 80Hz.
- BOOST (Bass Boost Level) Control: Adjusts the level of bass boost. Range: 0dB - 12dB.
5.2 Terminal Panel (Output Side)

- GND (Газар) Терминал: Тээврийн хэрэгслийн явах эд ангийн газардуулгатай холбогддог.
- REM (Алсын) Терминал: Connects to the remote turn-on lead from your source unit.
- +12V (Power) Terminal: Connects to the positive terminal of the vehicle's battery via an inline fuse.
- MONO OUTPUT (Speaker Terminals): Connects to your subwoofer(s). Minimum impedance 1 Ohm.
6. Суурилуулалт
Зөв суурилуулалт нь оновчтой гүйцэтгэл болон аюулгүй байдлын хувьд чухал юм. Бүх холболтууд найдвартай, зөв туйлширсан эсэхийг шалгаарай.
6.1 Холбох байршил
Choose a mounting location that is secure, provides adequate ventilation, and is protected from excessive moisture. While the amplifier is water-resistant, direct exposure to heavy water spray or submersion should be avoided.

6.2 утас холболт
- Эрчим хүч (B+): Connect a 4-gauge power cable from the +12V terminal of the amplifier directly to the positive terminal of the vehicle's battery. Install an appropriate inline fuse (100A recommended) within 18 inches of the battery.
- Газар (GND): Connect a 4-gauge ground cable from the GND terminal of the amplifier to a clean, bare metal point on the vehicle's chassis. Ensure a solid, low-resistance connection.
- Алсын удирдлага (REM): Connect a 18-gauge remote turn-on wire from the REM terminal of the amplifier to the remote output of your head unit.
- RCA оролт: Connect RCA cables from the subwoofer output of your head unit to the INPUT RCA jacks on the ampнастан.
- Чанга яригчийн гаралт: Connect your subwoofer(s) to the MONO OUTPUT terminals. Ensure the total impedance is not below 1 Ohm. Observe correct polarity (+ to + and - to -).
- Алсын удирдлагатай басс бариул: Connect the remote bass knob to the REMOTE port on the amplifier using the provided cable.
7. Үйл ажиллагаа
After installation, follow these steps to configure and operate your ampнастан.
7.1 Initial Setup and Gain Adjustment
- Turn the GAIN control on the amplifier to its minimum (counter-clockwise) position.
- Set your head unit's volume to about 75% of its maximum level.
- Хүчтэй басс агуулгатай динамик хөгжмийн бүтээлийг тоглуул.
- GAIN хяналтыг аажмаар нэмэгдүүлнэ үү amplifier until you hear distortion, then back it off slightly until the sound is clear. The CLIP indicator should not illuminate continuously.
7.2 Crossover and Filter Settings
- LPF (Бага нэвтрүүлэх шүүлтүүр): Adjust the LPF control to set the upper frequency limit for your subwoofer. A common starting point is 80Hz-100Hz, but this may vary depending on your subwoofer and other speakers in your system.
- SUBSONIC Filter: Set the SUBSONIC filter to protect your subwoofer from playing frequencies below its resonant frequency. A common setting is 25Hz-30Hz, or slightly below your subwoofer's tuning frequency if it's in a ported enclosure. If you have a sealed enclosure, you may set it to OFF or a very low frequency.
7.3 басс нэмэгдүүлэх
- FREQ (Bass Boost Frequency): Select the frequency at which you want the bass boost to be centered. This is typically between 30Hz and 80Hz, depending on the desired effect.
- BOOST (Bass Boost Level): Adjust the level of boost from 0dB to 12dB. Use this sparingly to avoid distortion and potential damage to your subwoofer.
7.4 Remote Bass Knob
The remote bass knob allows for convenient adjustment of the subwoofer output level from your listening position. It acts as a master volume for the subwoofer channel, allowing you to increase or decrease the bass intensity without affecting other ampөргөгчийн тохиргоо.
8. Засвар үйлчилгээ
Тогтмол засвар үйлчилгээ нь таны төхөөрөмжийн урт наслалт, гүйцэтгэлийг хангахад тусална ampнастан.
- Цэвэрлэгээ: Үе үе арчих amplifier-ийн гадна талыг зөөлөн, хуурай даавуугаар . Хүчтэй химийн бодис, зүлгүүрийн цэвэрлэгч хэрэглэхээс зайлсхий.
- Холболт шалгах: Annually inspect all power, ground, remote, and speaker connections for corrosion or looseness. Tighten as necessary.
- Агааржуулалт: гэдгийг баталгаажуулах ampАгааржуулагчийн хөргөлтийн сэрвээ нь дулааныг зохих ёсоор тараах боломжийг олгохын тулд саадгүй байдаг.
9. Алдаа засах
Хэрэв танд асуудал тулгарвал ampөргөгч, дараах нийтлэг асуудал болон шийдлүүдийг үзнэ үү.
| Асуудал | Боломжит шалтгаан | Шийдэл |
|---|---|---|
| Цахилгаан байхгүй / Цахилгаан LED унтарсан | Blown fuse, loose power/ground/remote wire, no remote signal. | Check inline fuse, verify all power connections, ensure head unit remote output is active. |
| Хамгаалалтын LED асаалттай байна | Чанга яригчийн богино холболт, импеданс хэт бага, хэт халалт, тогтмол гүйдлийн зөрүү. | Check speaker wiring for shorts, verify speaker impedance, ensure adequate ventilation, disconnect speakers and test. |
| Аудио гаралт байхгүй | Оролтын дохио байхгүй, олшруулалтын тохиргоо буруу, чанга яригчийн утаснууд салгагдсан. | Check RCA connections, adjust gain, verify speaker connections. |
| Гажуудсан дуу | Gain set too high, improper crossover settings, poor ground connection. | Reduce gain, adjust LPF/Subsonic filters, check ground wire for secure connection. |
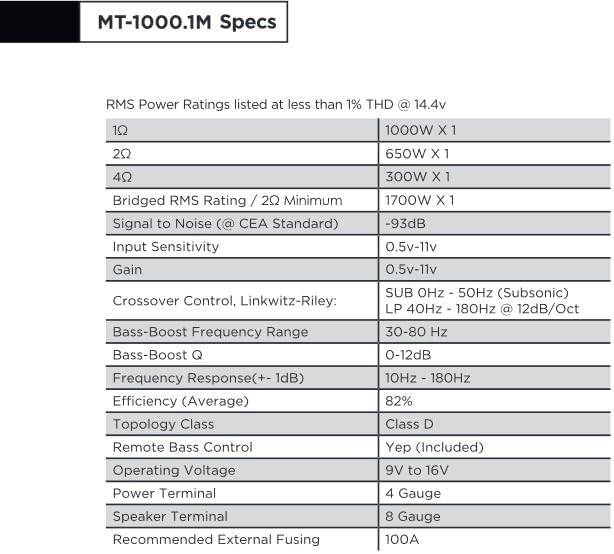
10. Техникийн үзүүлэлтүүд
Detailed technical specifications for the Stinger Audio MT-1000.1M ampнастан.
| Онцлог | Тодорхойлолт |
|---|---|
| RMS хүч (1Ω) | 1000W x 1 хувилбар |
| RMS хүч (2Ω) | 650W x 1 хувилбар |
| RMS хүч (4Ω) | 300W x 1 хувилбар |
| Bridged RMS Rating (2Ω Minimum) | 1700W x 1 хувилбар |
| Signal to Noise (CEA Standard) | -93дБ |
| Оролтын мэдрэмж | 0.5V - 11V |
| Олз | 0.5V - 11V |
| Crossover Control (Linkwitz-Riley) | SUB 0Hz - 50Hz (Subsonic), LP 40Hz - 180Hz @ 12dB/Oct |
| Басс өсгөх давтамжийн хүрээ | 30 Гц - 80 Гц |
| Басс өсгөх Q | 0 - 12dB |
| Давтамжийн хариу үйлдэл (+/- 1дБ) | 10 Гц - 180 Гц |
| Үр ашиг (дундаж) | 82% |
| Топологийн анги | D анги |
| Алсын удирдлагатай басс | Тийм (Оруулсан) |
| Үйл ажиллагааны ботьtage | 9V-оос 16V хүртэл |
| Цахилгаан терминал | 4 хэмжигч |
| Илтгэгч терминал | 8 хэмжигч |
| Зөвлөмж болгож буй гадаад хайлуулах | 100 А |
| Зүйлийн жин | 6.14 фунт |
| Багцын хэмжээ | 14.5 x 7.8 x 3.2 инч |
| Эхний боломжтой огноо | 13 оны гуравдугаар сарын 2024 |
| Үйлдвэрлэгч | STINGER |
11. Баталгаат хугацаа ба дэмжлэг
11.1 Баталгаат хугацааны мэдээлэл
The Stinger Audio MT-1000.1M ampөргөгч нь а-тай хамт ирдэг 1 жилийн баталгаат хугацаа from the date of purchase. Please retain your proof of purchase for warranty claims. The warranty covers manufacturing defects and workmanship under normal use. It does not cover damage caused by improper installation, accident, misuse, abuse, neglect, or unauthorized modification.
11.2 Хэрэглэгчийн дэмжлэг
For technical assistance, troubleshooting, or warranty inquiries, please contact Stinger Audio customer support. You can find more information and contact details by visiting the official STINGER brand store:


