1. Танилцуулга
Thank you for choosing the GeyouLux LED Dimmer Switch. This rotary dimmer is designed to provide smooth and flicker-free dimming for compatible LED and halogen bulbs, enhancing the ambiance of your living spaces. This manual provides detailed instructions for installation, operation, and maintenance to ensure safe and optimal performance of your dimmer switch.

Figure 1.1: GeyouLux LED Dimmer Switch (Front and Rear View)
This image displays the complete GeyouLux LED Dimmer Switch. The front features a clean, white square faceplate with a central rotary knob for dimming control. The rear view shows the blue internal module with connection terminals and technical markings, indicating its design for 220-240V, 50Hz trailing edge dimming.
2. Аюулгүй байдлын чухал мэдээлэл
Суулгах, ашиглахаасаа өмнө аюулгүй байдлын бүх зааврыг анхааралтай уншина уу. Эдгээр зааврыг дагаж мөрдөхгүй байх нь цахилгаан цочрол, гал болон бусад аюулд хүргэж болзошгүй.
- АНХААРУУЛГА: Цахилгаанд цохиулах эрсдэлтэй. Always turn off power at the circuit breaker or fuse box before installing, servicing, or removing the dimmer switch.
- Суурилуулалтыг орон нутгийн болон улсын бүх цахилгааны дүрмийн дагуу мэргэшсэн цахилгаанчин гүйцэтгэнэ.
- Do not use this dimmer switch with non-dimmable bulbs.
- Not suitable for motors, fans, toroidal transformers, or smart bulbs. Using the dimmer with these devices may cause damage to the dimmer or the connected device.
- Нийт ватыг баталгаажуулна ууtage of connected bulbs does not exceed 200W.
- Зөвхөн дотор ашиглах зориулалттай.
3. Техникийн үзүүлэлтүүд
| Параметр | Үнэ цэнэ |
|---|---|
| Бүтээгдэхүүний хэмжээ (L x W x H) | 84 x 84 x 45 мм (3.31 x 3.31 x 1.77 инч) |
| Оролтын хэмжээtage | 220-240 В хувьсах гүйдэл, 50 Гц |
| Permissible Wattage Хамрах хүрээ | 3W - 200W |
| Хөнгөн цар хүрээ | 0-100% |
| Бүдэгрүүлэх төрөл | Trailing Edge (R.C) |
| Материал | ABS + PC хуванцар |
| Хамгаалалт | Overload protection, Over-current protection, Over-temperature protection |
| Өнгө | Цагаан |

Figure 3.1: Dimmer Switch Dimensions and Wiring Diagrams
This image provides detailed dimensions of the dimmer switch, including its front face (84x84mm) and depth (45mm). It also illustrates two common wiring configurations: a 1-way circuit and a 2-way circuit, showing connections for Live (L), Neutral (N), and switched Live (L1, L2) terminals.
4. Багцын агуулга
Дараах зүйлсийн нүдийг шалгана уу.
- GeyouLux LED Dimmer Switch × 1
- Installation Accessories × 1 set
- Зааварчилгааны гарын авлага × 1

Зураг 4.1: Бүтээгдэхүүний сав баглаа боодол
This image shows the GeyouLux LED Dimmer Switch alongside its retail packaging. The black box features the 'LED Dimmer' label and the 'GeyouLux' brand logo, indicating the product as it would appear when unboxed.
5. Тохиргоо ба суурилуулалт
Чухал: Суурилуулалтыг эхлүүлэхийн өмнө хэлхээний таслуурын цахилгааныг унтраасан эсэхийг шалгаарай.
5.1. Суулгахаас өмнөх шалгалтууд
- Verify that your existing wiring is compatible with a 220-240V, 50Hz system.
- Confirm that the bulbs you intend to use are dimmable LED or halogen bulbs within the 3W-200W range.
- A cavity wall box is required for installation. Please note that a cavity wall box is NOT included in the package and must be prepared separately.
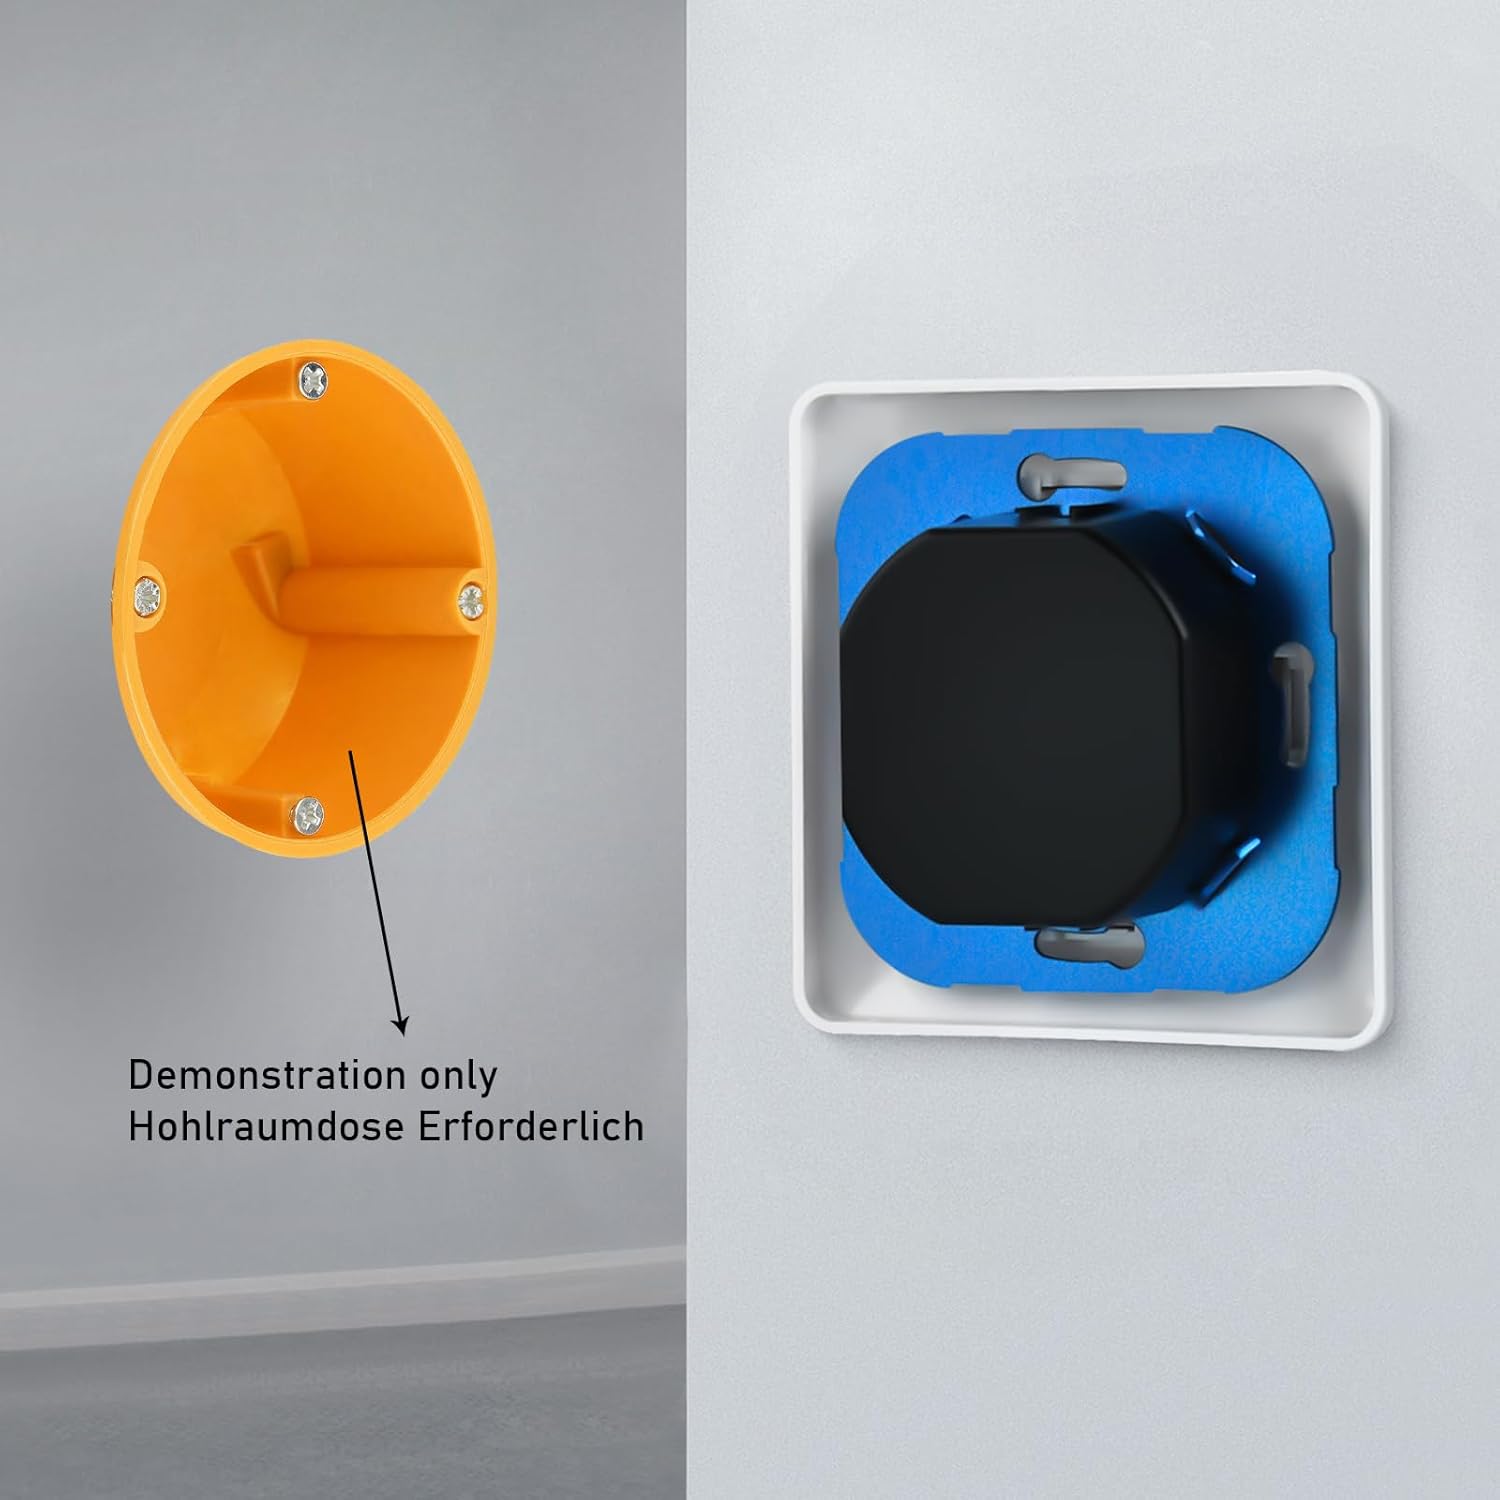
Figure 5.1: Cavity Wall Box Demonstration
This image illustrates the necessity of a cavity wall box for proper installation. It shows an orange cavity wall box with screw points, and the dimmer switch module neatly fitted into a wall opening, demonstrating how it integrates into the electrical system.
5.2. Утас тавих заавар
Refer to Figure 3.1 (in Technical Specifications) for detailed wiring diagrams for both 1-way and 2-way circuits. Ensure all connections are secure.
5.3. Физик суурилуулалт
- Үндсэн хэлхээний таслагчийн хүчийг унтраа.
- Carefully remove your existing switch from the wall box.
- Connect the wires to the appropriate terminals on the GeyouLux dimmer switch as per the wiring diagram (Figure 3.1).
- Mount the dimmer module into the wall box using the provided screws.
- Attach the faceplate and the rotary knob.
- Хэлхээ таслагчийн хүчийг сэргээнэ.

Зураг 5.2: Тэсэрсэн View and Installation Notes
Энэ зураг нь дэлбэрэлтийг харуулж байна view of the dimmer switch, detailing its components such as the knob, washer, nut, middle frame, frame, heatsink, and bottom case. Crucially, it includes important notes: the cavity wall box is not included, the dimmer is not compatible with smart bulbs, and it is recommended to consult a professional electrician for wiring.
6. Ашиглалтын заавар
6.1. Үндсэн үйл ажиллагаа
- Асаах/унтраах: Press the rotary knob to turn the lights on or off.
- Бүдэгрүүлж байна: Rotate the knob clockwise to increase brightness and counter-clockwise to decrease brightness. The dimmer provides a full 0-100% dimming range.
6.2. Хамгийн бага гэрэлтүүлгийн тохиргоо
The dimmer features a 'Min.set' adjustment screw to fine-tune the minimum brightness level, preventing flickering at very low dimming levels for certain bulb types.
- With the lights on and dimmed to their lowest setting, use a small screwdriver to adjust the 'Min.set' screw located on the dimmer module (visible when the faceplate is removed).
- Rotate the screw slowly until the desired stable minimum brightness is achieved without flickering.
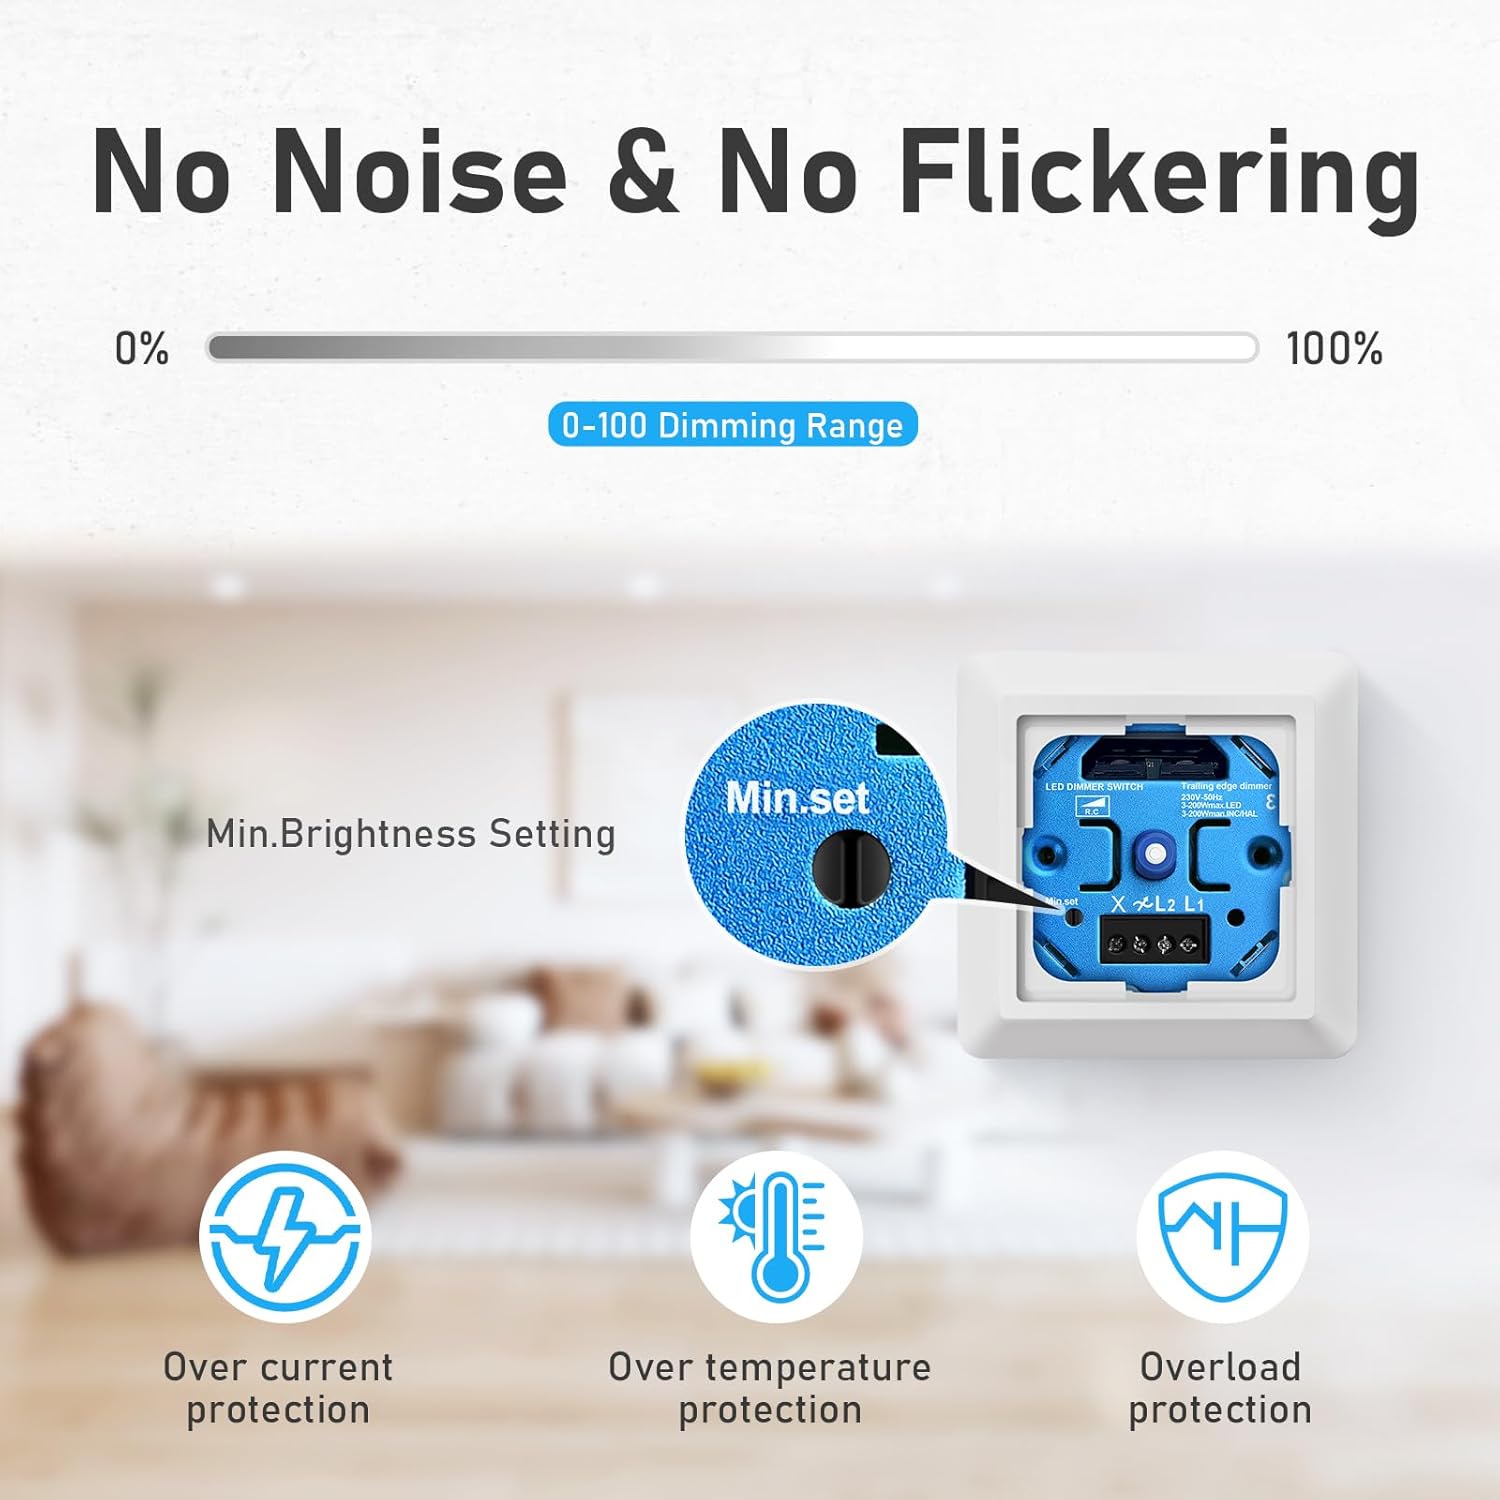
Figure 6.1: Minimum Brightness Setting and Protection Features
This image highlights the 'Min.set' screw on the dimmer module, which allows users to adjust the minimum brightness level for optimal performance. It also visually represents the built-in safety features: over-current protection, over-temperature protection, and overload protection, ensuring safe operation.
7. Bulb Compatibility
The GeyouLux LED Dimmer Switch is compatible with the following bulb types, provided they are dimmable and within the specified wattage муж:
- Багасгах LED чийдэн: 3-200 Вт
- Галоген чийдэн: 3-200 Вт
- Улайсдаг чийдэн: 3-200 Вт
Жич: Ensure your bulb is Dimmable & Trailing edge (R.C) compatible. It is not recommended to connect 12V or other low voltage halogen bulbs unless specifically designed for this dimmer type.

Figure 7.1: Compatible Bulb Types
This image visually confirms the compatibility of the dimmer switch with various bulb types, including dimmable LED, halogen, and incandescent bulbs, all within the 3-200W range. It also reiterates the requirement for bulbs to be dimmable and trailing edge compatible, and specifies the operating voltage 220-240 В.
8. Засвар үйлчилгээ
The GeyouLux LED Dimmer Switch requires minimal maintenance.
- To clean the dimmer switch, wipe the surface with a soft, damp даавуу.
- Зүлгүүрийн цэвэрлэгч, уусгагч, химийн шүршигч хэрэглэж болохгүй, учир нь эдгээр нь өнгөлгөө болон дотоод эд ангиудыг гэмтээж болзошгүй.
- Цэвэрлэхийн өмнө цахилгааныг унтраасан эсэхийг шалгаарай.
9. Алдаа засах
If you experience issues with your dimmer switch, please refer to the following common problems and solutions:
| Асуудал | Боломжит шалтгаан | Шийдэл |
|---|---|---|
| Гэрэл асахгүй байна. | No power, incorrect wiring, faulty bulb. | Check circuit breaker. Verify wiring connections. Test with a known working bulb. |
| Гэрэл анивчих эсвэл шуугилдана. | Incompatible bulb, minimum brightness not set correctly, loose connection. | Ensure bulbs are dimmable and compatible. Adjust 'Min.set' screw (Figure 6.1). Check wiring connections. |
| Dimmer does not dim or dims poorly. | Non-dimmable bulbs, total wattage too low/high, incompatible bulb type. | Use only dimmable LED or halogen bulbs. Ensure total wattage is within 3W-200W. Confirm bulb is trailing edge compatible. |
| Dimmer feels hot. | Overload, poor ventilation. | Reduce total connected wattage. Ensure proper air circulation around the dimmer. The dimmer has built-in over-temperature protection. |
Хэрэв эдгээр шийдлүүдийг туршиж үзсэний дараа асуудал хэвээр байвал хэрэглэгчийн дэмжлэгтэй холбогдоно уу.
10. Баталгаат хугацааны мэдээлэл
Specific warranty details for the GeyouLux LED Dimmer Switch are not provided in the product information. Please retain your proof of purchase for any warranty claims. For further information regarding warranty terms, please contact GeyouLux customer service.
11. Хэрэглэгчийн дэмжлэг
If you have any questions or require assistance with your GeyouLux LED Dimmer Switch, please do not hesitate to contact our customer service team. We are committed to providing support within 12 hours.
Contact information for GeyouLux customer service can typically be found on the product packaging or the official GeyouLux webсайт.
For product-specific inquiries, please reference the model number S46 and ASIN B0DP2F5BS9.


