1. Танилцуулга
This manual provides detailed instructions for the installation, operation, and maintenance of your Xigmatek Aqua V AIR Arctic Mid-Tower PC Case. Please read this manual thoroughly before beginning any installation to ensure proper setup and safe operation. Retain this manual for future reference.
2. Аюулгүй байдлын мэдээлэл
Суурилуулалт, ашиглалтын явцад дараахь аюулгүй байдлын урьдчилан сэргийлэх арга хэмжээг дагаж мөрдөнө.
- Аливаа эд ангиудыг суулгах эсвэл салгахаасаа өмнө цахилгаан тэжээлийг ханын залгуураас үргэлж салга.
- Эмзэг бүрэлдэхүүн хэсгүүдэд цахилгаан гүйдэл (ESD) гэмтэхээс сэргийлэхийн тулд антистатик бугуйн оосор зүү.
- Эд ангиудыг болгоомжтой харьц. Зүү эсвэл хэлхээний самбарт шууд хүрэхээс зайлсхий.
- Ensure proper ventilation around the PC case to prevent overheating.
- Жижиг эд анги, багаж хэрэгслийг хүүхдээс хол байлга.
- Do not attempt to modify the case or its components, as this may void your warranty and pose safety risks.
3. Багцын агуулга
Бүх зүйл багцад байгаа эсэхийг шалгана уу:
- Xigmatek Aqua V AIR Arctic Mid-Tower PC Case
- Дагалдах хэрэгсэл (эрэг, тулгуур, кабель зангиа)
- Хэрэглэгчийн гарын авлага (энэ баримт бичиг)
If any items are missing or damaged, contact your retailer or Xigmatek support.
4. Бүтээгдэхүүн дууссанview
The Xigmatek Aqua V AIR Arctic is a mid-tower PC case designed for high-performance gaming configurations. It features tempered glass panels for component visibility and optimized airflow with pre-installed ARGB fans.

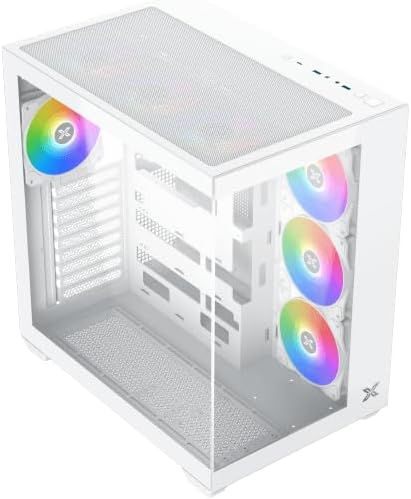
Зураг 4.1: Зүүн урд view of the Xigmatek Aqua V AIR Arctic PC case, showcasing the tempered glass front and side panels, and the pre-installed ARGB fans.

Зураг 4.2: Ар талд view of the PC case, showing the I/O shield cutout, expansion slots, and rear fan mount.
Зураг 4.3: Дээрээс доош чиглэсэн өнцөг view, highlighting the top mesh panel for additional cooling and the internal layout.
5. Тохиргоо ба суурилуулалт
Follow these steps to install your PC components into the Xigmatek Aqua V AIR Arctic case.
5.1. Кейс бэлтгэх
- Хайрцгийг хавтгай, тогтвортой гадаргуу дээр байрлуул.
- Remove the tempered glass side panel by unscrewing the thumb screws at the rear and carefully sliding it off. Place it on a soft, non-abrasive surface to prevent scratches.
- Remove the opposite steel side panel by unscrewing the thumb screws and sliding it off.
5.2. Эх хавтанг суурилуулах
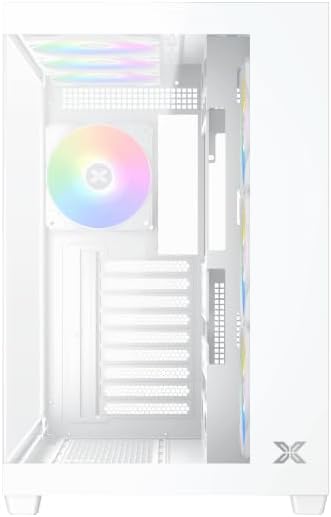
Зураг 5.1: Дотоод засал view of the case, illustrating the motherboard mounting area and cable routing cutouts.
- Install the I/O shield into the cutout at the rear of the case.
- Align your motherboard with the pre-installed standoffs. Ensure the standoffs match your motherboard's form factor (ATX, Micro ATX).
- Secure the motherboard using the provided screws from the accessory kit. Do not overtighten.
5.3. Цахилгаан хангамжийн нэгж (PSU) суурилуулах
- Locate the PSU mounting bracket at the bottom rear of the case.
- Цахилгаан тэжээлийн блокоо хайрцагны ар талаас тусгай тасалгаанд шургуулна уу.
- Secure the PSU to the case using the screws provided with your power supply.
5.4. Хадгалах диск суурилуулах
The case supports multiple storage drives:
- 2.5" SSD: Mount directly to the SSD trays located behind the motherboard tray. Secure with screws.
- 3.5" HDD: Install into the drive cage located beneath the PSU shroud. Slide the drive into the tray and secure with screws.
5.5. График карт (GPU) болон өргөтгөлийн карт суурилуулах
- Хайрцагны ар талд шаардлагатай тэлэлтийн үүрний тагийг ав.
- График карт эсвэл бусад өргөтгөлийн картуудаа эх хавтан дээрх тохирох PCIe үүрэнд хийнэ үү.
- Secure the cards with the provided screws.
5.6. Кабелийн менежмент

Зураг 5.2: View behind the motherboard tray, illustrating the ample space and tie-down points for effective cable management.
Кабелийг цэгцлэхийн тулд эх хавтангийн тавиурын ард байрлах кабелийн чиглүүлэлтийн таслуур болон холбох цэгүүдийг ашиглаарай. Энэ нь агаарын урсгал болон гоо зүйн байдлыг сайжруулна.
- Connect all necessary power cables from the PSU to the motherboard, GPU, and storage drives.
- Connect front panel cables (USB, audio, power/reset switches, LED indicators) to the corresponding headers on your motherboard. Refer to your motherboard manual for specific header locations.
- Connect the ARGB fan cables to the integrated fan controller or directly to your motherboard's ARGB headers if available.
5.7. Сэнс болон радиаторын тулгуур
The Xigmatek Aqua V AIR Arctic comes with 7 pre-installed 120mm ARGB fans. Additional cooling options are available:
- Урд: Supports up to 3 x 120mm or 2 x 140mm fans / 240mm, 280mm, 360mm radiators.
- Топ: Supports up to 3 x 120mm or 2 x 140mm fans / 240mm, 280mm, 360mm radiators.
- Арын: Supports 1 x 120mm fan.
- Доод талд: Supports up to 3 x 120mm fans.
Ensure proper fan orientation for optimal airflow (intake at front/bottom, exhaust at rear/top).
6. Ажиллаж байгаа
Once all components are installed and cables are connected, replace the side panels. Connect your monitor, keyboard, mouse, and power cable. Press the power button on the front panel to start your system.
The pre-installed ARGB fans can be controlled via the integrated controller (if present) or through compatible motherboard software, allowing customization of lighting effects and fan speeds.
7. Засвар үйлчилгээ
Тогтмол засвар үйлчилгээ нь таны компьютерын эд ангиудын оновчтой ажиллагаа, урт хугацааны ашиглалтыг хангахад тусална.
- Тоос цэвэрлэх: Periodically clean dust filters (top, front, bottom) to maintain good airflow. Use compressed air to remove dust from inside the case and components.
- Гадна цэвэрлэгээ: Гадна талын гадаргууг зөөлөн арчиж, damp даавуу. Зүлгүүрийн цэвэрлэгч эсвэл уусгагчаас зайлсхий.
- Кабелийн удирдлагын шалгалт: Occasionally check cable routing to ensure no cables are obstructing fans or airflow.
8. Алдаа засах
Хэрэв танд асуудал тулгарвал дараах нийтлэг алдааг олж засварлах алхмуудыг үзнэ үү.
- Систем асахгүй байна:
- Цахилгаан тэжээлийн хангамжийг асааж, ханын залгуурт зөв холбосон эсэхийг шалгана уу.
- Verify all power cables (24-pin ATX, 8-pin CPU, PCIe, SATA) are securely connected.
- Урд талын самбарын цахилгаан унтраалгын эх хавтантай холболтыг шалгана уу.
- Дэлгэцийн гаралт байхгүй байна:
- Ensure the monitor cable is connected to the graphics card (not the motherboard I/O if using a dedicated GPU).
- График карт болон RAM модулиудыг дахин суулгана уу.
- Fans not spinning or ARGB not working:
- Эх хавтан эсвэл сэнсний хянагчтай сэнсний тэжээлийн холболтыг шалгана уу.
- Verify ARGB connections to the controller or motherboard headers.
- Ensure any fan control software or BIOS settings are correctly configured.
For more complex issues, consult your component manuals or contact Xigmatek technical support.
9. Техникийн үзүүлэлтүүд
| Онцлог | Дэлгэрэнгүй |
|---|---|
| Загварын нэр | Aqua V AIR Arctic |
| Загварын дугаар | EN45837 |
| Кейсийн төрөл | Дунд цамхаг |
| Эх хавтангийн нийцтэй байдал | ATX, Micro ATX |
| Материал | Steel Alloy, Tempered Glass |
| Өнгө | Цагаан |
| Урьдчилан суулгасан фенүүд | 7 х 120 мм ARGB фенүүд |
| GPU-ийн хамгийн их урт | 410 мм |
| USB портууд | 3 |
| Жин | 8.8 кг |
10. Баталгаат хугацаа ба дэмжлэг
Xigmatek products are manufactured to high quality standards. For warranty information, please refer to the warranty card included with your product or visit the official Xigmatek website. For technical support or inquiries, please contact Xigmatek customer service through their official channels.
Албан ёсны Webсайт: www.xigmatek.com


