1. Танилцуулга
This manual provides detailed instructions for the installation, operation, maintenance, and troubleshooting of your GIGABYTE B550M Gaming X WIFI6 AMD AM4 mATX Motherboard. Please read this manual thoroughly before beginning installation to ensure proper setup and optimal performance.

Figure 1: GIGABYTE B550M Gaming X WIFI6 Motherboard Overview
2. Тохиргоо
2.1 Багцын агуулга
Before proceeding, verify that all items are present in your motherboard package:
- GIGABYTE B550M Gaming X WIFI6 Motherboard
- SATA кабель
- Magnetic WiFi Antenna
- Олон хэлээр ярьдаг суулгах гарын авлага
- Motherboard Driver CD/USB (if included)
Video 1: GIGABYTE B550M Gaming X WIFI6 Unboxing. This video demonstrates the contents of the motherboard package and initial handling.
2.2 Motherboard Layout and Connectors
Familiarize yourself with the motherboard's layout and various connectors before installation.

Зураг 2: Эх хавтангийн бүрэлдэхүүн хэсгийн зохион байгуулалт
Зураг 3: Арын оролт гаралтын самбар
2.3 Бүрэлдэхүүн хэсгүүдийн суурилуулалт
Follow these steps for installing essential components:
- CPU суурилуулах: Carefully open the CPU socket lever. Align the triangular mark on the CPU with the mark on the socket. Gently place the CPU into the socket without force. Close the lever to secure the CPU.
- CPU хөргөгч суурилуулах: CPU хөргөгчөө үйлдвэрлэгчийн зааврын дагуу суулгана уу. Дулааны оо зөв хэрэглэхийг баталгаажуулна.
- RAM (Санах ой) суурилуулах: Open the clips on the DDR4 memory slots. Align the notch on the memory module with the key in the slot. Press down firmly on both ends of the module until the clips snap into place. For dual-channel performance, refer to your motherboard manual for specific slot pairing.
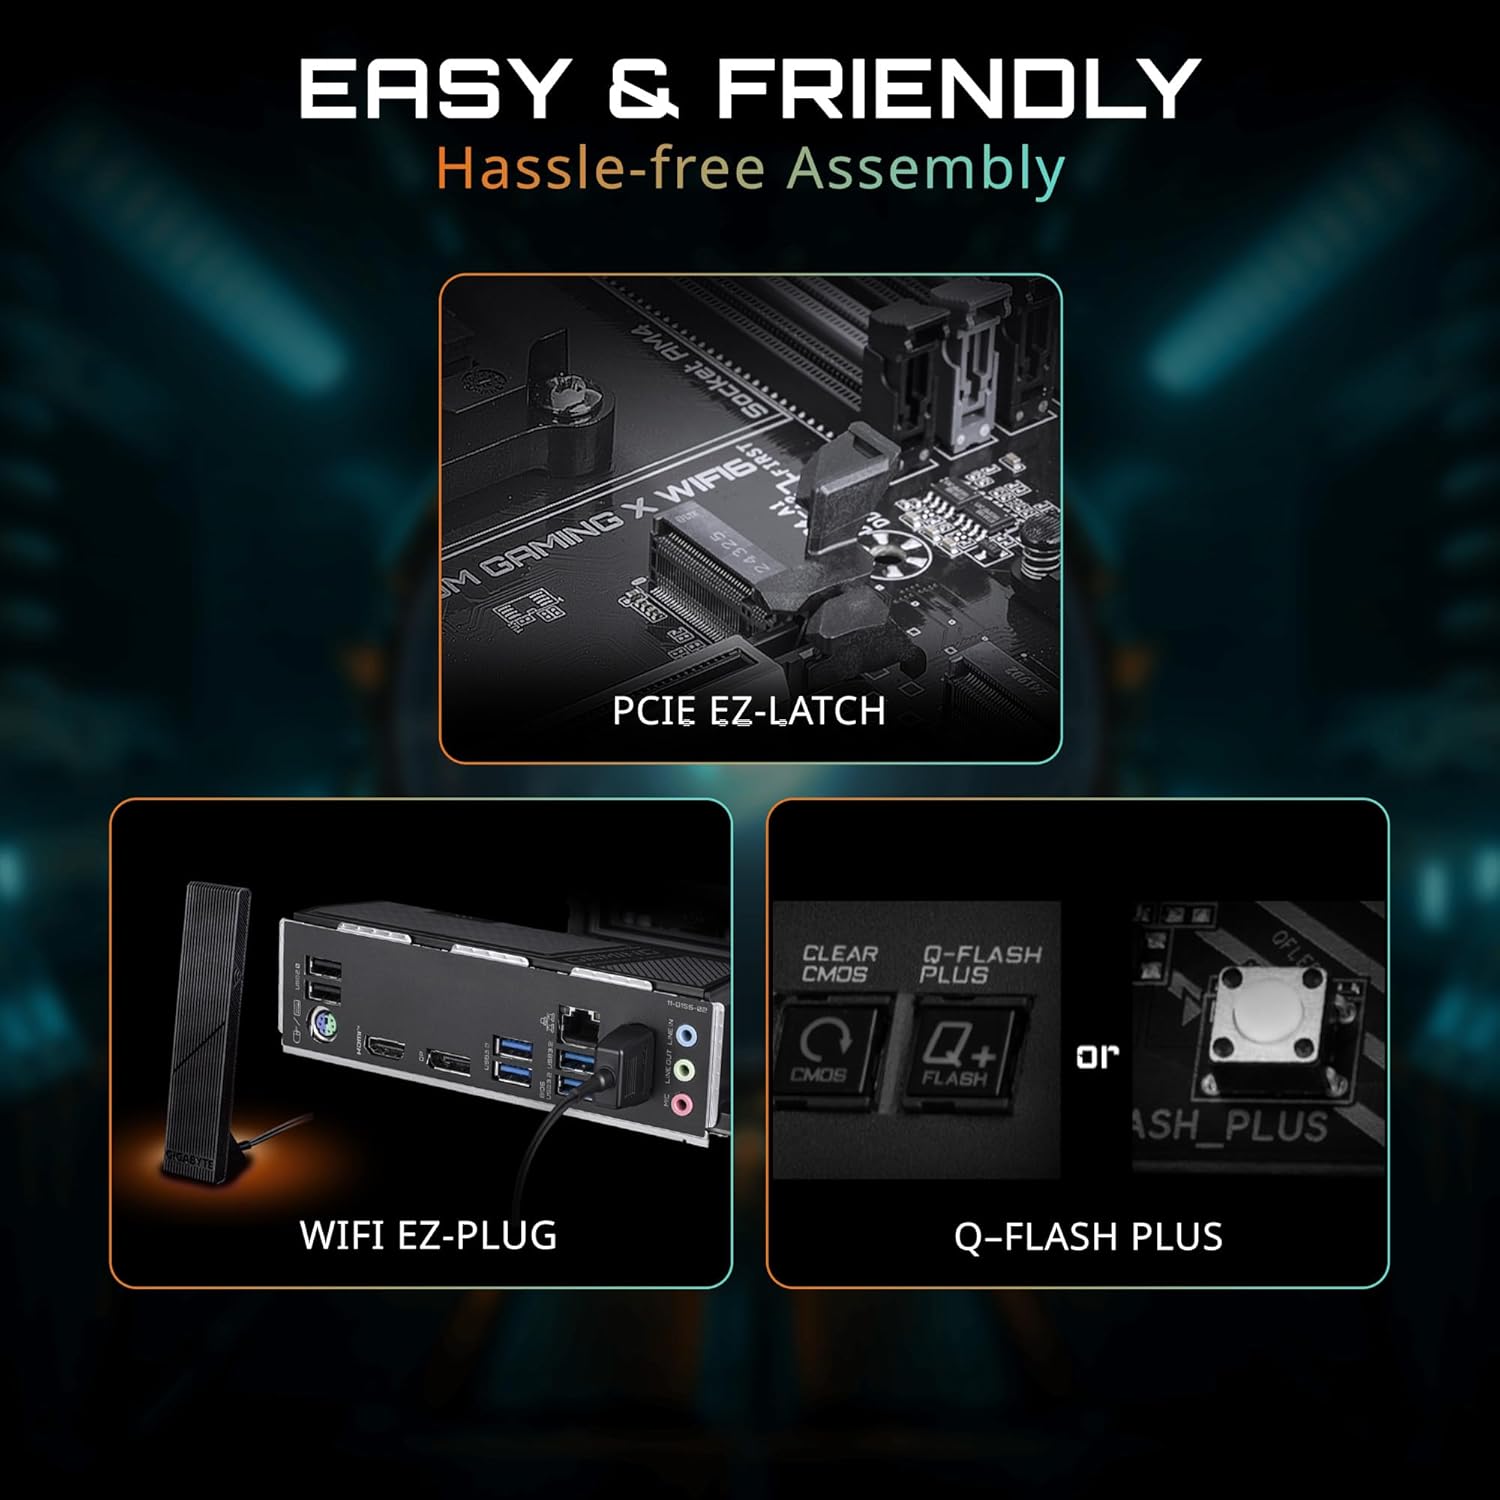
- M.2 SSD суурилуулах: Locate the M.2 slots. Remove the M.2 screw/standoff. Insert the M.2 SSD at an angle into the slot. Push it down gently and secure it with the screw/standoff. The motherboard features PCIe EZ-Latch for tool-less M.2 installation.
- График карт (PCIe) суурилуулах: Open the retention clip on the PCIe 4.0 x16 slot. Align your graphics card with the slot and press down firmly until it is seated. The PCIe EZ-Latch simplifies removal. Secure the card to your chassis with screws.
- SATA Device Installation: Connect SATA data cables from your storage devices (HDDs/SSDs) to the SATA ports on the motherboard. Connect SATA power cables from your power supply to the devices.
- Цахилгаан хангамжийн холболтууд: 24 зүү ATX тэжээлийн холбогч болон 8 зүү (эсвэл 4+4 зүү) CPU тэжээлийн холбогчийг тэжээлийн эх үүсвэрээс эх хавтан дээрх холбогдох портууд руу холбоно уу.
- Урд самбарын холболтууд: Connect the power button, reset button, HDD LED, power LED, and front panel USB/audio headers to their respective pins on the motherboard. Refer to the motherboard manual for pin assignments.
- WiFi Antenna Connection: Screw the magnetic WiFi antenna onto the designated connectors on the rear I/O panel. The WiFi EZ-Plug design ensures easy connection.

Figure 4: Easy Assembly Features (PCIe EZ-Latch, WiFi EZ-Plug, Q-Flash Plus)
3. Ажиллаж байгаа
3.1 Анхны ачаалалт болон BIOS-ийн тохиргоо
After assembling your system, connect a monitor, keyboard, and mouse. Power on your PC. Press the designated key (usually DEL or F2) during startup to enter the BIOS/UEFI setup. Here you can configure boot order, system time, and other advanced settings. The motherboard supports Q-Flash Plus for BIOS updates without a CPU, memory, or graphics card installed.
3.2 Драйвер суурилуулах
Once your operating system is installed, install the necessary drivers for your motherboard components. These can typically be found on the included driver CD/USB or downloaded from the official GIGABYTE website. Essential drivers include chipset, LAN, audio, and Wi-Fi drivers.
3.3 Програм хангамжийн хэрэгслүүд
GIGABYTE provides various software utilities to enhance your user experience:
- RGB хайлуулах: Customize the RGB lighting effects on your motherboard and connected compatible devices.
- Ухаалаг сэнс 6: Monitor and control your system's fan speeds and temperatures for optimal cooling and noise levels.
- Апп төв: A centralized platform to manage and update GIGABYTE utilities and drivers.
Video 2: GIGABYTE B550 Motherboards - Overview. Энэ видео нь ерөнхий мэдээллийг өгдөгview of the features and capabilities of GIGABYTE B550 series motherboards.
4. Засвар үйлчилгээ
Тогтмол засвар үйлчилгээ нь таны эх хавтангийн удаан эдэлгээ, тогтвортой ажиллагааг хангахад тусална.
- Цэвэрлэгээ: Periodically clean dust from your PC case and motherboard components using compressed air. Ensure the system is powered off and unplugged before cleaning. Avoid using liquids.
- BIOS-ийн шинэчлэлтүүд: GIGABYTE-г шалгана уу website for the latest BIOS updates. BIOS updates can improve compatibility, stability, and performance. Use the Q-Flash or Q-Flash Plus utility for safe updating.
- Драйверын шинэчлэлтүүд: Keep your drivers updated to ensure optimal performance and compatibility with new software and hardware. Download drivers only from the official GIGABYTE webсайт.
5. Алдаа засах
Хэрэв та эх хавтан дээрээ асуудалтай тулгарвал дараах алдааг олж засварлах алхмуудыг авч үзнэ үү.
- Цахилгаангүй/Ачаалахгүй:
- Check all power connections (24-pin ATX, 8-pin CPU, GPU, SATA).
- Цахилгаан хангамжийг асаасан эсэхийг шалгаарай.
- Try booting with minimal components (CPU, one RAM stick, graphics card if no integrated graphics).
- Дэлгэц байхгүй:
- Verify monitor cable connections and monitor input selection.
- График карт болон санах ойн модулиудыг дахин суулгана уу.
- Test with a different monitor or graphics card if possible.
- Системийн тогтворгүй байдал/гацалт:
- CPU болон GPU-ийн температурыг шалгана уу. Тохиромжтой хөргөлтийг хангах.
- RAM-ийн алдааг шалгахын тулд санах ойн оношлогооны хэрэгслийг ажиллуул.
- BIOS болон бүх драйверуудыг хамгийн сүүлийн хувилбар руу шинэчил.
- Network Connectivity Issues (Wired/Wireless):
- LAN кабель зөв холбогдсон эсвэл WiFi антенн найдвартай холбогдсон эсэхийг шалгана уу.
- LAN/WiFi драйверуудыг суулгах эсвэл шинэчлэх.
- Үйлдлийн систем дэх сүлжээний тохиргоогоо шалгана уу.
Хэрэв асуудал арилахгүй бол GIGABYTE дэмжлэгтэй холбогдоно уу webсайт эсвэл техникийн дэмжлэгтэй холбоо барина уу.


