1. Танилцуулга
This manual provides comprehensive instructions for the installation, operation, and maintenance of your SIXTOP 4 Channel Dash Cam. This device is designed to record video footage from multiple perspectives around and within your vehicle, enhancing driving safety and providing evidence in case of incidents.
Please read this manual thoroughly before using the product to ensure correct operation and to prevent damage.
2. Багцын агуулга
Доор жагсаасан бүх зүйл таны багцад байгаа эсэхийг шалгаарай.
- SIXTOP 4 Channel Dash Camera (Main Unit)
- Арын камер
- Цахилгаан кабель (3.4м)
- Extension Cord (5.5m) for Rear Camera
- Сорох цомын уул
- Anti-Slip Mats
- Хэрэглэгчийн гарын авлага

Figure 2.1: Package Contents and Main Unit Overview
This image displays the complete set of items included with your SIXTOP 4 Channel Dash Cam. It shows the main dash camera unit with its multiple lenses, the separate rear camera, the power cable for connecting to the vehicle's power source, an extension cord for the rear camera, a suction cup mount for windshield attachment, anti-slip mats, and the user manual. The main unit also highlights key components like HD lenses, display screen, night vision lights, reset button, menu button, power button, flip up/down buttons, OK button, microphone, AV-IN port, TF card slot, holes for bracket, Type-C port, speaker, and brackets.
3. Тохиргоо ба суурилуулалт
Follow these steps for proper installation of your dash cam:
- Суулгах гадаргууг бэлтгэх: Clean the area on your windshield where the dash cam will be mounted. Ensure it is free of dust and grease for optimal adhesion.
- Зураасны камерыг суурилуулах: Attach the suction cup mount to the main dash cam unit. Press the suction cup firmly onto the cleaned windshield surface, ensuring a secure fit. Position the camera to provide a clear view of the road ahead without obstructing your driving vision.
- Эрчим хүчийг холбох: Route the power cable from the dash cam to your vehicle's 12V power outlet (cigarette lighter socket). Secure the cable along the windshield trim to avoid interference with driving controls.
- Арын камер суурилуулах: Mount the rear camera on the rear windshield or license plate area. Connect the rear camera to the main dash cam unit using the provided extension cord. For reversing assist functionality, connect the red wire of the rear camera's power cable to your vehicle's reverse light power supply.
- Micro SD карт оруулах: Insert a Class 10 or higher speed Micro SD card (up to 128GB, not included) into the designated TF card slot on the dash cam. Ensure the card is inserted correctly.
- Adjust Camera Angles: Power on the dash cam and adjust the angles of the front, inside, and rear cameras to ensure desired coverage. The 3-inch IPS screen will display the camera views.
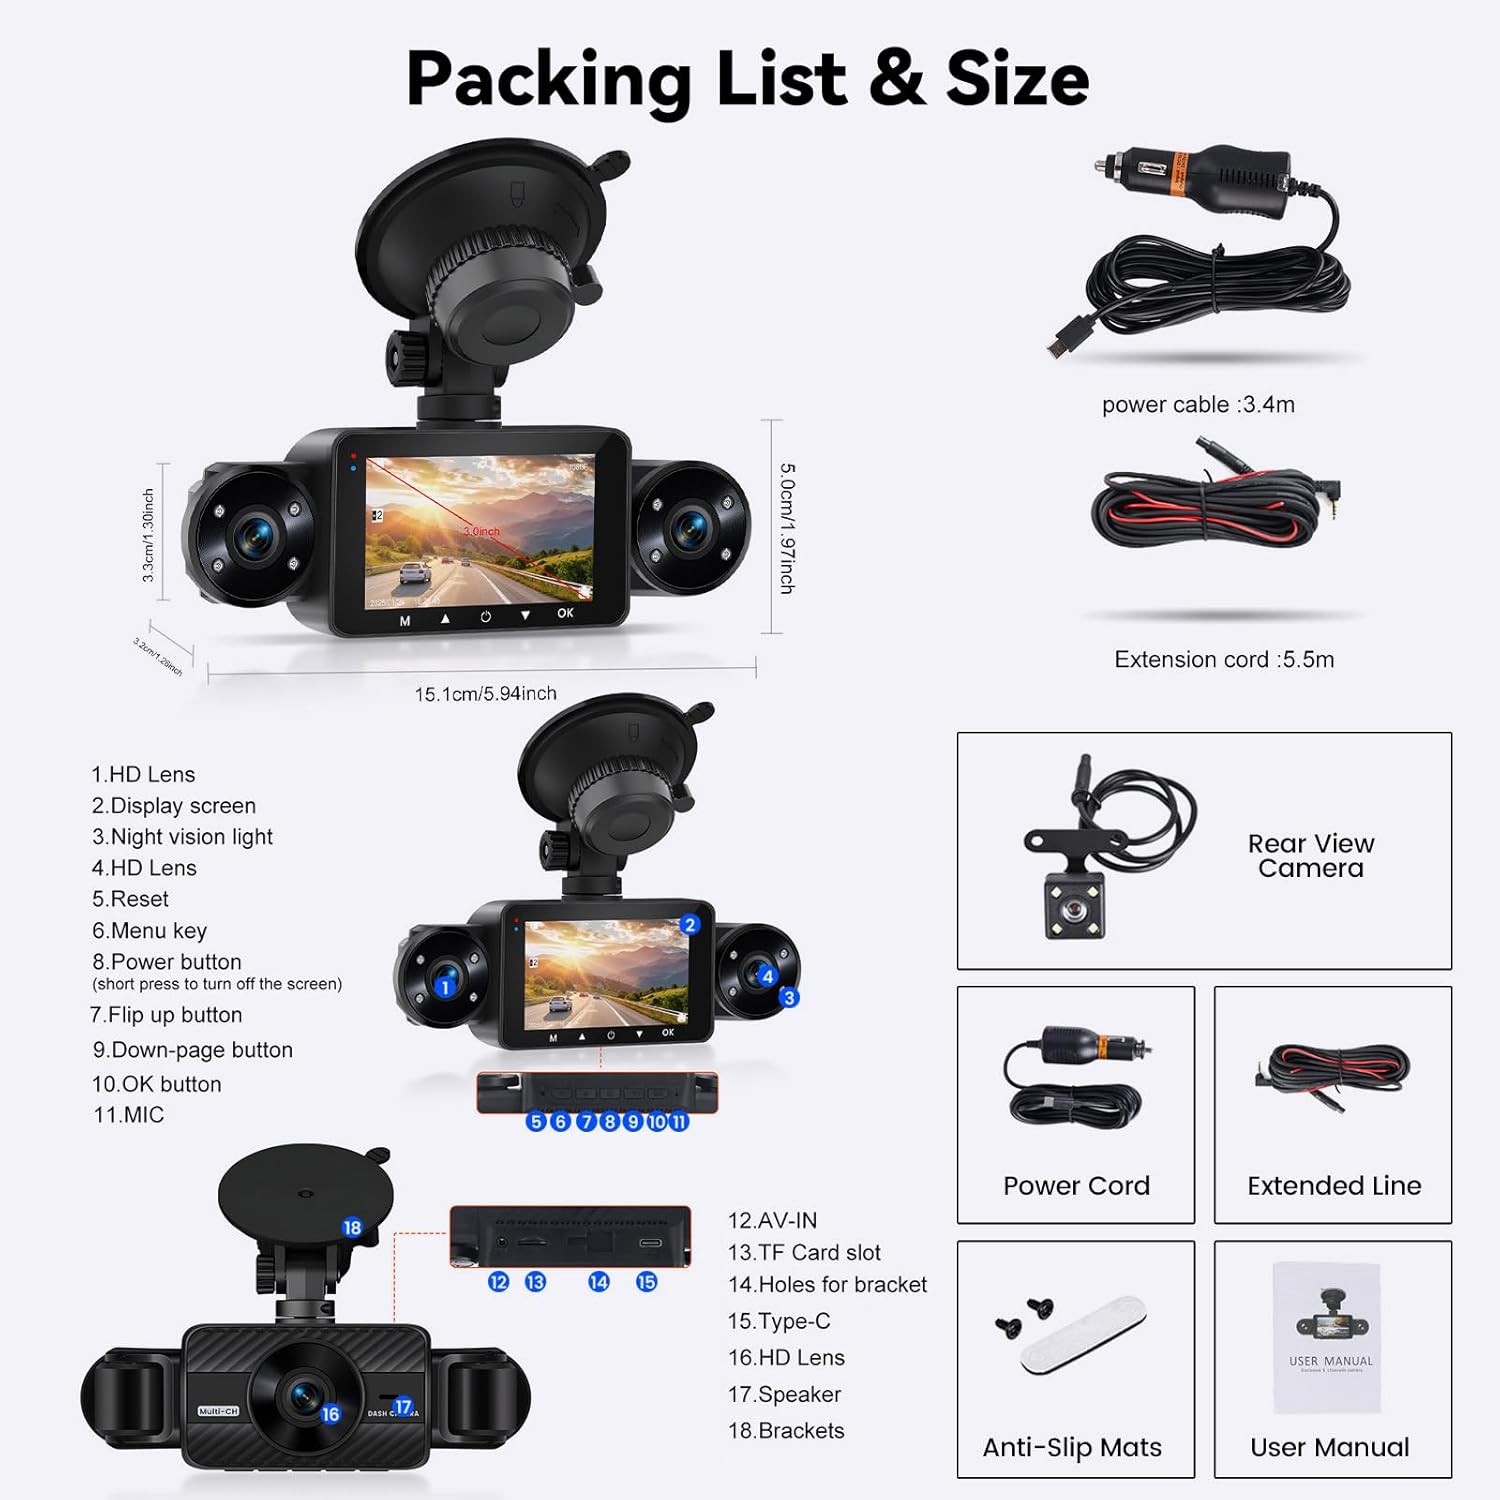
Figure 3.1: Dash Cam Installation Diagram
This diagram illustrates the recommended installation process for the dash cam. It shows the main logger display unit mounted on the front windshield, with the power cable routed to the vehicle's power supply. The rear camera is shown installed at the back of the vehicle, connected to the main unit via an extension cable, with a specific note to connect it to the reverse light anode for reversing assistance. The image also includes six smaller steps detailing how to clean the glass, mount the bracket, remove dust, connect the rear camera, connect the power supply, and adjust the angle.
4. Ашиглалтын заавар
4.1 Үндсэн үйл ажиллагаа
- Асаах/унтраах: The dash cam will automatically power on and begin recording when the vehicle's ignition is turned on. To manually power off, press and hold the Power button.
- Бичлэг: Once powered on, the dash cam automatically starts loop recording. A red indicator light or icon on the screen typically confirms recording is active.
- Screen Display Modes: The 3-inch IPS screen supports various display modes including full screen, front and rear split, 3-split screen, and 4-split screen. Use the menu buttons to cycle through these display options.
- Тоглуулах: руу view foo бүртгэгдсэнtage, stop recording (if active), then navigate to the playback menu using the menu buttons. Select the desired video file тоглуулах зориулалттай.
4.2 Key Features Operation
- Давталтын бичлэг: The dash cam continuously records, overwriting the oldest unlocked fileсанах ойн карт дүүрсэн үед. Энэ нь гараар оролцоогүйгээр тасралтгүй бичлэг хийхийг баталгаажуулдаг.
- G-мэдрэгч (Яаралтай түгжээ): In the event of a sudden impact or collision, the built-in G-sensor automatically detects the event and locks the current video file, preventing it from being overwritten by loop recording. This footage is saved as important evidence.
- 24 цагийн зогсоолын хяналт: With an optional ACC hardwire kit (sold separately), the dash cam can monitor your vehicle even when parked. If an impact is detected, it will automatically record and save the footage. This feature helps protect your vehicle from vandalism or hit-and-runs.
- Reversing Assist: When the rear camera is correctly wired to the vehicle's reverse light, the dash cam screen will automatically display the rear view with parking guidelines when the vehicle is put into reverse gear, aiding in safe parking.
- Night Vision & Exposure Compensation: Equipped with 8 IR night vision lights and exposure adjustment, the dash cam captures clear video in low-light conditions and prevents overexposure in bright light, ensuring optimal recording quality day and night.

Figure 4.1: Parking Monitoring, G-Sensor, and Loop Recording
This image illustrates three key operational features: 24 цагийн зогсоолын хяналт, which requires an additional hardwire kit for continuous surveillance when the car is parked; the Баригдсан G-мэдрэгч, which automatically locks video footage upon detecting a collision; and Давталтын бичлэг, which ensures continuous recording by overwriting the oldest fileсанах ойн карт дүүрсэн үед.

Figure 4.2: Reversing Assistance
This image shows the Reversing Assistance feature in action. When the vehicle is in reverse, the dash cam's screen displays the rear camera feed with clear, colored parking guidelines, helping the driver to park safely and accurately.

Figure 4.3: Enhanced Night Vision
This image highlights the enhanced night vision capabilities of the dash cam. It contrasts a view without IR LEDs (Infrared) and a view with 8 IR LEDs, showing a clearer 720P image. It also compares a generic 2.1-inch screen product with the SIXTOP's 3-inch IPS Night Vision, demonstrating the superior full-color 1080P clarity provided by the SIXTOP dash cam in low-light conditions.
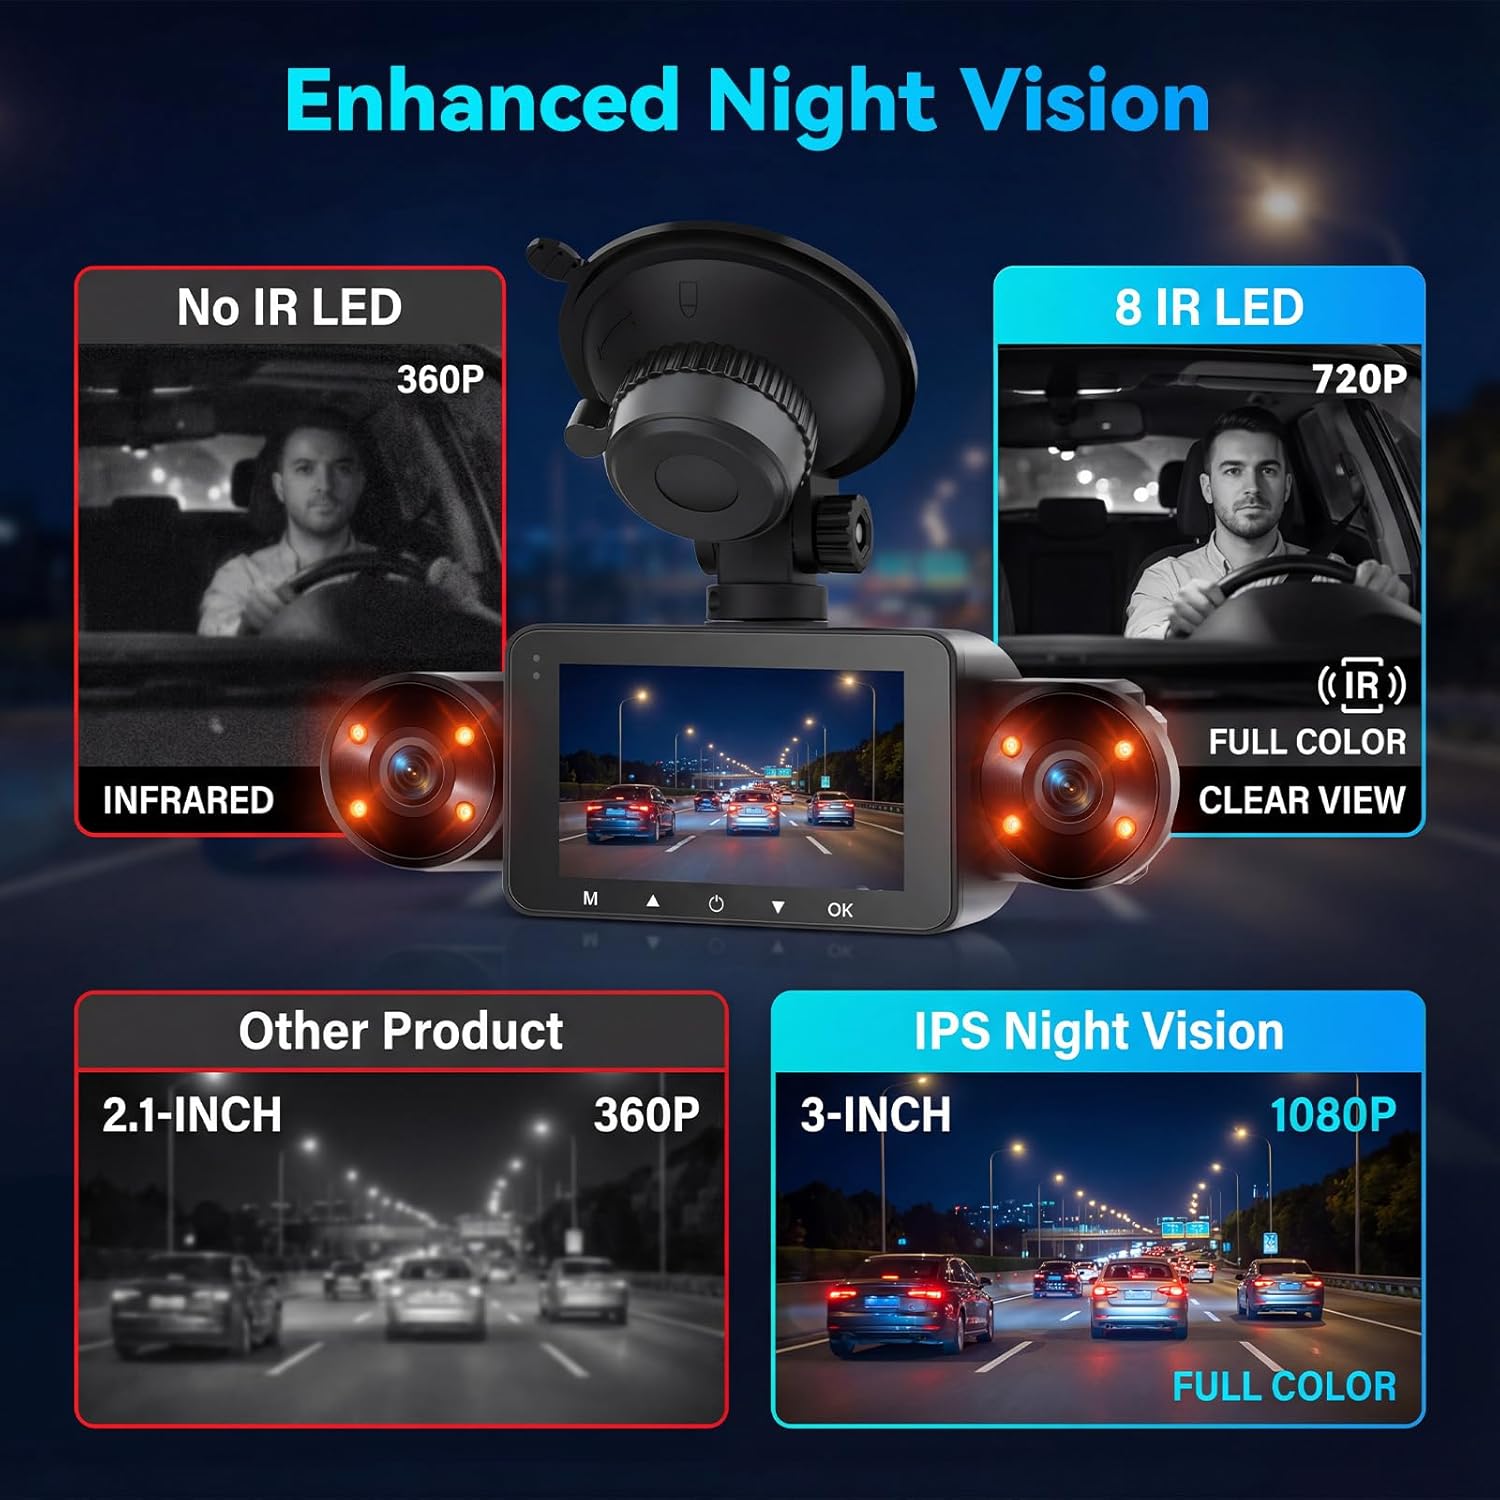
Figure 4.4: 4 Channel 360° View
This image illustrates the comprehensive 360-degree coverage provided by the 4-channel dash cam. It shows the individual fields of view for each camera: Front (150°), Rear (120°), Cabin Left (120°), and Cabin Right (120°). This multi-camera setup ensures all-around vehicle safety and recording from various angles simultaneously.
5. Засвар үйлчилгээ
- Микро SD карт: Format the Micro SD card regularly (e.g., once a month) to ensure optimal performance and prevent data corruption. Use the format function in the dash cam's menu.
- Цэвэрлэгээ: Use a soft, dry cloth to clean the camera lenses and the display screen. Avoid using abrasive cleaners or solvents.
- Температур: Хяналтын камерыг удаан хугацаанд хэт өндөр температурт өртүүлэхээс зайлсхий.
- Програм хангамжийн шинэчлэлтүүд: Үйлдвэрлэгчийг шалгана уу website periodically for firmware updates to ensure your dash cam has the latest features and bug fixes.
6. Алдаа засах
| Асуудал | Боломжит шалтгаан | Шийдэл |
|---|---|---|
| Зураасан камер асахгүй байна. | Цахилгаан хангамж байхгүй; кабель эвдэрсэн; холболт сул байна. | Check power cable connection to the vehicle's 12V outlet and the dash cam. Ensure the vehicle's ignition is on. Test the power cable in another outlet if possible. |
| Бичлэг зогсох эсвэл гацах. | SD card full; slow SD card; SD card error. | Format the Micro SD card. Ensure you are using a Class 10 or higher speed card. Replace the SD card if the issue persists. |
| Видео чанар муу. | Dirty lens; protective film on lens; incorrect settings. | Clean the camera lenses. Remove any protective film. Check video resolution settings in the menu. |
| Арын камер харагдахгүй байна. | Loose connection; faulty cable. | Ensure the rear camera cable is securely connected to the main unit. Check the cable for any damage. |
| Зогсоолын хяналт ажиллахгүй байна. | Hardwire kit not installed; feature disabled. | Verify that the ACC hardwire kit is correctly installed and connected. Check the dash cam settings to ensure parking monitoring is enabled. |
7. Техникийн үзүүлэлтүүд
| Онцлог | Дэлгэрэнгүй |
|---|---|
| Загвар | B0FXR327SM |
| Дэлгэцийг харуулах | 3 инчийн IPS дэлгэц |
| Видео бичлэгийн нягтрал | Front: 1080P, In-car (Left & Right): 720P, Rear: 480P |
| -ийн талбар View | Front: 150°, Rear: 120°, Cabin Left: 120°, Cabin Right: 120° (360° total coverage) |
| Шөнийн хараа | HD 8 IR Night Vision with Exposure Compensation |
| Онцлог шинж чанарууд | G-Sensor, Loop Recording, 24H Parking Monitoring (requires hardwire kit), Reversing Assistance |
| Хадгалах | Supports Micro SD card up to 128GB (Class 10 or higher, not included) |
| Холболт | USB |
| Суурилуулах төрөл | Салхины шил |
| Бүтээгдэхүүний хэмжээс | 1 x 1 x 1 инч |
| Зүйлийн жин | 1.1 фунт |
8. Баталгаат хугацаа ба дэмжлэг
SIXTOP products are designed for reliability and performance. For warranty information and technical support, please refer to the following:
- Баталгаат хугацаа: The product typically comes with a standard manufacturer's warranty. Please refer to the warranty card included in your package or contact customer support for specific details regarding coverage and duration.
- Техникийн дэмжлэг: If you encounter any issues or have questions regarding your SIXTOP 4 Channel Dash Cam, please contact SIXTOP customer support.
- Холбоо барих мэдээлэл: For online support, you may reach out to SIXTOP via the seller's contact information on the purchase platform or through the email provided in the product documentation.

Figure 8.1: SIXTOP Brand Commitment
This image highlights SIXTOP's dedication to integrating R&D, manufacturing, and sales, ensuring expert support and seamless partnerships. It emphasizes the brand's commitment to delivering driving pleasure.

Figure 8.2: Online Support Contact
This image provides an email address for online support: SIXTOP123@163.com. Users can contact this address for assistance with their product.
